Bios v 02.61 does not see the flash drive. Why doesn't the BIOS see the bootable USB flash drive?
So you decide to install new system, or use some utility to work with the same system, but it must be written to a flash drive. You insert a flash drive into a USB port, and then a question arises: Why doesn't the BIOS recognize the bootable USB flash drive??
You created a bootable USB flash drive, but the BIOS does not see it. Many factors play a role here, for example, you made the bootable USB flash drive incorrectly, the BIOS needs to be reset or even updated, the program you used to create the bootable USB flash drive turned out to be damaged, and much more. Let's try to solve this problem.
What to do if BIOS does not see the bootable USB flash drive
How to make a bootable USB flash drive and how to do it correctly
First, you should make sure that the flash drive really does not work with your computer. You can check this by using the drive on another PC or laptop; if the same thing happens there, then you probably created the bootable USB flash drive incorrectly.
I would like to note that if you just threw files onto a flash drive and think that it will work, then I hasten to disappoint you. To record a distribution kit of a system or program, you need special utilities. I will list them now:
- WinSetupFromUSB
- Rufus
- Windows USB/DVD Download Tool
- WinToHDD
- Windows To Go
- Ultra ISO
And this is not all the programs, but I have listed the most basic tools. I have a review for each. For example, if you want to make a bootable USB flash drive with Windows, then use Rufus or WinSetupFromUSB. If the first one does not work and the flash drive is not visible in the BIOS, then use another one.
I will list the articles that I talk about creating a bootable USB flash drive. You probably know many of the methods.
If you have used all the specified utilities and the flash drive still does not work, make sure it is working properly, try formatting it to NTFS or FAT32, and try booting from another computer. And if this does not help, then use another flash drive.
How to set up BIOS for a bootable USB flash drive
First you need to understand whether the flash drive is not visible at all in the BIOS, that is, there is no line “USB flash drive name”, or there is a line, but when you click on this item you see nothing but a black screen.
There are two options why this happens - your flash drive is faulty or you recorded the image incorrectly, or there are problems with your BIOS, so the BIOS does not see the bootable flash drive.
Most best option, will boot from the flash drive – . You can enter it using the ESC key or F8. On different devices differently, because . Opening Boot Menu You will see a list of devices from which you can boot - flash drives, hard drives, CD-DVD. You'll need to find something like a Kingston 8 GB USB or similar, depending on the brand of your flash drive.
If you do not have the Boot Menu, or it is disabled, then in the BIOS on the tab Boot or Advanced you need to move your flash drive to first place. This is done using the F5 and F6 keys, but I repeat, the parameters may differ for each BIOS model, you will have to figure it out yourself, or write in the comments so that I can help you.


After you have placed the bootable USB flash drive in the first place in the BIOS, press the key F10 to save current BIOS settings. Or on the tab Exit select the option Save Changes and Exit.
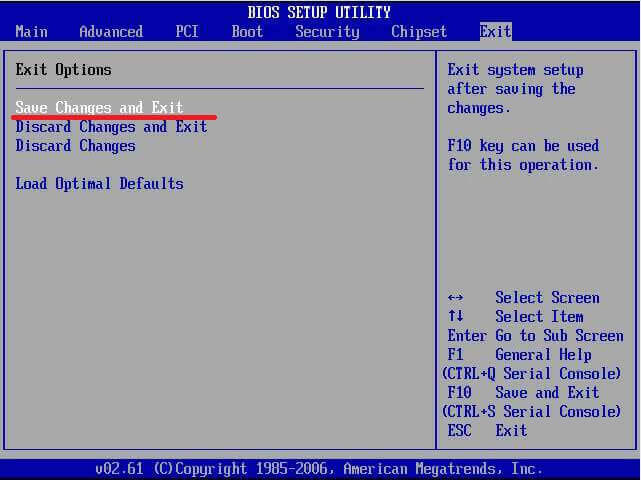
Finally, you can if none of the above helps. Follow the link and read about it. Typically the reset option is located on the Exit tab and is called Load Optimal Defaults or a little differently.
Let's summarize all of the above and say why the BIOS does not see the bootable USB flash drive:
- The flash drive is faulty. Use another flash drive, or try using it on another PC.
- The wrong program was selected to create a bootable USB flash drive.
- The image recorded on the flash drive is damaged and needs to be replaced.
- The BIOS settings are incorrect, you need to reset it.
- The BIOS does not support booting from flash drives (this also happens), then the BIOS needs to be updated.
If you have such “misunderstandings” with a flash drive, then try creating a disk with Windows or the desired program. Regarding this, I would like to note that you need to be extremely careful. First, you need to find the correct firmware that suits your motherboard, if the wrong version is selected, or from a different board, then there is a high probability of failure of the entire motherboard, and you certainly don’t want that.
Modern laptops are getting rid of CD/DVD drives one after another, becoming thinner and lighter. At the same time, users have a new need - the ability to install an OS from a flash drive. However, even with a bootable USB flash drive, not everything can go as smoothly as we would like. Microsoft specialists have always loved to present their users with interesting problems. One of them is that the BIOS may simply not see the media. The problem can be solved by several sequential actions, which we will now describe.
In general, there is nothing better for installing an OS on your computer than making it yourself bootable flash drive. You will be 100% confident in it. In some cases, it turns out that the media itself is not made correctly. Therefore, we will look at several ways to make it for the most popular versions of Windows.
In addition, you need to set the correct parameters in the BIOS itself. Sometimes this may be the reason why a drive is not in the list of drives. Therefore, after we figure out how to create a flash drive, we will look at three more ways to configure the most common BIOS versions.
Method 1. Flash drive with Windows 7 installer
IN in this case we will use .

This method Suitable for Windows 7 and older. To record images of other systems, use our instructions for creating bootable flash drives.
In the following instructions you can see ways to create the same drive, but not with Windows, but with other operating systems.
Method 2: Setting up Award BIOS
To enter Award BIOS, press F8 during boot operating system. This is the most common option. There are also the following entry combinations:
- Ctrl+Alt+Esc;
- Ctrl+Alt+Del;
- Delete;
- Reset (for Dell computers);
- Ctrl+Alt+F11;
- Insert.
Now let's talk about how to properly configure the BIOS. In most cases, this is precisely the problem. If you have an Award BIOS, do this:

Every system administrator should know how boot computer from USB flash drive. Most often, this skill is needed when installing an operating system. After all, the Windows distribution does not have to be located on a CD. And, for example, it won’t even be possible to install Windows on a netbook any other way, because... it usually does not have a disk drive.
Today I will tell you how to set boot from a flash drive to BIOS of various manufacturers. Regardless of which version you have, the procedure will be as follows:
1. We insert our bootable USB flash drive into the USB connector of the computer. It is advisable to insert it into a port located directly on the motherboard, i.e. from the back of the system unit.
2. Turn on the computer and press the key Delete(or F2) to get into the BIOS. Depending on the manufacturer and BIOS version, other keys (Esc, F1, Tab) may be used, so you need to carefully watch the prompts on the screen.
In Bios, we can navigate through tabs and lines only using the keyboard.
Next I will describe in detail this process using the example of different BIOS versions.
Settings Award Bios to boot from a flash drive
Award Bios: First, let's check if the USB controller is enabled. Let's go to “Integrated Peripherals”. Use the arrow on the keyboard to move down to the “USB Controller” item. Press the “Enter” key and select “Enable” in the window that appears (also using “Enter”). Opposite “USB Controller 2.0” there should also be “Enable”.
  Exit this tab by pressing “Esc”.
Then go to “Advanced BIOS Features” – “Hard Disk Boot Priority.” Now in my example the hard drive comes first, but the flash drive should be there.  We stand on the line with the name of our flash drive (Patriot Memory) and raise it to the very top using the “+” key on the keyboard.
  We leave here by pressing “Esc”.
Now on the line “First Boot Device” press “Enter”. We selected “CD-ROM”, but we need to set “USB-HDD” (if suddenly loading from a flash drive does not work, come back here and try setting “USB-FDD”). Let the second device be “Hard Disk”.  Exit this tab by pressing Esc.
Now exit the BIOS, saving the changes. To do this, click “Save & Exit Setup” – press the “Y” – “Enter” key. 
Setting up AMI Bios to boot from a flash drive
If, after entering Bios, you see such a screen, it means you have AMI Bios: First, let's check if the USB controller is enabled. Go to the “Advanced” – “USB Configuration” tab.
 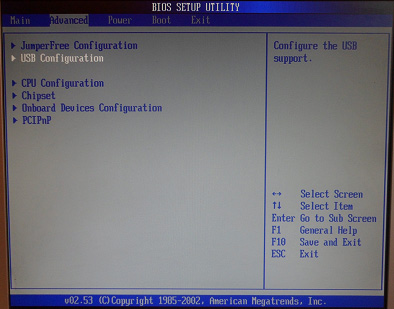 Opposite the items “USB Function” and “USB 2.0 Controller” should be “Enabled”.
  If this is not the case, go to this line and press the “Enter” key. From the list that appears, select “Enabled” (also using “Enter”).
Then exit this tab by pressing “Esc”.
Go to the “Boot” – “Hard Disk Drives” tab. 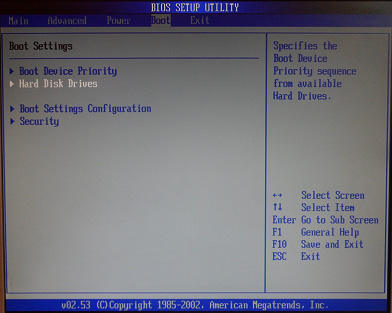 Now my hard drive is in first place, but I need to put a flash drive here. We go to the first line, press “Enter” and in the window that appears, select our Patriot Memory flash drive.
  It should be like this:
  We leave here via “Esc”.
Select “Boot Device Priority”. Here first boot device There must be a flash drive.  Press Esc.
Then we exit the Bios, saving all the settings made. To do this, go to “Exit” – “Exit & Save Changes” – “OK”. 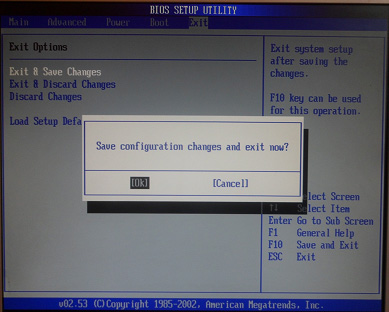
Setting up Phoenix-Award Bios to boot from a flash drive
If, after entering Bios, you see such a screen, it means you have Phoenix-Award BIOS: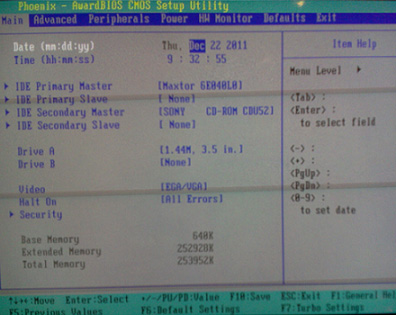 First, let's check if the USB controller is enabled. Go to the “Peripherals” tab – opposite the “USB Controller” and “USB 2.0 Controller” items there should be “Enabled”.
  Then go to the “Advanced” tab and opposite “First Boot Device” set “USB-HDD”.
  After that, exit the Bios, saving the changes. To do this, go to “Exit” – “Save & Exit Setup” – press the “Y” – “Enter” key
  That's practically everything you need to know in order to boot from a flash drive. In my article, I described the process of setting up the BIOS of the most popular versions: Award And AMI. The third example presents Phoenix-Award Bios, which is much less common.
In different BIOS versions The described procedure may vary slightly. But the main thing is that you understand the principle of setting itself.
By the way, I would also like to add: in order to choose which device to boot your computer from, it is not necessary to change the settings in the BIOS. You can call immediately after turning on the computer special menu to select boot devices (this can be done by pressing F8, F10, F11, F12 or Esc). In order not to guess with the keys, look carefully at the monitor immediately after turning it on. We need to have time to see an inscription like this: “Press Esc to selest boot device.” In my case, it was necessary to press “Esc”. 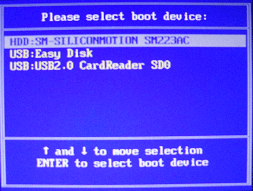 If on your computer BIOS UEFI, and you need to boot from a flash drive - you can check it out.
If you need reset forgotten password user using a bootable USB flash drive - how to do it.
Hello dear readers and colleagues in computer science!
Why might this happen?
Let's look at the reasons. Imagine that you decided to install an operating system and found an old flash drive. It was detected on the laptop, you formatted it and rolled up the system for installation on it. And so you rebooted, but the PC simply did not see the flash drive. The most common case is that you simply did not change the BIOS to the boot from mobile hard drive setting.
It's done like this. To change these same settings, you need to restart the laptop and when you see a screen like this -

Then pay attention to which button is written in the line that I underlined. In the figure I also indicated which keys can also be used to call up the BIOS (it all depends on the model of the program itself). If you did everything correctly, you will see a screen like this.

Here you need to configure the boot parameters . Go to the section First Boot Device and in this line you select USB-HDD.


Now the computer should see the flash drive.
The second reason is a problem with the drivers. They either got lost and produce bugs, or were not installed initially. USB ports are on the motherboard. If they do not work, then the media will not be visible, or will be detected only once.
Need to download software from the manufacturer's website and install it. It is also advisable to scan the laptop for the presence of firewood in other devices. This can be done with this software.
Install, scan and reboot. In general, this procedure should be done after each demolition of the operating system and also after restoring it. The program is free, works quickly, and is entirely in Russian.
How to identify the problem?

If you insert a flash drive and the computer freezes, then the problem lies in the media itself. You need to do formatting at a low level. This is a complete reassembly of sectors with their cleaning.

Also, system brakes can be caused by a conflict with hard drive. In this case, you need to check the hard drive itself standard program, built into the OS. Due to untimely defragmentation of the media, such problems appear.
If you have Windows 7 Ultimate, then it is quite possible that you downloaded a homemade assembly. In such cases, only reinstalling the licensed software from an image can help. Of course, there won’t be any additional features, but stability of operation in this case is guaranteed. You will have to format the disk, so be prepared to transfer the data to an external hard drive or online storage.

If you get an error that says that there is no connection to the portable device, this means that the device itself is faulty. Again, it is unlikely that you will be able to save the data, so just format it. Also check your entire computer for viruses; it is quite possible that malicious scripts will block OS operations responsible for connecting via USB ports. It is advisable to do this powerful antivirus with updated databases, not free analogues, who rarely find anything at all.
Universal solution

If you don’t know what to do and how to fix the problem, then just remove Windows, format hard drive and the flash drive itself. It is better to do a major reinstallation of the OS rather than do it with half measures. In my case this was the only thing that helped. In addition, buy new media, most likely this is the problem. The impact could have damaged it, or shorted out the circuit board inside the case.
Conclusion
This is where I will end the article. I hope you don't encounter any bugs when working on your laptops. Share the article on social networks and subscribe to the blog to stay updated on new materials! All the best to you and see you, my dear readers!
How is it happening? It's very simple friends! On Samsung laptops latest models, several new options have appeared in the BIOS (“Fast BIOS Mode" and "Secure Boot"), which are directly related to the ability to boot a laptop from a flash drive or disk. Samsung suddenly decided to protect the boot of the new operating system Windows systems 8 from some virus or from the laptop owners themselves, it’s whatever you like. Naturally, many users immediately had questions.
One of my friends wanted to boot a Samsung laptop from a bootable flash drive containing a program backup Acronis to backup Windows 8, but it didn’t work out. Another one decided and also got stuck at the very beginning, he just couldn’t find his flash drive anywhere, neither in the BIOS, nor in the boot menu of the laptop. After he tried five flash drives, he flew to me with bulging eyes and said that his new laptop could not be booted from either the disk or the flash drive. In short, I had to figure it all out, and if you also found yourself in the same situation, read our article.
Booting a Samsung laptop from a flash drive
If you suddenly want boot samsung laptop from flash drive, then you will try to enter boot menu laptop using the F10 key when booting and select your connected flash drive there, but you won’t succeed, since first of all, you need to make small changes in the BIOS parameters of the laptop.Turn on the laptop and immediately press F2 when loading, enter the BIOS, go to Advanced section and set the “Fast BIOS Mode” parameter to Disabled.

Then go to the Boot section, we are interested in the “Secure Boot” option,

We also set it to the “Disabled” position and press “Enter”

A warning appears about the possibility of booting the laptop with an error.

We agree, press “Enter". Below appears additional parameter"OS Mode Selection",

We put it in the “CMS OS” or “UEFI and Legacy OS” position

And press “Enter”. Again a warning appears about the possibility of booting the laptop with an error, “Enter”.
We save the changes we made in the BIOS and press “F10” on the keyboard. To the question “Save the changes made and reboot?” press “Enter”. Yes.


The laptop reboots, press F10 and go to the boot menu, select the flash drive, boot occurs Samsung laptop from a flash drive.
If you cannot get into the laptop boot menu, then you need to change the boot device priority directly in the BIOS. We enter the BIOS, go to the Boot section, then the option Boot device Priority

Our flash drive should be here, set it as the first boot device, then press F10 (save the changed settings) and reboot. After rebooting, your laptop will boot from the flash drive.


