How to change the program icon. How to reduce or increase the size of a shortcut
Desktop shortcuts are used to quick launch installed applications. Usually the image is set by default, but the user can change it independently appearance icons: icon, size, remove arrow and more.
Shortcuts on the desktop: what they are and why they are needed
Shortcuts provide quick access to files. If you delete the shortcut, then to launch the utility you will have to search for the location of the file, and this will take more time.
It is worth saying that the shortcut is not the program itself, it simply indicates the path to it. And if you delete the icon, the utility will remain in the system.
How to change shortcut icons
If you are not satisfied standard icons shortcuts, you can change them.
How to reduce or increase the size of a shortcut
The same icon size will look different at different screen resolutions. There are two ways to change the scale.
The first is through the desktop settings:
With this method, the icons may automatically align to the grid and will have to be sorted again.
The second way is to hold down the Ctrl key and roll the mouse wheel up or down, the icons will increase or decrease accordingly.
How to remove the arrow from a shortcut
By default, each shortcut is marked with a small arrow to make it clear to the user that it is a shortcut. But not everyone likes this appearance of the icons. Quick solutions for problems developers operating system was not provided for, and it can be corrected by making changes to the register or using a special program.
More simple and in a safe way is software solution. The most popular utility is Aero Tweak. It has a simple interface, does not require installation and, in addition to changing the type of shortcuts, has several more useful functions.
 Aero Tweak can customize other display options besides arrows on shortcuts
Open the program and go to “ Windows Explorer", check the box next to "Do not show arrows on labels". They will disappear after you restart your computer.
If it is not possible to download the utility, then you can solve the problem through the register:

It is important to do everything exactly according to the instructions and rename the file “IsShortcut”. The registry is responsible for the operation of the entire system, and if there is an error, the computer may not function correctly.
Video: how to remove the arrow from a shortcut using Aero Tweak
How to change the appearance of shortcuts
You can completely change the appearance of the shortcut:

You can download individual packages on the Internet, where the choice is much wider. To see the downloaded icons in the window, you need to click “Browse” and specify the path to the package.
How to change system icons
System shortcuts are a little more complicated to change:

System icons may change along with the desktop theme.
How to remove shields from labels
If all shortcuts are marked with arrows, then the shields indicate that the program can make changes to the system and works with administrator rights. If you remove the shield, the computer will read the utility being launched simple application. For computer safety, inexperienced users are advised not to expose the computer to danger and leave the guards in place.
If you still want to remove the shields, then to do this you need:

The shields will disappear. To return them back, we do the same steps, only we return the slider to the middle.
How to remove and hide shortcuts
If you need to hide shortcuts for a while, then:

All icons will disappear from the screen. It is worth noting that all files that were on the desktop will be hidden: documents, folders, images. To return everything to its place, you need to check the box “Show desktop shortcuts”.
To delete, select an icon (or several) and press Delete. Or simply drag the files to the trash.
How to recover deleted shortcuts
If you accidentally deleted a shortcut yourself, you can easily restore it by going to the trash. Or you can create a new one:

If shortcuts disappear without your participation, then the reason may be as follows. The system maintenance tool checks your computer every week (unless this function is disabled) and if there are more than four damaged shortcuts, it deletes them.
A shortcut that does not lead anywhere is considered damaged. For example, after deleting a program, its icon remains. But the system may consider the label of a removable storage device damaged if it is not connected or is in an inaccessible place at the time of scanning.
What you can do:
- move all shortcuts to a separate folder, the service tool checks only the desktop;
- disable the service tool.
The second method may affect the operation of the system, so it is preferable to simply move the shortcuts to a separate folder.
If you still want to disable the service tool, you can do this as follows:

If the icons still continue to disappear, then the problem is most likely a virus. Install good protection and scan your computer.
Editing the appearance of shortcuts is a matter of personal taste and, in general, does not pose any danger to the operation of the system. But if you download additional software for settings, then download it only from a trusted source and be sure to check for viruses.
Having released a new operating Windows system 10, Microsoft gave it many new features and significantly redesigned the system. Desktop icons have also undergone changes. Many users are accustomed to the old icons that were present on Windows 7. Therefore, non-standard icons after the transition to the new Windows 10 did not appeal to many PC users. In the new Windows 10, they can be easily changed for any shortcut on the desktop. In this material we will describe all the ways to change icons in Windows 10. In addition, we will describe the process of creating new icons.
Changing the icons of the main desktop shortcuts
Basic desktop shortcuts include links such as " This computer», « Control Panel», « Basket" To change these icons, you need to go to the " Options» to links « CUSTOMIZATION/Themes».

Now let's try to change the shortcut " Basket" To do this, select the basket and click on the Change icon button.

In the list of shortcuts that appears, we will select the one we like and confirm our decision with the Apply button. Below is a basket with a different image.

Users can also use icons not from the standard Windows 10 libraries, but from third-party sources. One such source is the free icon pack " Open Icon Library" You can download this package on its official website https://sourceforge.net/projects/openiconlibrary. After downloading and unpacking the archive, about 10 thousand icons will be available to you various formats. To use them from the “Open Icon Library”, click on the same button Change icon for the recycle bin shortcut. In the window that appears, click on the Browse button. . . . After that, select one of the “Open Icon Library” shortcuts. Below is a cart using images from the Open Icon Library.

Which Windows 10 desktop shortcuts can be changed?
The main desktop elements for which you can change icons are shortcuts (links to programs, files and folders) and folders. Let's describe an example of changing the icon in Google Chrome. To do this, go to the properties of the browser shortcut.

Now if we click on the button Change icon. . ., then we will have four options for choosing an icon.

From the example it is clear that when we get to the icon selection list window, the same window appears in front of us as in the first example. The only difference is that all icons are not taken from system library, but from the executable file “chrome.exe”. In this window, just like in the first example, you can select an icon from “ Open Icon Library"or any other.
Now let's look at changing the icon for folders on the desktop. For example, we will create a folder named “Icon” on the desktop. After creating it, we will go to its properties on the “ tab Settings».

On this tab, click on the button that is already familiar to us Change icon. . .. After this action, the same window will appear in front of us, as in the previous examples.

The principle of replacing folder icons with a third-party one, and not from the “shell32.dll” library, is the same as in the previous examples.
We create icons ourselves
For this example we will use the program IcoFX. This program can Easily create different icons from raster images . For this example, we'll take a free photo from https://pixabay.com. This site has thousands of free images.

We will also download and install the program IcoFX. After this, open the IcoFX program, and also open our image in it.

When opening an image, the utility prompts us to make a choice. We will focus on the option " Create an icon from the image" This option will open our image in a reduced resolution, which can be saved for use as an icon.

Once you select the appropriate icon size, you can save it. In our case, the size is 256 × 256. It is saved in the “*ico” file format. Below is an example of a Shortcut user shortcut with our icon.
Using IcoFX, you can create various icons from raster and vector images, which are located on the desktop.
Setting label sizes
Changing the size of desktop shortcuts is quite easy. To do this, go to the active desktop and click on it right click mice. After this action, a context menu will open in which you need to go to the line “ View».

As you can see in the image above, you can make the size large, regular, and small. This setting allows you to adjust the size for monitors with different resolutions and diagonals. For example, for large monitors you can reduce the size of the labels, and for small diagonals you can make them larger. It is also worth noting that in the “View” item you can pin shortcuts in a grid and pin them automatically to the desktop.
In conclusion
After reading this article, you will learn how easy it is to change icons in Windows 10. In addition, the article shows how you can create icons from bitmap images yourself. We hope the material will help our readers change icons in Windows 10, as well as create new ones.
Video on the topic
In addition to desktop backgrounds, screensavers, and window color styles, Windows users 7 have the ability to change standard icons folders and program shortcuts to any others. Diversify the design working environment You can use icons from system libraries or from third-party sources. Various collections of beautiful miniatures are available for free download on many web resources.
Installing icons from the Windows 7 collection
So, you want to change the standard folder image to something more original. Where can I get badges? The simplest and fastest solution is to find them in the system.
Change icon
- Open the folder properties.

- Go to the “Settings” tab and click the “Change Icon” button.

- Specify the location to search for the icon. By default this is the system library Shell32.dll, but you can choose another source. Click the appropriate image and click OK.

Now the folder looks like this.

The Shell32.dll library as a source of icons for folders is not always the best choice. The icons in it are not particularly beautiful and there are not too many of them. Other images can be found in the libraries Aclui.dll, Ddores.dll, Moricons.dll and many others.
To make it easier to view icons on your computer, we suggest using the free Icon Viewer utility: it shows all the icons that are stored in different files selected folder. So, in the C:Windowssystem32 directory alone there are several hundred of these images.

By clicking on the icon you like, at the bottom of the window you will see which file it contains.
Changing the image
- To change the folder image, leaving the standard icon, on the same tab, in the “Folder Image” section, click “Select file”.

- Select any image of a suitable format and click “Open”.

Our folder looked like this. The picture selected as an image is not moved inside the folder.

Installing folder icons and desktop shortcuts from third-party sources
Many design-related web resources offer collections of icons for folders and desktops. This is usually a set of images in ico format and, less commonly, dynamic library files supported by Windows 7.
Changing the folder icon
To change the standard folder icon to one of the new ones, you need to do the same as we discussed above: open the folder properties, click the “Change Icon” button, indicate the location where you unpacked the collection of icons, and select one of them.

Windows 7 supports formats ico files, icl, dll and exe (the latter can also contain images that can be used as icons and shortcuts).
Changing desktop shortcuts
A program shortcut on the desktop is a graphical miniature that is installed on the computer during installation of this program. Physically, the shortcut image is stored in the executable (exe) file of the application and, as in the case of folders, it can be changed to another.
- Open the properties of the application shortcut and go to the “Shortcut” tab. Click the “Change Icon” button.

- Specify the path to the folder with the desired image (as in the previously discussed example, we can use files in ico, icl, dll and exe formats). Select an icon and click “Open”.

- Confirm your selection by pressing OK.

After this, the shortcut to our “experimental” program Total Commander took on an updated look.

Using the same method, you can change any desktop icons, with the exception of system ones.
Changing system icons on the desktop
To change the appearance of the “Computer”, “Trash”, “Network” and root icons account user, you need to enter the personalization panel (but note that the “Personalization” component is not available in the start and home basic editions of Windows 7).
To do this:
- right-click to open desktop properties and click “Personalization”;

- on the left side of the panel window, click on the menu item “Change desktop icons”;

Popularity of the operating room Android systems This is largely due to the fact that it gives the user ample opportunity to customize the device interface. However, standard set the functions were not enough to change the basic set of icons. This, of course, causes some inconvenience, especially if you want to customize your gadget taking into account your own preferences.
However, the question of how to change icons on Android is solved quite simply.
For these purposes, they were developed special programs– launchers. Launcher (from the English Launcher) is considered to be the shell responsible for graphic image. This includes applications that control the device, desktops and all kinds of widgets.
How to change icons using the launcher
Choose any launcher you like, since the range of this range of software is quite large. We would suggest one of the most popular -:

Changing icons in each launcher is slightly different, but the principle itself is the same everywhere. You can use the application icons that the launcher itself provides. For example, in the same " C Launcher“They are presented in sufficient quantities. Or you can download an icon pack (a set of icons) from a store (for example,).
Now you need to open " Settings", go to the section " Applications"(on different devices it can be “Icons” or “Personalization”), and select the desired package.
There is a second option. Open first installed package, then select from the menu “ Set icons", and then select the launcher to use.
Replacing icons using special software
It is quite possible that you are quite happy with the stock (pre-installed) launcher, but you are already tired of the application icons and just want to change them. In this case, you can use the Beautiful Icon Styler program, with which you can change application icons without installing a launcher.
After launch, the main menu of the program will open, where by clicking the “Start” button, select the launcher, then by swiping to the left we will see a tab with the icons that we will change. One more swipe, and we will see a set of paid and free icons for downloading:

Here it must be said that although the application itself is distributed free of charge, you can take advantage of the free offer only for three downloads, and then you will have to, as they say, “fork out.” True cost full version fits into one dollar ten cents, which is quite affordable for any wallet.
Replacing icons with “Superuser” rights
I don’t think that to change icons it makes sense to lose the right to warranty service and install Root rights. Therefore, we will not dwell on this method in detail, we will simply outline it briefly.
So, select and install it. Then we need the Xposed Framework and the Unicon module for it. Next, go to Xposed, open the “Modules” section, select “Unicon”, and use it to change the icons.
*Note: Don’t forget that when installing programs and applications not from the Google Play store, you will need to allow installation from unknown sources in your phone’s settings:

I hope that today’s topic “How to change icons on Android” is written in a simple and understandable way. Stay in touch and share your experience on the pages of our “Knowledge Base” section. Good luck!
Standard folder symbols and Windows files wander from version to version and, perhaps, someone is quite tired of them. However, many users do not suspect that these icons can be replaced with others. The system's capabilities in this regard are too limited, but, fortunately, third-party developers have made sure that we can diversify the design of Windows 8 to our liking.
Let's figure out how and by what means you can change the standard Windows icons 8 to more attractive.
Changing icons using Windows
Consider a situation where you need to change the icon of a single folder or shortcut to make it stand out from the rest. Let's assume you don't have any special desires for originality and you'll be satisfied with the standard icons from the Windows set.
Changing the folder image
- Open the context menu of the folder whose icon you want to change and select Properties.

- Go to the “Settings” tab and click the “Change Icon” button.

- By default, a set of icons from the Shell32 system library will open. Select the appropriate image and click OK. If none of the pictures suits you, you can click “Browse” and select another file with icons. The icons contain various Windows libraries and executables, but to find something specific, you need to know exactly where to look.

- Click on an empty area of the desktop and press F5 - the desktop will refresh and the folder will change appearance.

- To return the folder to its original icon, open the change icon window again and click “Restore Defaults.”
Changing standard desktop icons
The standard desktop icons in Windows 8 are the “This PC”, “Trash”, “User Files” and “Network” icons.
- To access the necessary settings open the Personalization panel. To get there, call up the desktop context menu and click the corresponding item in it.

- Click “Change desktop icons” in the navigation bar.

- In the “Icon Options” window, select what you want to change and click “Change Icon”.

- By default, a set of icons from the imageres.dll library will be opened. Select any image and click OK. The icon will change.
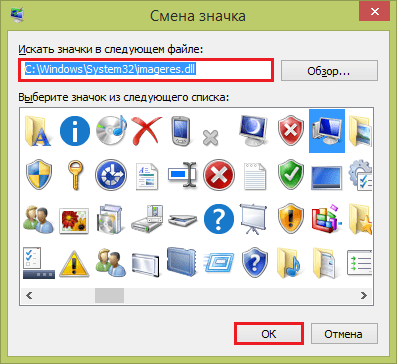
- To return the default image in the “Desktop Icon Options” window, click the “Normal Icon” button.
Changing program shortcut images
The program's desktop shortcut image is created based on the resources of the program itself. The icon is usually contained in the executable file or some library of that application.
- To change the shortcut image, open from context menu its properties, go to the “Shortcut” tab and click “Change Icon”.

- Select one of the suggested options or click “Browse” and specify a different file. In our example, the MEGAsync application icon is located in the MEGAsync.exe executable file.

After selecting a different icon and clicking OK, the program's shortcut will be changed.
Installing icons from other sources
On the Internet you can find a lot of tools for designing Windows. These are ready-made themes, which include icons for folders and system icons, and thematic sets of pictures in ico format (single icons), icl (groups of icons of different sizes) or png (regular pictures with elements of transparency), and applications for changing icons “ in one click."
Icon set
To set a picture as an icon in png format, you must first convert it to ico. To do this, you can use a simple program AveIconifier2.

Drag and drop into the right window of the program png file, from the left we take ico and throw it into the same folder. After that, change the folder icon in the same way as we discussed above. We specify the folder with the set of icons as the source.

Here's what we ended up with:

Applications
Programs for changing icons have O greater opportunities. With their help, you can design not only folders and system icons, but also files, drive icons in the “This PC” directory, control panel elements, etc.
IconTo
As an example of such programs, consider IconTo. It comes with about 300 icons in different artistic styles, but these are not the only ones you can install.
- Run IconTo as an administrator.
- Click the “Specify folder/file” item. Let's check if the program can change icons for an entire type of file (let's take text files, for example).

- Select an icon. The program makes it possible to install icons from Windows 8 files, from its own, rather rich set, or any others. Let's take one of the pictures from our fruit set.

- After selecting the appropriate image, click “Set Icon”.

Here's what we got: everything text files Now they look very tasty.

To return them to the standard view, you need to click “Remove icon from folder”.

Other programs work in a similar way. Their capabilities are quite enough to completely transform Windows, but sometimes problems arise with restoration to its previous appearance. Therefore, before launching such an application, create a restore point in case you are not satisfied with the end result.


