How to change the partition table. How to Check If Your Hard Drive Uses GPT or MBR and Convert One Standard to the Other
With the release of hard drives with the new GTP partition style, the topic has become very relevant, GPT conversion in MBR. This procedure may be required in different situations, but the most popular topic was the inability to reinstall the operating system.
GPT- This new standard format for placing partition tables on a hard drive, appeared mainly with the beginning of the use of UEFI - BIOS.
MBR– a standard HDD format with which we are all accustomed to working.
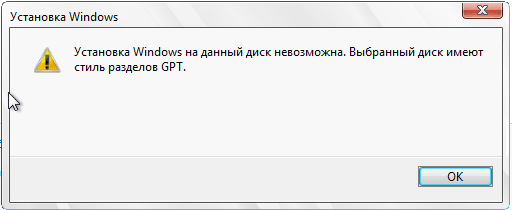
Often, when buying a laptop or computer, it comes with Windows 8 pre-installed, and after some time, users reinstall the system to their familiar Windows 7 ( Often, the reason for reinstallation is the absence of a standard Start menu). But when installing Having inserted the disk, booted from it, selected the system language and the partition on which we will install, everything seems to be going well, but when you click on “Next”, the following message appears: Uinstalling Windows on this disk impossible. The selected disk has a GPT partition style. Completely deleting partitions and formatting the disk does not help, what should I do?
The answer to this question is quite simple, you need to convert GPT to MBR. To implement our plan, we only need .
How to convert GPT to MBR using command line
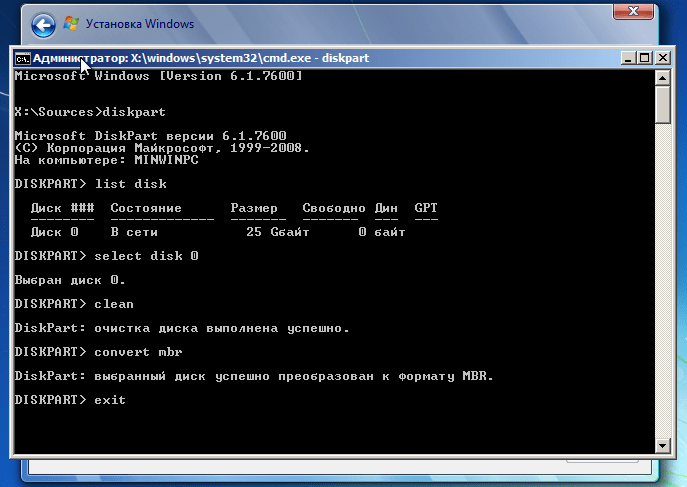
Having started the installation again, we get to the selection of partitions where we call command line. To do this, you need to press Shift+F10, after which the console will appear.
To convert the partition format, we will use the utility Diskpart. We have already met with her work earlier in the article:. By typing the command diskpart we will launch the utility.
Then, the team list disk open our list of disks, in which each disk will have its own number, for me it is 0. If you have several hard drives, the number may be different.
Attention, when performing the next step, all data on the hard drive will be deleted
The next step is to completely clean our hard drive team clean. If you are reinstalling Windows and decide to use this method, and you have important data that needs to be saved, then I recommend sending it to external storage(flash drive or external HDD), since transferring to “D:/” will not help. After waiting for the cleaning to finish, you can proceed to converting our disk.
We start the conversion with the command convert mbr,
which will make a regular MBR from a GPT disk. After a moment, a message indicating the successful completion of the process will appear.
Now the disk has become the usual one that we are used to working with, all you have to do is exit the utility by writing, Exit and install the operating system you want.
Convert from GPT to MBR without data loss
After working with Windows 8 for several days, weeks, months, you decided. Having started the installation, we saw an error that it cannot be installed on a GPT disk. Yes, of course, you can use the first option and convert the disk to MBR using the command line, but all data will be destroyed. But, over the entire period of work, the “D:\” drive has accumulated quite a bit of important information for you, photographs that are dear to you, favorite music, etc., and the loss of all this will be a rather unpleasant moment. Is it possible to make a conversion while saving all the data, you ask?
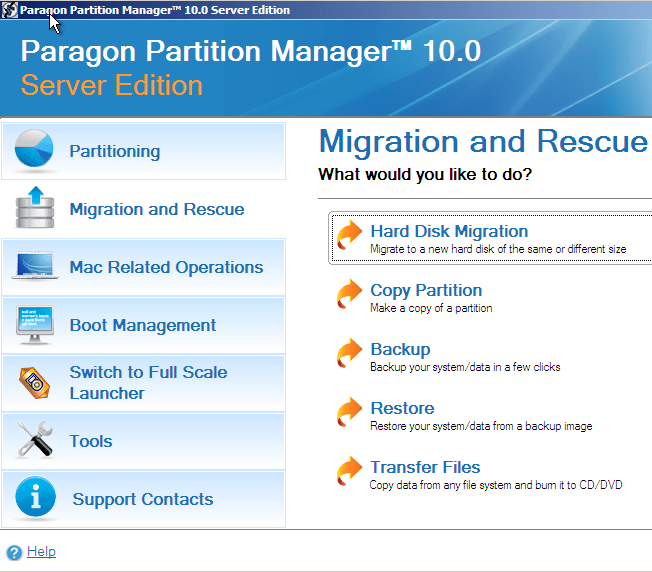
There is such an option, but for this we need a bootable Live disk CD/DVD. I am using the LEX LIVE STARTLEX DX MEDIA 2011 disk, I chose this disk because this assembly contains a program that will be needed to convert a disk from GPT to MBR. It's called Paragon Hard Disk Manager, Be careful, it is not included in every collection of Live CDs.
If you have a ready boot disk or a Live CD flash drive, insert it into the computer and boot from it (). After waiting just a few minutes, a desktop will appear in front of us, where in the start we look for “HDD & USB Utilities” and find the program “ Paragon HDM 2010 Pro" and launch it.

In the list of hard drives we see our basic GPT disk, select it with 1 click, select “Hard disk” in the top menu, and in the list that opens click “Convert to basic MBR disk”.

The conversion will not start immediately; to confirm and start the process, click the green checkmark.

In the next window, simply click "Convert".

The conversion of our hard drive will begin, wait a few minutes.

Having completed the conversion of the hard drive from GPT to MBR, paragon will notify us about this with the message that “All operations are completed.” To complete the process, close the window with the corresponding button.

That's all, all you have to do now is restart your computer and continue installing Windows, and all the files that were on the “D:\” drive will be saved. Leave your comments, with the help of which you, dear readers, will convert a hard drive from GPT to MBR.
Computer disks use GPT or MBR partition tables. Modern computers use a GPT partition table in the Windows 10 or Windows 8.1 (Windows 8) operating systems.
The GUID Partition Table (GPT) is part of the EFI interface, which replaced the BIOS. The BIOS uses MBR (Master Boot Record) - main boot record. Gradually, computers with MBR disks are being replaced by computers with GPT disks, the types of disks SSD or HDD do not matter.
The main difference between partition tables is the following: on MBR disks you can create 4 main partitions, disks up to 2.2 TB are supported, on GPT disks the number of partitions is practically unlimited (depending on the used operating system), disks larger than 2.2 TB are supported, more fast loading systems.
The advantage of GPT is that it stores its data in different places on the disk, unlike MBR, which is located in one place. In GPT, in case of corruption or failure, the data may be used from another location, on MBR disks, in which case loading will not be possible. The benefits of the GPT partition style are mainly realized in 64-bit Windows versions(Windows 7 x64 supported).
How to find out which GPT disk or MBR? You can find out the MBR or GPT disk format using the Windows operating system using third party programs, designed to work with disks. The article discusses the AOMEI Partition Assistant program; other similar programs are suitable.
How to find out GPT or MBR in Disk Management
The easiest way to find out the disk partition style is to go into Disk Management.
On Windows 10, click right click mouse on the Start menu, select Disk Management. In Windows 7, right-click on “Computer”, select the “Manage” context menu item, and in the “Computer Management” window select the “Disk Management” section.
You can enter disk management in Windows in another way: press “Win” + “R” on your keyboard, in the “Run” window enter the command “diskmgmt.msc” (without quotes), and then click on the “OK” button.
After this, the “Disk Management” window will open, which displays all the disks connected to this computer.
At the bottom of the snap-in window, you will see all the physical disks connected to the computer, which are labeled: “Disk 0”, “Disk 1”, etc. Please note that one physical hard drive can have multiple partitions ("C" drives). ", "D", etc.).
Right-click on the drive name to in this case to "Disk 0", and in context menu select "Properties".
In the “XXX Disk Properties” window that opens, open the “Volumes” tab. In the Disk Information section, you will see an option called Partition Style: Table with GUID Partitions (GUID). This means that this disk has a GPT partition style.

After I went into the properties of "Disk 1" and opened the "Volumes" tab, I saw that this disk contains an MBR table - "Partition style: master boot record (MBR)".

How to find out GPT or MBR hard drive on the command line
Run Command Prompt as Administrator. In the command line interpreter window, enter the command:
Diskpart
List disk
Click on "Enter".
The Command Prompt window will display all the physical drives connected to the computer.
One of the options displayed is labeled "GPT". A disk that has a GPT partition style is marked with an asterisk (“Disk 0”). This means that the remaining disks, where there are no asterisks, have the MBR partition style.

How to find out GPT or MBR disk partition in AOMEI Partition Assistant
AOMEI Partition Assistant ( free version- AOMEI Partition Assistant Standard) is designed to operate and manage disks. The program has the ability to convert (convert) GPT disks to MBR and MBR to GPT.
After launching the program, the computer disks will be displayed in the main window of AOMEI Partition Assistant. At the bottom of the application window, under the name of each physical disk, the partition type is shown: GPT or MBR.

Conclusions of the article
You can find out what type of GPT or MBR partition the disks on your computer have using the Disk Management snap-in, the command line and third-party software: the AOMEI Partition Assistant program.
Newer versions of Windows (Vista, 7), like older ones (XP, 2000), use the outdated M.B.R. boot record. or an updated GUID partition registry (G.P.T.), like a plan for parts of hard drives.
In other words, this various methods placing and saving the plan of parts on hard drives computer. The "GUID" part table is a more advanced method that is used to Windows systems running on UEFI. For example, starting from Windows 8 and higher.
Master Boot Record - used on earlier Windows systems, which operate on the basis of BIOS, but Windows 7 with 64-bit bits can also boot from a GUID.
How to Find Out What Parts Table Your Drives Use
Click on the combination Win+R and type cmd in the field and press “Enter” to launch the command line. Then, in the command line, enter diskpart , press enter, then type the request list disk , confirm the command with the “Enter” key. A display will appear showing a list of working information repositories.
The "Gpt" string will be marked with an asterisk if it is used on disk. An unchecked line means that the MBR scheme is used.
For example, in the image below, "Disk 0" and "Disk 1" operate with "G.P.T" and "Disk 2" operate with "M.B.R" circuit.
Save the information from the disk and start formatting. Before converting a hard drive from gpt to mbr or vice versa, you need to format it, completely deleting everything stored on it. Therefore, copy the data to a backup if you need the information.
When the system is converted to a new scheme, all data with partition tables will be deleted in order to load the new scheme.
Convert partition schemes via command line
Be sure to copy all your data before you begin the conversion. Remember, the system will clean the disk completely!
It is better to convert partition schemes through the command line, because the “clean” option used opens closed or locked partitions and disks from the graphical disk management partition for modification.
At the command prompt, enter diskpart and list disk . The window will display a list of computer disks. (They differ in number and volume) Write down the serial number of the object being converted.

Type select disk# , where we replace the hash mark with the number of the storage to be formatted. Then type clean, each command is executed by entering using the Enter key. After this, all information and parts will be completely erased from the disk.
Then type convert gpt if you want to convert from M.B.R, and convert mbr if you want to convert from G.P.T.

This way you repeat a set of commands to convert all the necessary drives.
How to convert gpt to mbr without data loss
There are several options for reformatting partition table schemes while saving data on disks. There are programs that can perform this task. You can take a chance and use them.
But such programs have a significant drawback - these are unofficial products, and their compatibility has not been confirmed by Microsoft. So it is possible to convert to gpt without losing data, but according to Microsoft this is “unsafe” for your computer.
But if such a need still arises, this can be done using a boot disk, for example “LIVE CD/DVD”, which contains a utility PARAGON HARD DISK MANADGER
We load Windows through this disk, through the “START” menu, select the desired program. We launch it, and then begin converting storages through it.


This is how you can easily convert mbr partitions to gpt with Windows installation without losing the necessary information.
In one of the previous articles in the section with instructions for Windows 10, we discussed which of these markup standards is best to use on modern computer with a modern operating system. In short, it is better to use GPT, as it is a newer and more convenient standard for hard drive partitioning. If after reading the article you set out to convert MBR to GPT on your wonderful computer, this article is exactly what you need. Here you will find instructions on how to convert MBR to GPT without third-party programs (system tools), as well as how to convert MBR to GPT without data loss.
For reference: All procedures described in this article must be performed on behalf of the Administrator. Therefore, your account must have the appropriate rights. If there are none, you will need to enter the computer administrator password.
How to convert MBR to GPT without third party programs
To begin with, we must immediately note that changing the layout of a hard drive inside the system is only possible if it No sections in general. In other words, you need to completely delete all existing sections and then convert. This in turn equals deleting information from the disk. Make sure to back up all the data you need.
Also note that this method cannot change the markup system disk on which the operating system is installed. If you need to change the MBR to GPT of the system disk, you will have to reinstall Windows and change the partition during the installation process. This procedure is described a little below.
When backups created, proceed to the procedure:
By the way, so as not to return to the interface Disk management, you can complete the conversion procedure directly on the command line.
- Enter again listdisk and then selectdisk X. Traditionally, X is responsible for the number of the disk to be changed.
- Now enter the command convertmbr. Click Enter and wait for the procedure to complete.
After this, you can mark. This procedure can be performed in the Command Line, but the interface will be much simpler and clearer Disk management.
How to Convert MBR to GPT During Windows 10 Installation
This procedure must be done not only at the moment when you purposefully change the layout of the system disk, but also when you encounter the error Installing Windows on this disk is impossible. The selected disk contains an MBR partition table. On EFI systems, Windows can only be installed on a GPT disk. In other words, when you try to install Windows on a UEFI system, you will have to change the markup from MBR to GPT. And yes, you will lose all information on this disk.
MBR to GPT conversion process during Windows installations actually the same as in the case of conversion “from under Windows”. Its essence is to call the command line and enter a couple of commands. This is all done very simply:
- When the Windows installation interface loads (or when the above error appears on the screen), click Shift+F10 to launch the command line.
- In the window that appears, enter the command diskpart.
- Then comes the command Listdisk to display all connected drives. Look for the drive on which you want to install the operating system. For example, Disk 0.
- Enter the command selectdissk X. Replace X with the disk number. For example, the command might look like this: select disk 3.
- The following command will erase the MBR table. Enter clean and press Enter.
- Now all that remains is to convert the blank disk to GPT. To do this use the command convertgpt.
- After the successful conversion message, enter the command exit to exit the command line. Then continue installing Windows as usual. When the computer is ready for use, you will see the utility in the interface Disk management, What system partition now uses GPT format markup.
If the disk is not partitioned and you are installing the system on an EFI computer, Windows will automatically select GPT partitioning during installation.
How to Convert MBR to GPT without Data Loss
As you probably already understood, Windows does not have built-in mechanisms that allow you to convert Master Boot Record to GPT without first complete cleaning disk. Fortunately, there is large number free applications, which do an excellent job with this task. One of them is called AOMEI Partition Assistant.
Warning: There is always a risk of losing information on your hard drive during such procedures. It's best to always back up your important data to the cloud or other storage. And remember that only you are responsible for the safety of your information.

As you can see, the whole procedure is quite simple and is much easier to do than it might seem to a novice user or simply an inexperienced user.
Modern hard drives (HDDs) are becoming more spacious and less expensive, and many people believe that it is better to buy one large drive - 2 - 3 - 4 terabytes - than several small ones. But not everyone realizes what difficulties they will encounter when installing an operating system on such a disk. The fact is that disks with a capacity of more than 2 TiB use non-standard, new type data organization – GPT partition table. It contains “surprises” that await the inexperienced user.
The main differences between GPT (new) and MBR (old) disks
- Disk partitioning according to the MBR standard cannot address space exceeding 2.2 TiB, and for GPT disks there are no restrictions (or rather, their limit is an astronomical number by our standards - 8.6 billion TiB).
- Only the 64-bit version of Windows can be installed on GPT disks, starting from Windows Vista x64. Windows XP 64-bit and all x86 versions since Vista can write to and read data from GPT partitions, but cannot boot from them. Windows XP x86 and higher versions do not support the GPT platform.
- The GPT partition table is part of the UEFI interface - the new BIOS, so to speak. Computers with traditional BIOSes do not support the GPT structure.
But this does not mean that modern, capacious GPT hard drives cannot be used the old fashioned way - on computers without UEFI or for installing 32-bit systems. You can: to do this, the GPT partition table just needs to be converted to MBR. Part of the volume - that which is beyond 2.2 TiB - will be inaccessible, but nothing can be done about it.
Convert partition table from GPT to MBR
Work with hard drive up to 2 TiB
When installing Windows 7 x86 (32-bit) on a GPT disk, an error message pops up clearly indicating the reason:
If your hard drive is less than 2 TiB, this will solve the problem full formatting with the removal of all sections. This can be done through the “Disk Setup” option from the distribution package.
- When, during the installation of Windows 7, you get to the selection of the partition where to install the system, and you see an error message, click the “Disk Setup” button.

- Select each section, starting from the bottom, and delete by clicking the button of the same name. You should end up with one total unallocated space equal to the size of the entire hard drive.

- Now you need to create each partition again. To do this, click the “Create” button, set the desired partition size and click “Apply”. Repeat the operation as many times as you want to obtain partitions. The system will ask you to allocate an area for its needs (boot partition 100 mb), it is advisable to agree.

- Formatting of newly created partitions is done by clicking the “Format” button. After these steps the table hard sections The GPT disk will be converted to MBR, suitable for installing the 32-bit version of Windows 7. Further installation proceeds without any special features.
Working with a hard drive larger than 2 TiB
To create an MBR on disks of such large capacity, you will need a utility DiskPart, part of the seven distribution kit. It starts and works via the command line.
- Having reached the choice of installation location, launch the command line by pressing “Shift” + “F10” on the keyboard. In the black window that opens, enter: diskpart and press Enter.
- Next command: list disk– to view all hard drives installed on your computer.
- Select the disk on which you will create the MBR. If he is alone, enter the command select disk 0, if there are several, instead of zero, substitute the serial number of the disk that you need.
- Next, delete all data and all markings from the selected HDD with the command clean.
- Team convert mbr converts GPT table to MBR.
- To close the console, enter: exit.
- Then you can proceed to installing Windows 7.
Preparing a disk for installing Windows 7 using third-party programs: partitioning, formatting, etc.
You can also partition and format the HDD before installing Windows 7 using third-party programs, such as “Acronis Disk Director”, “Paragon Partition Manager”, etc. There are enough applications for these purposes, but these two are familiar to many and are the best in in our class, so we will consider them.
Acronis Disk Director
Powerful disk management tool. Available in two versions - for use in Windows environment and how boot image. The second allows you to repartition, format, delete, move and restore volumes, and transfer data from partition to partition without booting into Windows.
The principle of using Acronis Disk Director is intuitive - each of its options has a clear, unambiguous definition. Interface – English and Russian.

In order to divide the HDD into partitions and format it in any of the proposed file systems (their list is quite extensive), select “Create partitions” and follow the wizard’s instructions.

Acronis Disk Director has one very useful function– Partition Recovery Wizard. It allows you to restore deleted volumes to disk with all their data. Unless, of course, the information was overwritten.

Paragon Partition Manager
Another full-featured set of disk management tools. It is a boot image with which you can do a lot of things: split disks into volumes, format them in various file systems, do boot menus, create installation packages for OS distributions (not only Windows), manage system boot loaders, etc.
As for partition management functions, Paragon Partition Manager allows you to create, delete, divide, copy, restore, merge, make backup copies and transfer them to external media. You can even transfer the entire contents of your hard drive to another. In addition to the above, the application has network functions, making it possible to create a connection with other computers on the local network.

Despite the English-language interface, Partition Manager is quite easy to manage. Most options launch a built-in wizard that guides the user through all stages of the selected operation. It doesn’t take much time to master the program, and the result of what is done is always good.

Partition management, formatting and other operations through the disk manager
Redistribute disk space from under a running system, you can also use “Disk Management” - your own Windows tool 7. The tool is located in the “Computer Management” set.
- Launch Control Panel and open the Administrative Tools application. From the list of administrative tools, select “Computer Management”.

- Next select “Disk Management”.

- You will see a “map” of hard drives and other storage devices installed on the computer - flash drives, memory cards, etc., if they are connected.
If the disks are divided into parts, each partition, otherwise called a volume, will be displayed on the map with its letter, size and type designation: primary or logical. At the top is a table of the properties of each volume. Here you can see which of them your system boots from - the boot partition has the “Active” attribute.
The active partition in Windows 7 is a 100 MB partition at the very beginning of the hard drive (MBR standard). It does not have a letter and does not appear in Explorer.
Right-clicking on one of the partitions on the disk map opens a list of available commands: what operations can be performed on this volume.
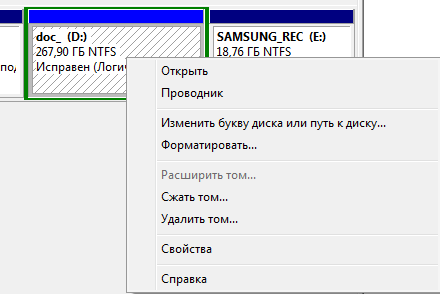
So, on logical partition D of our only hard drive, you can do the following:
- open (via Explorer);
- change letter;
- change the disk path;
- format;
- expand;
- squeeze; compress
- delete;
- view properties;
- read the help.
If you remove the volume letter, it will not appear in Windows Explorer, like the rest of the hidden sections. Such as SYSTEM - where is it located Windows boot loader 7, and RECOVERY section(recovery). This protects the files stored there from accidental damage and deletion.
The “formatting” command will destroy all information, the “expand” and “shrink” commands are intended to control the size of the partition. “Delete”, accordingly, will turn the selected area of the hard drive into unallocated space.
In short, working with the disk manager is not difficult, but it requires attention and caution from the user.


