How to set up fingerprint on iphone se. Setting up Touch ID
They told me how to use the new one iOS function 11.
Why Apple added the feature to disable Touch ID
Apple once again decided to worry about the safety of its users. The Quick Disable Touch ID feature allows you to iPhone owners the ability to protect your smartphones as much as possible in case of various emergency situations. By blocking Touch ID, the user will prevent an attacker from gaining access to the iPhone by placing the owners’ fingers on the scanner. Of course (and fortunately), such situations rarely arise, but Apple decided to provide for the actions of its customers in them.
Another reason for the appearance iOS 11 The function of quickly disabling Touch ID on the iPhone is associated with Apple’s desire to protect its users from law enforcement agencies. There have been several cases over the past year in which police officers have literally forced suspects to provide access to their iPhones by scanning their fingerprints.
The most high-profile of these cases occurred in February. A Norwegian resident suspected of committing a crime was required to unlock his iPhone using Touch ID. According to the court ruling, fingerprint locking of smartphones was recognized as unprotected by the country's constitution. This means that upon request of the police, any iPhone user is required to remove the lock from their Touch ID-protected smartphone.
Note: This feature only works on iPhones running iOS 11 or later.
To disable Touch ID on your iPhone, you need to quickly press the Power button five times in a row. A successful operation will display a screen asking you to turn off your iPhone or make an emergency call. At the same time, the function blocks Touch ID, indicating that to activate the fingerprint scanner you need to enter a passcode. In this case, you can only unlock your iPhone using a password. A similar limitation applies to iOS 11 and previous versions operating system installed after every iPhone reboot.

You do not need to make any special settings to enable the function. Moreover, these same settings are not provided in iOS. In the menu " Settings» → « Emergency call - SOS» users can only activate the auto call option emergency services when you press the “Power” button five times and configure contacts in case of emergency. Recent contacts will receive notification messages if you call emergency services.

Assistive Touch is a feature that can help people with disabilities who find it difficult to use standard gestures and buttons on iOS devices, and it is more convenient to tap once in a certain place on the screen.
Here's how to turn on and use Assistive Touch!
How to enable Assistive Touch
1: Go to " Settings» on your device
2: Click " Basic«
3: Click " Universal Access«
4: Click " Assistive Touch«
5: Click switch next to AssistiveTouch to turn it on
A dark square with a white circle should appear on the screen. This is the button to launch the Assistive Touch menu and it will be located everywhere. You can click on it to open it or drag it to any convenient location on the screen.
You can also activate Assistive Touch using Siri.
How to use Assistive Touch
1: Click the button Assistive Touch
2: Select option:
- Notification Center: Brings up Action Center so there's no need to swipe down from the top of the screen.
- Apparatus: Opens a submenu where you can perform various actions on the device, such as locking the screen, changing the volume, rotating the screen, and much more.
- Control room: Brings up Control Center so you don't have to swipe up from the bottom of the screen.
- Home: Duplicates the functions of the Home button, closes open application or returns to the first desktop tab.
- Siri: Activates Siri.
- Gestures: Allows you to perform and add custom gestures.

Note: These are the default buttons, but you can change them to your liking.
How to add custom gestures for Assistive Touch
1: Go to " Settings» on your device
2: Click " Basic«
3: Click " Universal Access«
4: Click " Assistive Touch«
5: Click " Create a new gesture«
6: Tap or swipe to create a new gesture. A series of taps will be combined into one multi-touch gesture.
7: Click " Stop" in the bottom right corner of the screen when you finish your gesture.
8: Press " Start"to see the gesture, " Record" to rewrite or " Save" in the top right corner to save it.
9: Lead Name gesture

Your custom gesture will now be available to you in the menu Assistive Touch → User. You can also add custom gestures by tapping " User» in the Assistive Touch menu and pressing one of add buttons.
How to customize the top-level menu for Assistive Touch
1: Go to " Settings» on your device
2: Click " Basic«
3: Click " Universal Access«
4: Click " Assistive Touch«
5: Click " Customize the top level menu«
6: Click on one of the buttons " Add» or click on an existing icon
7: Choose function or action
8: Click on plus or minus button in the lower right corner to add or remove a button. The maximum number of icons is eight.

These icons will be the first ones you see when you activate the Assistive Touch menu
If you don’t like what you created, you can click “ Reset“...at the bottom of the screen.
Some users and potential buyers mobile iPhone devices and iPad don't know what it is Touch ID, what it is for and how to configure it. Let's explain - Touch ID is a touch module built into the button that can scan (as well as read) your fingerprint, so the phone recognizes its owner and unlocks the screen to access the home screen.
Well, you understand, basically this fingerprint scanner button serves as protection for the iPhone or iPad, while replacing the password on the lock screen. You can also use your fingerprint to purchase media content in the iTunes Store.
Not all iPhone and iPad models have a built-in button. touch sensor ID. From iPhone 5s and up, phones Apple brands began to be equipped with a fingerprint sensor. The list of models without Touch ID is below:

How to enable Touch ID fingerprint on iPhone
In order to put a fingerprint on your iPhone, which will be requested every time it is unlocked, you need to click on the Settings application:


By enabling Touch ID, you can unlock your iPhone or iPad using your fingerprint
Above are your fingerprint recognition screens for logging into your iPhone. But if you go into Touch ID settings and turn on iTunes Store and App Store, then the fingerprint can be used instead and when purchasing applications, music, videos, etc. In the same settings, you can add fingerprints of those you allow to use your iPhone.
Biometric sensor Touch ID first appeared in Apple devices V . A year later he moved to,. From a pleasant addition for owners of a flagship smartphone, the fingerprint scanner has turned into a real tool for protecting access not only to the smartphone itself. mobile device, but also to individual applications, and has also become an integral element payment system. Unfortunately, Touch ID still does not always work as intended and as users would like. Let's try this to correct.
All the most great deals for iPhones (there are even 20 thousand cheaper than the market). They change something and even give it away for free.
In May last year, Roman Yuryev already discussed this topic in detail and described in detail how to set up Touch ID so that you could then forget for a long time about malfunctions of the sensor and manually entering a password. Unfortunately, over time, the algorithm of the fingerprint scanner still begins to work with some “quirks”, which subsequently only become more frequent. For example, after switching to the iPhone 6, I was completely delighted with the updated Touch ID - it worked perfectly and smoothly for more than a month, and then suddenly began to fail, and this happened more and more every day.

The main thing is not to give up, or in this case fingers. The problem can be solved, using improvised means and will not require much of your time. This method was first described about a year ago, but for some reason it passed by most thematic resources, although the method really works, as I was convinced of from my own experience.
So, the best way to start is to delete all the prints and set them up again, as described in last year. After this, restart your smartphone, ending all applications first. Maybe these steps are unnecessary, but let them be for the purity of the experiment. Now let's go to Settings -> Touch ID & Password-> Enter the password, if necessary, and get into the very menu where your fingerprints are stored.

Now - attention - no more manipulations or transitions are needed, just touch the scanner the same way you do to unlock your device. Pay attention when you delay known to the system finger on the sensor one of the prints in the list on the screen illuminated. This is the fingerprint of this finger, and you have just performed an additional scan of it, the results of which iOS saved somewhere in the system on the chip.

It happens in such a simple way Touch ID training, the biometric sensor takes additional pictures of your finger and can use them to unlock. Take five to seven minutes to properly scan each of your saved fingers, applying them to the button while in this menu. Every time one of the prints is highlighted, it means that the procedure was successful. Additional scans of your finger will appear in the device’s memory, and Touch ID will work much better, the activation process will be noticeably faster.
We repeat once again: each finger, differently, many times - the result will be noticeable immediately and will remain everyday use Touch ID.
One of the common problems with older Apple smartphone models (iPhone 8 and earlier) is Touch ID failure.
A broken or broken button becomes a serious problem because the fingerprint scanner tied to native motherboard and when replacing the button it will simply refuse to work.
Let's figure out together what types of breakdowns occur most often and how you can correct this or that situation.
Replacing the Home Button Mechanism
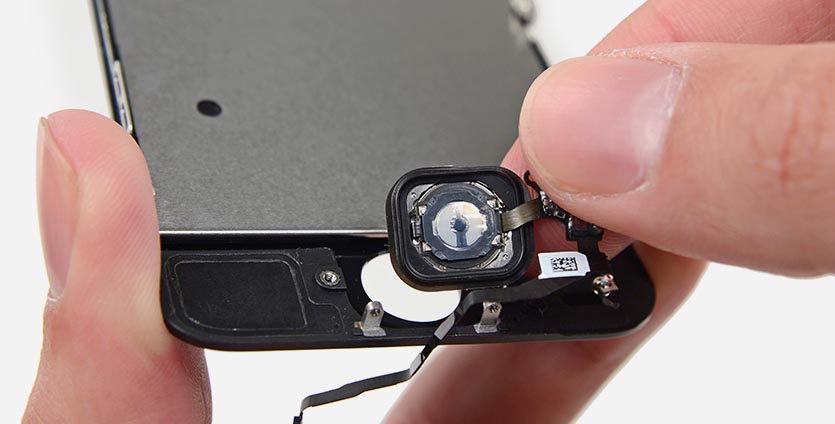
Each physical button has its own resource for the number of operations. So active users of iPhone 5s/6/6s could already exceed it.
A broken button does not work well or does not work at all. There is no click sound and the system may not perform an action.
If the top panel of the key is not damaged and Touch ID is working properly, the button itself can be replaced.
Starting with the iPhone 7, developers abandoned the physical key in favor of a virtual one, and this problem ceased to be relevant.
How much does the repair cost: Repairing a worn click mechanism is possible on iPhone 5s/6/6s/SE and will cost 1000-1500 rub.
The procedure will take up to 30 minutes
Restoring the Touch ID cable

A much more common failure is a broken cable that connects the button and the scanner to motherboard smartphone.
A dozen thin tracks were placed on a cable one and a half centimeters wide and covered with a protective insulating layer.
If the cable is placed incorrectly, undergoes frequent vibrations, or is dropped, the cable may break. This can even occur due to natural wear and tear of the part.
It is almost impossible to replace the cable, but restoring it is difficult, but possible. Many masters undertake a similar procedure and perform it quite efficiently.
Restoration is carried out only if the Touch ID sensor itself is working properly. IN otherwise it is easier to replace the entire button with the loss of the fingerprint scanner functions.
How to repair: restoring the Touch ID cable takes an hour and a half on average, but not every service center takes care of it.
The procedure will cost from 3000 (for iPhone 6) up to 6000 (for iPhone 8) rubles.
Replacing the entire button with loss of Touch ID functionality

If on iPhone models with a physical button it is possible to replace a damaged module, albeit with loss of functionality of the fingerprint scanner, then on iPhone 7/8 models such repair is impossible.
The button is touch sensitive and when installing a non-native component, it is simply not recognized by the device. Won't work both Touch ID and the Home button itself.
The ubiquitous Chinese have found a solution to the problem. This thing from AliExpress can help in such a situation.
Our reader already has a similar solution and is very pleased with it.
At first glance, this is a Chinese button, which is installed instead of the original one on older iPhones with a physical key.
This button is also physical (has a pressable movable button), but with a built-in Bluetooth module. How do you like this?
The key is connected to replace the original one, and after installation it connects to the smartphone via Bluetooth. So, pressing the button is perceived by the system as pressing the Home button and allows you to go to home screen, launch the polysemy panel and take screenshots.
How to repair: buttons like JC home already offer to install in many unofficial service centers. A similar device can be ordered on ALiExpress and you can simply find a competent technician to replace it or pay 1500-2000 rub. in the service.
What can be done without repairs?

As a temporary solution, you can use one of the iOS features - AssistiveTouch. This is a virtual button on the smartphone screen to which you can assign several desired actions at once.
To enable, follow the path Settings – General – Accessibility – AssistiveTouch and activate the main switch.
Below you can set the button action to single or double tap, long press or 3D-Touch. In addition, some of the possibilities may be located in the menu that appears after pressing the button.
This way you can do without a broken Home button for a while.


