How to create a special password on a flash drive. How to put a password on a flash drive - choose a data protection method
From time to time, here and there, news popped up about secure flash drives with hardware encryption. Time passed, the problem grew, and then one day I realized that the time had come. First of all, I opened Yandex Market and, through an advanced search, began to look at what the market offered us. The list of proposals was only a couple of pages long. As I studied the specifics, I highlighted the main requirements. The most important issue, perhaps, became the issue of working without additional programs with any OS. Thus, almost all proposals instantly disappeared from view, since most flash drives, when connected to a PC, launched a built-in program asking for a password and further decrypting the container. And as you would expect, this approach only worked under Windows. As a result, devices with a physical keyboard began to appear in the field of view - you entered the code, inserted it into the USB and you work. Yandex offered only Corsair Flash Padlock 2. But for many security parameters it did not suit me. While searching on the Internet, I was quite surprised by the fact that there is practically no information about this kind of devices in Russian. There was a post on Habré about the amazing IStorage datAshur flash drive. Impressive. But that's not the problem. Such devices are prohibited for sale in Russia. Ebay, Amazon - the search did not give the desired results. And then Aegis Secure Key caught my eye. In appearance and description - one to one datAshur, only from a different company. Ebay - result 0, Amazon - result positive. 16Gb - $125. A month of waiting, notification, queue, joy.
When holding a new toy in your hands for the first time, the first thing you notice is the pleasant weight and slight coolness of the metal case. Smoothly remove the case and... the intercom, covered throughout the entire body with a material similar to a soft touch. 
On the front side there are ten digital buttons, one system button and three LEDs. 
WITH reverse side - useful information, which tells us that the flash drive is 16gb, uses AES 256 bit encryption, and is powered by a lithium-polymer battery, which is recharged via USB. Despite the fact that the specifications indicate protection from water and shock, I am not ready to test this yet. 
Let's return to the button panel. Despite the fact that the physical dimensions of the flash drive are 80x20x10 mm (including the case), the buttons turned out to be very successful, of sufficient size, 5x5 mm. Since my fingers are not large, pressing the buttons does not cause any difficulties. The buttons have a fairly tight, tactile action. Pressing is felt well with a slight click. The material of the buttons is made of good, hard rubber, which does not leave marks (dents) from hard objects, such as nails.
Well, it's time to see how it works! We plug it into usb..., the red LED blinks several times, then the blue LED blinks constantly and... oh, usb device not identified. 
Open the instructions, find out the factory password, press the key, enter 11223344 and the key again. The green LED flashed in a friendly manner and now we have 30 seconds to connect the drive to the port. Installing new equipment, 10 seconds and a window with task selection. Open properties. 
We are trying to upload a movie weighing 700MB. Speed starts from 42Mb/s and ends at 21Mb/s. The reading speed does not exceed 12MB/s. Apparently decoding on the fly takes its toll. Neither fat32 nor ntfs make a significant difference.
Hack:
Checking brute force protection. We make 10 incorrect attempts and the red LED lights up without blinking, it doesn’t allow us to try to enter the codes anymore. Programming New Password, connect to usb and voila, we are asked to format the disk.
Of course, I won’t open the flash drive, so we’ll trust the manufacturer. According to the manufacturer, everything inside is coated with a tough epoxy resin that will destroy the chip if you try to remove it.
Thermorectal cryptanalysis? As far as I understand, there is no way to configure the data deletion code...
Bottom line.
Quite a high-quality and reliable product, relatively inexpensive, compact and stylish. Excellent data protection if your device is lost or stolen. I wanted to try to partition it and see what happens, but hard drive programs don’t see it. I'll be glad to answer your questions.
Instructions
Before transferring personal data and passwords to a flash drive, you should ensure that the media is securely protected. The type of protection largely depends on what information and in what form needs to be protected. If you just need to protect a few files from prying eyes, you can use the usual WinRar archiver program. This method is well suited when you need to transfer information through third parties once and at the same time protect the transmitted data from the casual curiosity of strangers.
To do this, you need to create a separate new folder, into which to transfer the protected files. Then, clicking on it right click mouse, select “Add to archive” in the context menu that appears. In the window that opens, you need to go to the “Advanced” tab, on which there will be the “Set password” option. After that, you need to enter the password twice in the provided field and, for reliability, check the “Encrypt file names” checkbox. The password can be sent via SMS or e-mail to the final recipient. This method is not very reliable, but is convenient for one-time cases due to its simplicity.
A more serious security option involves setting a password for the entire flash drive at once. This is a more complex method and requires the use of special software, but its high and long-term use justifies all the efforts. The principle of its operation is based on the creation of an encrypted virtual disk (volume) on a flash drive, which looks like a regular single file before entering the password. The big advantage of an encrypted disk is that it cannot be viewed from the outside, and it is impossible to know which directories are inside.
There are several programs that create virtual encrypted disks. The most convenient of them today is probably the TrueCrypt program. It can be downloaded from the manufacturer’s website ( http://www.truecrypt.org/downloads). The program is in English, so it’s more convenient to immediately install the crack, which can also be downloaded on the website ( http://www.truecrypt.org/localizations). TrueCrypt is initially best installed on your computer's hard drive rather than directly on a flash drive. The program is unpacked and installed automatically, without requiring any special settings.
After installing TrueCrypt on your hard drive, you need to launch it and insert your flash drive into the USB port. First of all, the flash drive will have to be formatted, so you should take care in advance to save the information on it. After formatting, start creating virtual disk. On the menu TrueCrypt programs select “Create an encrypted file container” and then “Regular volume”.
The program will ask for the address to place the volume. Select your flash drive from the “File” menu (usually drive E) and give the new volume a name (any name you like). The volume size should be slightly less than the size of the flash drive. Next, when prompted by the program, enter your password. To avoid mistakes when re-entering your password, it is convenient to use the “Show password” option. As a result, the flash drive will contain an encrypted container in the form of a single file in which any information can be stored. After entering the password, it opens like a regular logical drive.
Many of us have had to store our family photos and other valuable files on a flash drive. It is not uncommon for such incidents to happen when the carrier is lost and falls into the wrong hands. Therefore, in order to protect their data from prying eyes, every user simply needs to know how to put a password on a flash drive.
There are at least three ways to protect information on a flash drive:
- Standard operating system tools.
- With the help third party applications(utilities).
- The hardware of the device itself.
Let's take a closer look at each of the methods.
Standard OS tools
From standard means in practice, only two simple, proven methods of protecting data on a flash drive are most often used.
- Password-protected archive
- BitLocker utility
Password-protected archive
If the data on the flash drive does not have a large volume, then it is quite possible to protect it with a password, having previously archived it. The standard WinRAR archiver is perfect for this.
Having selected a folder for packaging, we carry out the archiving process. After completing the process, you need to go to the menu by tabs: Advanced – Set password.


When the password is entered and the appropriate checkbox is set, all that remains is to click on the OK button.
Please note that putting a password on winrar archive you can only during the archiving process. That is, it is not possible to set a password on a finished archive.
More detailed information You can find information about the procedure for setting a password on our website in the article:
Using BitLocker Windows
BitLocker Windows is an integral part of the operating system. Windows systems, starting with Seven. Moreover, BitLocker is built into the Ultimate and Enterprise versions, as well as Windows Server 2008 R2, Windows 8, 8.1 and Windows 10. Unfortunately, in home Windows versions BitLocker utility is missing.
Once you make sure that BitLocker is on your system, setting a password on the flash drive will be very simple:
- Just right-click on it and select the item in the context menu that appears "Enable BitLocker".

- Next, check the box next to “Use a password to unlock the disk” and enter the password twice.
Please note that the password must be at least 8 characters long

- Next, you need to save to a file or print the recovery key, which you will need if you decide to change your password.

- After saving the key, you can click “Next” and begin encryption.

- Click “Start encryption” and wait for the operation to complete.

If you want to pause the process, you can use the “Pause” button.

This completes the process of setting a password on the flash drive. Now, when you insert a flash drive into the device, you will be asked to enter a password to unlock it.

Third Party Applications
Programmers have released many of the most different programs, which allow you to organize high-quality data protection on flash drives. Here are just a few of them:
Rohos Mini Drive
With this compact and free utility You can effectively password protect a specific partition on your drive. Alas, it is impossible to “lock” the entire drive with its help. A special feature of this utility is that it creates a special partition on the flash drive where it writes protected data. Free version Rohos Mini Drive can work with 8 gigabytes of information.
- After starting the program, click "Encrypt USB drive"

- Rohos Mini Drive independently identifies the flash drive. Select an item: "Disk Options".

- Next, set the drive size and letter. It is better to choose a file system like a flash drive. Press OK to confirm your selections.

- At this stage, enter the password twice and click “Create Disk”.

- Now a password-protected sector will appear on your flash drive. To gain access to this sector you need to run one of the files: run the file "Rohos mini.exe" if the utility is installed on this computer or "Rohos Disk Portable.exe" if this utility is not on your computer.

- After starting the program, all you have to do is enter your password and press "OK".

- The protected drive will appear in the list of hard drives. You can transfer your most valuable data to it.

To hide our secret drive (in our example, drive R) we find the icon in the tray Rohos programs, right-click on it and turn off the disk.

To protect yourself in case you forget your password, we recommend creating a password reset file. To do this you need to do the following:
- Open the Rohos disk and select "Create backup copy» .

- Select an item "Password reset file".

- Next, in the window that opens, enter the password that you created when creating the disk, click "Create file" and choose a location to save it on your computer.

USB Flash Security
Another free program, easy to learn, with a minimum number of settings. However, it allows you to effectively protect data on a flash drive using a password.
To download this utility, go to the website: and download the program by clicking on the button: "Download Free edition(up to 4GB,v4.1.13.19)"
After launching the program itself will determine the capacity of the flash drive, its volume and file system. All you have to do is press the button "Install"

Next, a warning will appear that during the operation on the flash drive, all data will be destroyed, so transfer it to your computer in advance. Of course, this will create certain inconveniences when working with a flash drive, but this is the peculiarity of this program.


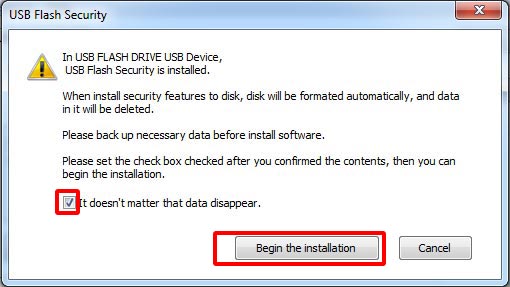
A window will appear again warning you that the disk will be formatted and all data will be deleted. You need to check the box and press the button "Begin the installation".
Now your flash drive will be displayed in the section: “Devices with removable media”

When you open the flash drive, you will find the file “UsbEnter.exe” that you need to run.

In the window that appears, you need to enter your password and click “OK.”

Now your flash drive has acquired secret status, and you can transfer the corresponding files to it.
Hardware protection
There are models of flash drives that are equipped with their own password encryption devices. Directly on the body of such devices there are control keys, with which you can set the desired password.

The cost of such devices, of course, is quite high. But sometimes the value of data significantly exceeds the cost of the drive on which it is recorded. Depending on the drive model and settings, data may be immediately erased through formatting if an attempt is made to gain unauthorized access to it.
Resume
What conclusion did I come to after testing all of the above methods for setting a password on a flash drive? Of the utilities, in my opinion, Rohos Mini Drive performed better. Reliable program. The distribution can be easily downloaded from the developer's website. Suitable for all versions of Windows, including home ones. If you suddenly decide not to use Rohos Mini Drive anymore, the system will allow you to safely remove it.
In this review I wanted to look at another, once very popular disk encryption program, TrueCrypt. Unfortunately, the creators of the program announced in May 2014 that they could not guarantee security when using the application and recommended switching to BitLocker.
Therefore, based on the above, a simple conclusion arises. We use the Rohos Mini Drive utility if you have a home version of Windows, or the BitLocker program if your computer has a more advanced system installed and you don’t want to bother installing additional utilities.
Each of us has had cases when it was necessary to hide personal information from prying eyes. This is especially important if it is stored on a flash drive, which is so easy to forget, leave, or lose somewhere, and then a random passer-by may suddenly become the owner of something that you would like to keep with you. You can avoid this in a simple and reliable way - set a password on the flash drive.
This is very easy to do, you only need a built-in Windows utility. It's called BitLocker. However, you need to remember that not all versions of Windows will allow you to use it. Only Windows 7 Enterprise and Windows 7 Ultimate will allow you to do this, as well as later versions of Windows.
Start coding
Let's take the flash drive and get started. Mine is 8GB.
In the file explorer (My Computer) we find our flash drive and right-click. Will open context menu. In it we look for the BitLocker item. If you find it, then everything is fine, but if it’s not there, then this method Data protection will not work for you, since the operating system does not support it - you will not be able to set a password.

In the window that appears, select “Use a password to unlock the flash drive.” Next, enter a password consisting of at least 8 characters with the obligatory inclusion of not only letters, but also numbers, otherwise the system will not accept it.

By clicking “next” we will see that the system offers us to save the recovery key, which will be useful for decrypting data if the password is suddenly forgotten. There are three options to choose from: save the key to your Microsoft account (for Windows 8.1), save it to a file, or print it on paper - as is convenient for you. I chose to save to file.

A standard file saving window appears. Everything is clear here - select a location, save button. We check whether the file with the recovery key has appeared.

The next step is to select the part of the disk that you want to encrypt. It also explains which item and why you should choose. For new flash drives, select “Encrypt only used disk space,” which is what I did.
The final step is to confirm the start of encryption.

The process has begun. All that remains is to wait for the encryption to complete.

After some time, depending on what part of the flash drive you are encrypting and the amount of information on it, you will see the message “Encryption complete.”

Now when reconnection flash drive, it can only be opened after entering the password, as evidenced by the padlock that appears on the icon.

When we try to open the flash drive, we see an unlock window. No one except you can move forward.
After entering the password, the lock opens and we can work with the storage medium as before, and all new files that you add to the flash drive will be tightly encrypted and protected from unauthorized access.

In this way you can protect your confidential information from intruders and just strangers. BitLocker works not only with flash drives, but also with hard drives, both external and built-in.
The era of laser discs is gradually becoming history, because they have been almost completely replaced by portable storage devices - flash drives and memory cards. Compared to the former, they have many more advantages than disadvantages: firstly, they are much more compact; secondly, they store much more information; the entire memory capacity can reach hundreds of gigabytes; thirdly, they are reusable, unlike the same disks on which information can be written only once; and fourthly, they are much more reliable than most storage media. Experiments were conducted during which flash drives were subjected to various tests. The result is impressive - they are almost impossible to spoil.
It is logical that many people use this storage medium as a storage for important documents and files. You can carry a flash drive with you all the time; it does not take up much space. But the most important thing is that the data on it can be reliably protected. How? Various users they solve this issue in their own way: they place important documents in an archive and put a password on it, some encrypt a separate folder, and some completely protect the portable drive with a password. One of the most simple options- set an access password, without knowing which it will be completely impossible to read the information stored on it.
In this material we will look at how to put a password on a flash drive. We'll find out everything possible options: built-in Windows features, free special utilities, as well as special drive models.
Windows Standard Tools
If you are using Windows 7 or older, you generally don't have to think about using third party programs, because you can take advantage of the excellent built-in BitLocker encryption mode. How can he help you?

- Insert the flash drive into the USB connector, then go to Windows Explorer and find your drive in the list of drives and devices.
- Right-click on it and select “Enable BitLocker.”
- The encryption wizard will open and prompt you to enter a security password. Check the appropriate box and then enter the combination. Choose strong password, at least 10 characters long, containing numbers, letters, spaces, and symbols.
- The next step will ask you to create a recovery key. It can be linked to an account Microsoft entry, save in text file or print it out. It is needed so that you can access your files even if you forget your password.
- After this, specify the type of encryption: the entire flash drive or only the part on which the files are located. They differ only in the speed of operation.
- Depending on the size of the flash drive and the power of the computer, after a maximum of a few minutes you will see a system notification about the end of encryption. Click the “Close” button, then remove and then reinsert the drive into the computer connector.
- Pay attention to how the flash drive is displayed in the list of disks - there will be an image of a lock on it. Double-click on the disk and then enter your password. Until you enter it, you will not be able to view any information about the drive at all.
Using special utilities
If you use more old Windows XP or you are simply not satisfied with something standard program BitLocker encryption, use one of free programs presented below. Their essence is simple - to encrypt the contents of either an entire flash drive or separate file, or folders. Let's get to know the best utilities for encryption.
Rohos Mini Drive
The most popular encryption program external drives or any data on your computer's hard drive. The work is based on the creation of a protected partition, encrypted with the incredibly reliable AES algorithm with a 256-bit key. The program is completely free, but will have some limitations. For example, the maximum partition size is 8 GB. In most cases, this is completely enough, but if it’s not enough for you, purchase the paid version. How to use this software product?

- Go to the developer's website using this link http://www.rohos.ru/products/rohos-mini-drive/ to download the installation file. There will be three utilities presented on the page; you need to download the first one from the list.
- Next you will need to install the utility on hard drive your computer, then insert the USB flash drive and run.
- There are 4 buttons available in the program menu: “Encrypt USB drive”, “Encrypt application”, “Customize options” and “Create a backup copy”. Click "Encrypt USB Drive".
- In the window that opens, you need to enter your password, and you can also change the drive letter, file system, and size of the encrypted partition. Come up with a reliable combination, but one that you won’t quickly forget.
- After some time, the system will display a virtual disk, and in the root of the memory card you will be able to see two files: Rohos Mini.exe and Rohos Mini Drive (Portable).exe. They are necessary in order to be able to access the encrypted partition on any computer.
- Now, to put the information on the encrypted partition, copy the desired files to the virtual drive that appears in Explorer as “Hidden Drive.”
Everything is implemented very conveniently, since the files will be accessible only if the encrypted partition is connected and the access password is entered. From the main menu of the program, you can disable and enable the section as needed, and if you no longer need it, delete it altogether. For quick access to the utility, go to the system tray and click on the icon in the form of a yellow rectangle with a padlock.
USB Safeguard
Light and very simple program to set a password on a flash drive or memory card. It is distributed in two versions: free and paid. The free version will work with media that has maximum volume 4 gigabytes, while the paid version supports any drive up to 16 terabytes. How to put a password on a flash drive using the utility? Follow these steps:

- Go to the official website http://www.usbsafeguard.com/download.html and download the installation file for the free or paid version.
- Copy the installation file to the root of the flash drive or memory card and run it by double clicking the mouse.
- First of all, the program will offer to format the drive in NTFS format. Please remember that this will delete all data. If the flash drive is already formatted in NTFS, check the Don’t format box.
- After formatting is completed, click Finish and also agree to the terms license agreement by clicking the I agree button.
- In the next step, you need to enter a created password of at least 6 characters and confirm it.
- To access the encrypted drive, run the USBSafeguard.exe file located in the root of the flash drive, enter the password you created earlier, and click the Open button.
In the future, you will only be able to read encrypted files after entering the password. You can burn files by going to virtual disk Z in Explorer.
Hardware protection from the manufacturer
There are drive models with a built-in protection system. Such accessories are not cheap, but if you regularly need to store secret information, you can spend the money once. Their feature is the presence numeric keypad to enter the unlock code, which will need to be set upon the very first use. This option allows you to very reliably protect secret information, because it is encrypted in real time using the built-in processor, and due to the absence of a special software the chance of keyboard interception or hacking is negated.
Conclusions
IN modern world The issue of information security is very important. Therefore, if you need to store encrypted information on a flash drive, use one of the options described above. But which method might be the most suitable?
BitLocker. The simplest one, because it does not require installation or downloading special utilities. One of the disadvantages is that it only supports Windows, so you are unlikely to be able to view encrypted information on other operating systems. In addition, the function is implemented only on maximum versions of Windows.
Third party programs. A good option in the absence of BitLocker, but you may be faced with the need to purchase a paid version of the program, since free ones may have a number of limitations. Like the previous option, there may be a problem accessing files on computers with operating system, other than Windows.
Hardware protection from the manufacturer. The most expensive, but at the same time the most reliable option, suitable even for employees of large companies with access to secret data. It can only be hacked by physical force on the owner of the device.
Which option did you choose for yourself? Tell us about it in the comments.


