How to fill the background in Photoshop cs5. Getting Started in Photoshop - Quick Selections and Fills
When editing or creating images, you may often need to fill certain areas on the canvas, layer, background, or gradient with the editor's tool. Even the simplest graphic editors have such a tool, but additional settings maybe not enough.
In the case of the popular Photoshop program, the situation is different: it has everything necessary for the user to work comfortably with pictures. In this article we will tell you how to fill in Photoshop.
There are two tools for filling in Photoshop:
“Filling” – used when you need to apply paint evenly to a specified area (for example, to create a background or sketch objects);
Gradient is a useful tool for creating subtle and smooth transitions from one color to another. This is done by gradually changing shades in the right place in the work area.
You can find the tools in the left sidebar. Click on the icon (usually located under the eraser) with a tilted bucket with paint flowing out of it. In the menu that opens, you can select one of the named tools.

It is clear that for different situations you will need a different filling option. And this applies not only to the correct choice of tool, but also to the correct settings additional parameters. Below we will look at everything that may be useful when applying color to an image.
How to customize the Fill tool
It is very simple to apply; Just click on the appropriate item in the toolbar, and then click on the area that you want to fill with color.
The main parameters are located on the top panel in the area of the activated tool:
1. “Selecting a source.” Allows you to specify the fill type: solid or patterned.

2. "Mode". In the list provided, you can activate one of the paint application options.

3. “Opacity level.” By decreasing or increasing this value you change the percentage of transparency of the tool.

4. "Admission". Here you can change the range of similarity of shades, which, together with the active value “Adjacent. pixels" to fill areas within the tolerance.

5. "Smoothing". A useful addition, with the help of which the transitions between the areas processed and unprocessed by tools will be less noticeable and sharp.

6. “All layers.” Processing all existing layers in the picture.

How to make a gradient
Step-by-step instructions for performing a simple gradient fill:
1. Select the area on the working part of the screen that you want to process.

2. Activate "Gradient" in the left sidebar.

3. In the “Color Picker” window, set the main color and transition color.

4. The top panel also has a whole list of additional options such as inversion, opacity, modes, dither, etc.
5. After setting all the necessary parameters, hold LMB on the selected area and draw a straight line.

6. When to let go left button, the gradient will fill the selection.

By the way, the longer the line, the smoother the transition, and it is not so noticeable.
Painting with a pattern
By default, the tool paints with the color specified in the main color of the palette. But you can also paint over areas with a pattern. Let's try it.
Create any blank document and draw a closed shape.
Now look at the top menu and below it you will see the Fill Tool properties. There you will see a button that says “Primary Color”. Click on it and select “Pattern” from the drop-down menu. Don't worry. You won't get lost, as there are only 2 points. Found it? Well great.
To the right of the button you will see a thumbnail of the pattern. Click on it and a drop-down list with other patterns will open. There are not many of them, but you can add them.
To add patterns, you need to click on the gear in the patterns menu. And select new sets of patterns in the drop-down menu. Choose any, for example natural patterns. And when a sign pops up in front of you with the question “Replace blah blah blah?”, then click on the “Add” button.
Now select any of the patterns by left-clicking on it twice and clicking in the center of the drawn circle. Well? What happened? Is the circle painted with a new texture rather than the usual color? Of course yes!
Tolerance
Many instruments have such a property as tolerance. And everywhere this tolerance works approximately the same.
The smaller the tolerance, the smaller the color range of the painted area. Those. if the tolerance is 0 and you want to paint with white on a blue-blue background, then only the shade that you clicked on initially will be filled, and of course all the exact same shades do not deviate one gram from the norm. And if the tolerance is maximum (255), then the fill will paint over the entire canvas without exception.
Let's look at an example, and then you can experiment for yourself. Let's take a square as a basis, which changes its color smoothly from yellow to white. Let's try to set different tolerance values and paint them black.
As you can see, the greater the access, the more he uses the range of colors that he considers native and the more colors and shades he paints.
How to change color using fill
The process of color correction of images, when the main color of the background or some object is changed, in principle is not accompanied by any particular difficulties. A novice designer, having figured out where the fill is located in Photoshop cs6, can safely begin his first practical experience. It is enough to make adjustments to several photos, following the recommendations of experienced graphic designers, and every detail will become clear, and the process of improving the image will begin to be perceived differently, accompanied by creativity and increased interest.
Recommendations on how to change the fill
The user must first decide in which specific area it is planned to change the color, that is, fill. This area needs to be selected using some Lasso or Rectangular Marquee tools.
After selecting the desired area, you can right-click and select “Fill” in the window that opens, or immediately activate the fill mode in the menu bar.
Now appears additional panel, which allows you to make changes to the parameters of the corresponding tool. In particular, the area can be filled with an even, monochromatic layer of color, or a pattern with several color shades can be applied to it.
In the horizontal settings panel, you should select the main color, and then immediately proceed to selecting the desired pattern. You can also take advantage of other offers on the same panel. In particular, you can make the fill opaque, and also use the color proximity mode.
If you run a function such as “Smoothing”, a smooth transition will be made from the painted area to the unpainted one.
It’s quite interesting to figure out how to fill certain areas in Photoshop cs6 using the Gradient tool. Initially, you should also highlight the area you plan to work on. After that, activate the Gradient tool.
In the tool settings, you should select the main color and the color with which you plan to color individual parts of the background.
Now, using the left mouse button, you should draw a straight line of arbitrary length, acting as the boundary of the color transition. However, it is important to understand that the longer this line is, the less noticeable the color transition will be.
Methods for filling a layer with color
Method 1
Menu command Editing - Fill, or pressing a combination of hot keys that duplicate this command:
Hotkey combination: Shift+F5
The Fill dialog box opens. In it, in the Use drop-down list, select Color. The color selection palette will immediately open. Decide on a color and click OK.
Method 2
Using the Alt+Backspace key combination, the layer is filled with the main color set on the tool palette - Foreground and background color indicators.
Method 3 Fill Tool
From the toolbar, select the Paint Fill tool. Click on the layer and it will immediately be painted with the main color (see example above).
Important!
Filling works when there is nothing extra on the layer. Otherwise, the tool will paint only certain areas.
Method 4 Brush Tool
I remember when I first started learning Photoshop, I used exactly this method. The idea is that you simply paint over the layer with a brush, like Tom Sawyer painted a fence.
All of the above methods have one common drawback - in cases where you need to increase the size of the canvas, the layer filled with color will not increase. The part of the canvas that was added will be painted over automatically with the background color.
Example. Initially, the layer was filled with yellow paint. After enlarging the canvas, a reddish color was added along the outline, in accordance with what was displayed on the background color indicator.
To prevent this, you need to use the following method.
Method 5 Fill layer
Execute the command Layer - New Fill Layer - Color. You can immediately click OK. After this, a fill color selection palette will appear. Make a choice.
After all the actions, an independent type of layers will appear in the Layers palette - a fill layer.
If you double-click on the layer thumbnail, a color selection window will appear. This way, changing colors will be a breeze.
In addition, pay attention to the mask. You can use it to hide part of the fill for artistic purposes.
Once this procedure is complete, you can again adjust the fill area settings by adjusting the opacity level, style, and blending method.
Filling a layer with color is a simple and popular operation in Photoshop. This may need to be done when you need a plain background or to apply some shade over the image - toning, for example, using a layer with yellow color to create a sepia effect.
In order to make a layer completely one color, I counted 5 possible ways.
Methods for filling a layer with color
Method 1
Menu command Editing - Fill(Fill) , or pressing a combination of hot keys that duplicates this command:
Hotkey combination: Shift+F5
A dialog box will open Fill in. In it, in the drop-down list Use select Color. The color selection palette will immediately open. Decide on a color and click OK.
Method 2
Using the Alt+Backspace key combination, the layer is filled with the main color set on the tool palette - .

Method 3 Fill Tool
From the toolbar, select Fill tool. Click on the layer and it will immediately be painted with the main color (see example above).
Filling works when there is nothing extra on the layer. Otherwise, the tool will paint only certain areas.
I remember when I first started learning Photoshop, I used exactly this method. The idea is that you simply paint over the layer with a brush, like Tom Sawyer painted a fence.
All of the above methods have one common drawback - in cases where it is necessary, the layer filled with color will not increase. The part of the canvas that was added will be painted over automatically with the background color.
Example. Initially, the layer was filled with yellow paint. After enlarging the canvas, a reddish color was added along the outline, in accordance with what was displayed on the background color indicator.

To prevent this, you need to use the following method.
Method 5 Fill layer
Run the command Layer - New Fill Layer(New Fill Layer) - Color. You can immediately click OK. After this, a fill color selection palette will appear. Make a choice.
One of the most common things you'll do with a new layer is fill it with color. Whether you've hidden the original background of your image or added an interesting effect to the borders of your design, for example you can spice them up even more by adding a solid-colored background, Photoshop offers several in various ways solutions to this problem:
Fill an existing layer with color. After you create a new layer, select the menu command "Editing - Fill". In the dropdown list "Use" When the Fill dialog box appears, select a color, and then click OK. You can also fill with a foreground color by pressing Alt+Backspace.
Create a fill layer. If you're not sure what color you want to use, choose the New Fill Layer menu command and choose Color. Give the layer a name in the dialog box that appears and click OK. Photoshop will display the Color Picker dialog box so you can select the fill color you want. If you decide to change the color, double-click on the thumbnail and the dialog box will re-open so you can choose a new color or grab one from the image itself. Fill layers are created with their own masks, and therefore, if necessary, it will be very easy to hide part of the layer.


Note
Dragging a new fill layer down the list allows you to create a solid background of the image. If you want to change the color, double-click the thumbnail to open the Color Picker dialog box.
If you want to get creative, you can grab colors from an image by moving your mouse over it while the dialog box is open (the mouse pointer will change to an eyedropper shape). Click to select the color you want, and then click OK.
Finally, if for some reason you need to hide part of the new color (say, to create a fade effect), paint over the attached layer mask.
One of the many advantages of using fill layers is that, unlike regular layers, they fill with color. all layer, even if you enlarge the canvas. They can be used not only to create a solid background, but also to fill with a gradient or repeating pattern.
If you notice an error in the text, select it and press Ctrl + Enter. Thank you!
Good day everyone, dear readers of my blog. How are you? Are you ready for work and defense? Great. We have learned, but what if you need to paint over some area? Are we really going to puff ourselves up to carefully paint over the area with a brush, trying not to touch the borders? Of course not.
One very interesting tool will help us completely paint over an object in one click. Just today I will tell you how to make a fill in Photoshop using the tool of the same name.
What exactly does the fill tool do in Photoshop? Yes, it's quite simple. He paints the area you want. But here we need to take into account various factors. In general, am I telling you some kind of naked theory? Let's look at specific example.
So, let's go!
Simple fill
In general, since the inside of the circle was completely white, and the background outside was also completely white, the entire area would be filled until it encountered an obstacle, such as the third and fourth circles.
Now take another color of any color and fill the area where the circle intersects. Only this area of intersection is painted over. But why? After all, we drew 2 different circles? Yes, because we drew them on one layer, so they are considered a single whole. Now, if two circles were drawn on two layers, then it would be a different matter. One of the circles (on the active layer) would be completely painted over. But it’s better to read about layers.
I just noticed that I have these two circles with a filled red area in the center, they look like an eye with a red pupil))).
Painting with a pattern
By default, the tool paints with the color specified in the main color of the palette. But you can also paint over areas with a pattern. Let's try it.

Tolerance
Many instruments have such a property as tolerance. And everywhere this tolerance works approximately the same.
The smaller the tolerance, the smaller the color range of the painted area. Those. if tolerance 0 and you want to paint with white on a blue-blue background, then only the shade that you clicked on initially will be filled, and of course all the exact same shades do not deviate one gram from the norm. And if the tolerance is maximum ( 255 ), then the fill will paint over the entire canvas without exception.
Let's look at an example, and then you can experiment for yourself. Let's take a square as a basis, which changes its color smoothly from yellow to white. Let's try to set different tolerance values and paint them black.

As you can see, the greater the access, the more he uses the range of colors that he considers native and the more colors and shades he paints. I hope you get the gist. Got it? If not, then ask. I'll answer.

By the way
Finally, I want to tell you about one more point. It is not necessary to fill any drawing with color. You can simply fill the area.
To do this, select some area (I chose ) and draw a selection on a white background.

Now I pick up the fill again and choose any color. The selection hasn't gone away, and that's great. Then fill in what is inside the selection outline in a way already known to us. Hop! And you're done. Here's a little trick.

Well, although these are not all the properties, they will be quite enough for you. If you want to study Photoshop more thoroughly and in detail, and also “swim” in it like a fish in water, then I highly recommend that you check out this video course. I haven't seen anything better yet. If only I had it before, then studying this graphic editor It would have been much easier for me. Overall I highly recommend it.
Well, I’m finishing our lesson for today, dear friends. I hope that the article was useful to you and I strongly recommend subscribing to my blog updates, then you will not miss the release of new and useful articles, as well as various news and competitions.
Good luck with your studies. The main thing is not to philander). See you in the next lessons. Bye bye!
Best regards, Dmitry Kostin.
1 voteGood day, dear readers of my blog. The background is one of the most important elements of a picture. Thanks to it, you can turn even the most unimportant photo into a stylish and modern one. This is not difficult to do even for a beginner with minimal knowledge Photoshop programs.
Today I will tell you how to fill a background in Photoshop in four ways, I will show you what tools to use for quick results, the highest quality, and I will give you a few useful recommendations to make the picture look more professional.

Let's get started?
Fill Tool
If you want to fill in the background on a finished photo, then you won’t succeed until you get rid of what you already have background. There are several ways to do this. I recommend that you first understand the fill by working with the current publications and a “clean” document, and then read the article on my blog about how to work with png.
Create a new document through the “File” - “New” menu.

In Photoshop, some tools are located on the same button. Like, for example, “Gradient” and “Fill”. To open an additional menu, you just need to hold down the left mouse button for a few seconds, it will open and you can select what you need.
Since I use it myself latest version Photoshop CC, then I also have the 3D Material Selector. To be honest, I have never used this function.
If you want to fill the document with one color, then you will need a regular “Fill”.

Just below, in the same panel you can see two colors. One on top is the current one that you are using now, to the second, bottom, you have the opportunity quick access. You can switch between them using the arrows in the upper right corner, and the thumbnail in the lower left allows you to switch to the most common and frequently used ones - black and white.
In addition, some two-color filters, for example, “Clouds,” are displayed in the color scheme that you have set in this menu, but that’s a completely different story.

Click on the top color with the left mouse button and you will see additional window choice. First, in the strip on the right you choose the main color, and in the square on the left you decide on the shade. Then click “Ok” to apply the changes.

Click the mouse anywhere in the working field with the picture and the background changes its color to the one you just selected. 
Applying filters
In nature there is never one clear color; there are shades, tints, shadows, some kind of texture or highlights. Therefore, simply filling a priori cannot please our eyes.
Usually I at least add “Noise” to the background. You can open the filter gallery and try one or another option in practice to understand what it looks like. Or just use my diagram. In one of my articles I talked about this, perhaps this article will be useful to you.
Select Noise and then Add Noise.

Almost any filter has a preview function; click on the checkbox and see how the changes are reflected in your photo. In the case of noise, all you have to do is move the slider to achieve the best result.
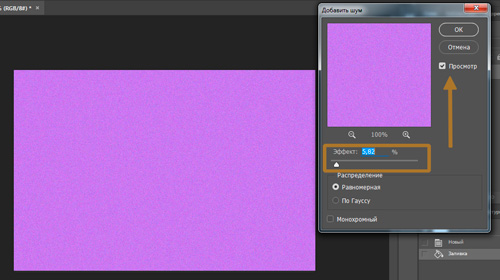
This is the result I got. For some colors I also use the “Blur” filter - “Gaussian Blur”, but in the case of purple this is unnecessary. But this might be useful to you. Try it yourself.

I noticed that not many people use History, which shows all the actions taken by the user. It’s a shame, because it’s very convenient. One click on a specific step takes you back to the point where you performed it.
Open "Window", check the box next to "History" and place it in the bottom panel on the right.

Now, to go back to the beginning, I just need to click on “New” and all the colors and noise will be removed. You can start over

Gradient Tool
Open the folder containing the image and drag it into working window.

All that's left to do is stretch it. There's nothing complicated about it. But you can read the article about: Perhaps you will learn something new.

Well, that's almost all.
Video instructions
After I wrote the article, I thought some of you might be interested in collages. That is, you have some kind of base, and on top you will add a picture as a background. When creating the video, I immediately placed an object in the center of the image. IN in this case product page from AliExpress - Telescope for phone .
To fill the background, you just need to activate the background, click on it. Then all changes will be applied not to the object itself, but to the back layer. Well, I think you will understand when you see the video. I deliberately did not cut anything out of it.
You can see what difficulties I encountered during my work.
If you liked this article, subscribe to the newsletter and learn more about Photoshop. Well, if you want to learn how to work with the program professionally and know everything about its tools and capabilities, I can recommend the video course “ Photoshop from scratch in video format ».

You no longer have to look for answers on the Internet. If you know what tools and what can be done, then solutions will appear to you by themselves. This is what distinguishes professionals.
Well, that's all. See you again and good luck.


