Let's start working with VirtualBox (for dummies). Installing and configuring a program for working with virtual machines - Oracle VirtualBox Why virtualbox is not installed on Windows 10
VirtualBox is an intuitive program to use. If you are not interested in theory and want to immediately start practicing, then refer to the instructions for using VirtualBox to install and run operating systems in a virtual computer:
- Installing Linux on a virtual computer (using Linux Mint as an example)
This series of articles discusses in detail the capabilities of VirtualBox, and also gives detailed description its options. This material is recommended for you if you want to thoroughly understand VirtualBox, and also if you have any problems or questions that you cannot solve on your own.
What is virtualization and its usefulness
VirtualBox is a program that allows you to run multiple operating systems simultaneously on one computer. These operating systems may include Linux, Windows, Mac and others. VirtualBox itself also works on various systems(is cross-platform).
This means that with the help of VirtualBox, being, for example, in Windows, you can, without rebooting the computer or even installing another OS on a real computer, boot into Linux and work with any Linux applications as if you had an operating system installed Linux system. You can, for example, run other versions of Windows to test settings and programs that you don't want to run on your main operating system.
Virtualization (running operating systems inside virtual computers using VirtualBox) has a number of useful features:
- simultaneous launch of several operating systems - you can get acquainted with new operating systems without turning off your main system;
- separation of real and virtual computers - when working in a virtual OS, there is no need to be afraid of erasing the bootloader, losing files, or in any way harming your main operating system, since the virtual system is completely separated from your main system. No matter what mistakes you make in the virtual computer, your main OS will always remain intact. For this reason, a virtual computer is suitable for conducting various tests, including those that can harm the OS; for example, in a virtual computer you can analyze malware (viruses) without fear for the main system;
- ease of installation software- if you are on Windows and you need to work with a program that only runs on Linux, then instead of the tedious task of trying to run the program on someone else's OS, you can very easily deploy a Linux virtual machine and work with the desired program from there. Or vice versa, if you are on Linux you can create a Windows virtual machine to work with Windows programs without having to try to run them on Linux;
- the ability to roll back changes made - you don’t need to be afraid of doing anything wrong in a virtual computer, since you can take any number of “snapshots” of the system at any time and, if desired, return to any of them;
- infrastructure consolidation - virtualization can significantly reduce hardware and electricity costs; Today, most of the time, computers during their operation use only a part of their potential capabilities and, on average, are loaded system resources is low. A large amount of hardware resources as well as electricity is wasted. So instead of running large quantity physical computers that are only partially used, you can pack many virtual machines onto several powerful hosts and balance the loads between them.
VirtualBox Concepts
When talking about virtualization (and also to understand further information), it is useful to become familiar with the terminology, we will especially often encounter the following terms:
Host operating system (host system).
This is the operating system of the physical computer on which VirtualBox was installed. There are versions of VirtualBox for Windows, Mac OS X, Linux and Solaris.
Guest operating system (guest OS).
This is an operating system that runs inside a virtual machine. In theory, VirtualBox can run any x86 operating system (DOS, Windows, OS/2, FreeBSD, OpenBSD).
Virtual machine (VM).
This is a special environment that VirtualBox creates for your guest operating system while it is running. In other words, you are running the guest operating system "in" virtual machine. Typically the VM will appear as a window on your computer's desktop, but depending on which of the various VirtualBox interfaces you use, it may appear in full screen or remotely on another computer.
In a more abstract way, VirtualBox internally thinks of the VM as a set of parameters that determine its behavior. These include hardware settings (how much memory the virtual machine should have, which hard drives VirtualBox should virtualize through, which container files to use, which drives to mount, etc.), as well as state information (this could include: the virtual machine in currently running, saved, about its pictures, etc.). These settings are reflected in the VirtualBox Manager window, as well as in the VBoxManage command line program. In other words, the virtual machine is also what you can see in the settings dialog.
Guest Additions.
This applies to special packages software that comes with VirtualBox but is designed to be installed inside a virtual machine to improve the performance of the guest OS and add additional features.
Installing VirtualBox on Windows
To download VirtualBox, go to the official website https://www.virtualbox.org/wiki/Downloads. Click the link " Windows hosts " to start downloading the installation file. Run the file by double-clicking - the installation process is similar to any other programs in Windows.
You can choose which components to install, it is recommended to install all VirtualBox components to fully support all options:
Messages about installing unsigned drivers may appear - agree to install them. For the program to work correctly, agree to all requests from the installer.
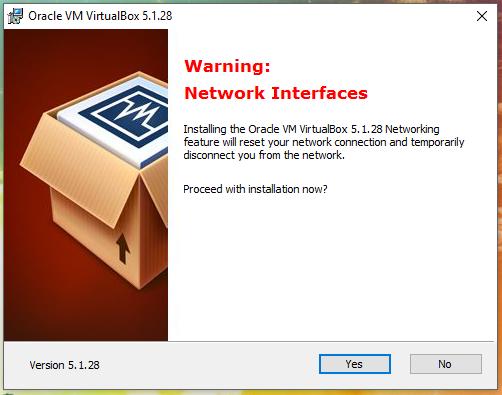
The following warning informs you that there will be resets for a short time network connections, i.e. you will be temporarily disconnected from the network. We agree, the Internet connection will automatically resume in just a second.
Installing VirtualBox on Linux
On Linux, VirtualBox can be installed in several ways:
- from the standard repository
- binary file downloaded from the official website
- from the VirtualBox repository added to application sources (Debian-based distributions only)
Installing VirtualBox on Debian and derivatives (Ubuntu, Linux Mint, Kali Linux)
For Debian and derivatives (Ubuntu, Linux Mint, Kali Linux) you can install VirtualBox from the standard repositories:
Sudo apt install virtualbox virtualbox-qt linux-headers-"$(uname -r)" dkms vde2 virtualbox-guest-additions-iso vde2-cryptcab
Installing VirtualBox on Arch Linux and derivatives (BlackArch and others)
For Arch Linux and derivatives (BlackArch and others), you can install VirtualBox from the standard repositories:
Sudo pacman -S virtualbox linux-headers virtualbox-host-dkms virtualbox-guest-iso
Information on installation in other distributions, as well as additional details, can be found on the corresponding page: https://www.virtualbox.org/wiki/Linux_Downloads
Installing the VirtualBox extension packs
To expand the functionality of the basic VirtualBox package, you can download additional packages extensions. Oracle currently provides one extension package.
The VirtualBox Extension Pack adds the following features
- Virtual USB device 2.0 (EHCI)
- USB 3.0 Virtual Device (xHCI)
- Protocol support Remote Desk VirtualBox (VRDP)
- Host webcam transfer
- Intel PXE boot ROM
- Experimental support for PCI transfer on Linux hosts
- Encrypting a disk image using the AES algorithm
VirtualBox extension packs have the extension in their filename .vbox-extpack. To install an extension, simply double-click on the package file and an assistant will appear that will guide you through the installation steps.
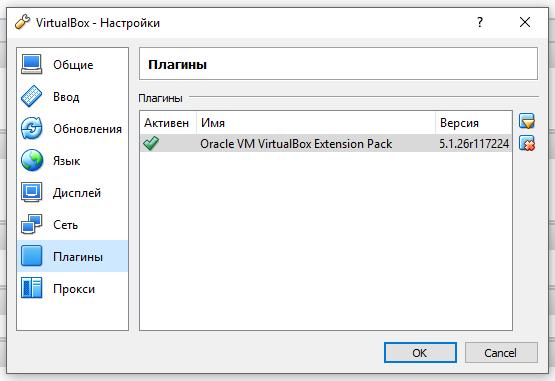
To view currently installed extension packs, open Home VirtualBox Manager(main program window), in the menu " File» select « Settings" In the window that opens, go to the “ Plugins", there you will see the currently installed extensions and can remove the package or add a new one:
The extension pack for the latest version can be found on the download page.
If you are not using latest version VirtualBox, then you can find the extension package by - select the folder with your version number and download, then double-click the file with the extension .vbox-extpack.
Launching VirtualBox
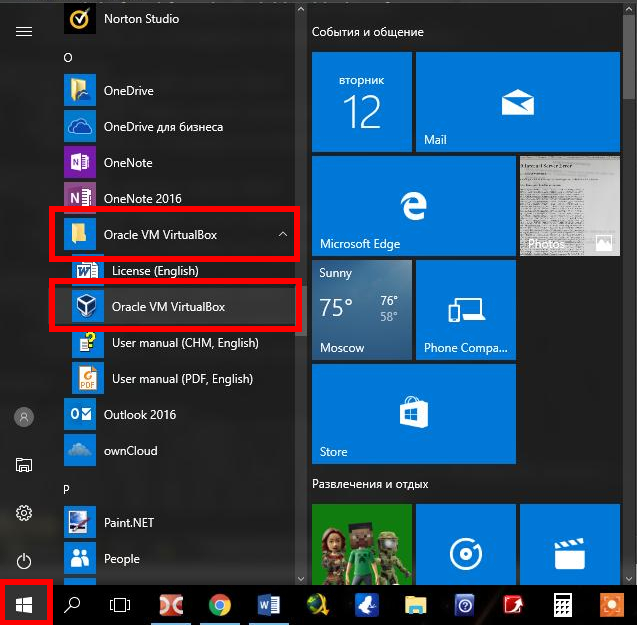
On Windows, VirtualBox can be launched from the menu or from a desktop shortcut.
On Linux you will also find VirtualBox in the menu,

or you can type the command in the terminal:
Virtualbox
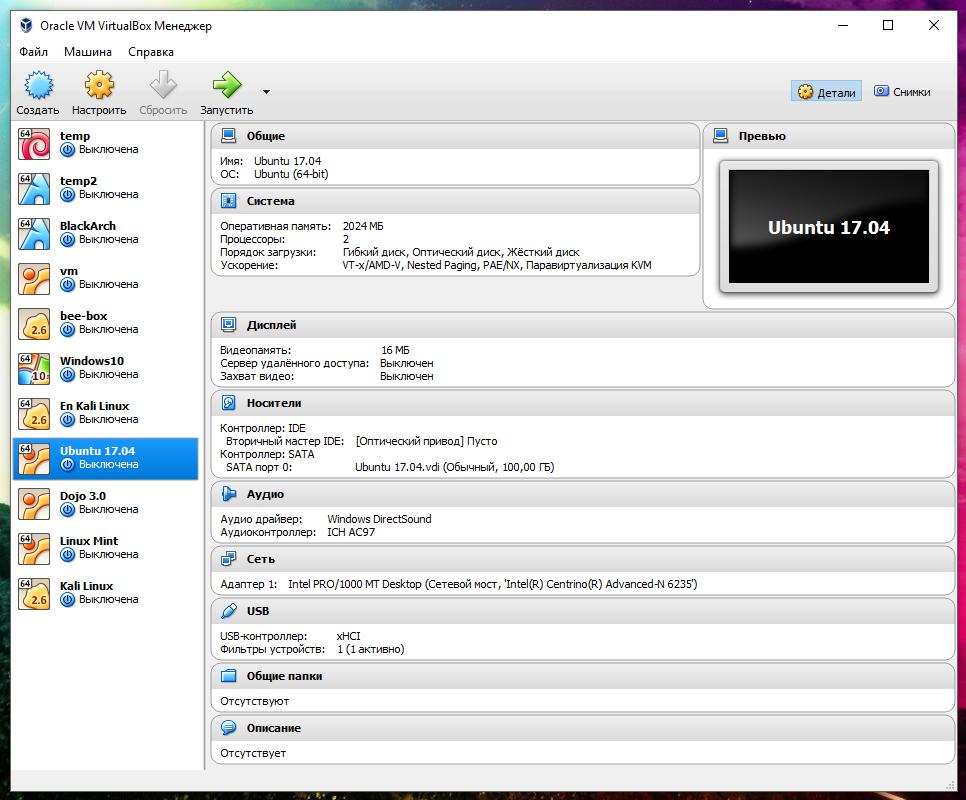
A window similar to the following will open:

Or, if you have already created virtual machines:
Installing software on a computer, especially little-known software, is always associated with a certain risk. The program may contain errors that affect the stability of the system, built-in advertising or tracking modules, and other unwanted elements. In addition, any software leaves traces on the system that may not have the best effect on its operation. As for experiments with Windows, everything is even more risky here, because sometimes even a seemingly insignificant change in registry data or modification system files can lead to the most unpleasant consequences.
Ask how to avoid them? Very simple, use virtualization systems, for example, virtual VirtualBox machine – special program, which allows you to install, run and test different operating systems in an isolated environment. You can do anything with such virtual computers - install programs on them, configure them, modify system files, work with disks and partitions, in a word, perform any experiments. If the virtual OS is damaged, you can restore it from a snapshot or delete it altogether - this will not have any effect on the host system, that is, the main working system.
Installing VirtualBox for Windows
Perhaps all this may seem complicated to some, but in fact there is nothing in working with Virtualbox that a novice user cannot handle. So how to use VirtualBox? As usual, it all starts with installation. We go to the developer’s website www.oracle.com/virtualization/virtualbox/index.html and download the latest version of the program.
Installing VirtualBox on Windows 7/10 is almost no different from installing most other programs; you just need to follow the instructions of the wizard and do not change anything in its parameters. Upon completion of the procedure, you will receive a ready-made virtualization platform.


Creating and basic configuration of a virtual machine
Like installing VirtualBox, creation and configuration virtual computer is not particularly difficult; the program automatically selects the best configuration depending on the operating system being installed. User control, however, will not hurt.
Let's create a virtual machine for Windows 10 32-bit as an example. Launch VirtualBox and click the “Create” button on the toolbar. In the window that opens, give the machine a name (can be arbitrary); in the drop-down lists, select the operating system and its version.

At the next stage you will be asked to specify the volume of the allocated virtual machine RAM. There are no strict rules regarding the allocated RAM; for 32-bit Windows it is advisable to reserve at least 1 GB of memory, for 64-bit Windows - at least 1.8-2 GB.

At the third stage, a virtual hard drive, here we leave everything by default. Click “Create”, select the disk type VDI or VHD.


As for the storage format, it is better to select “Dynamic”, this way you will save time and space on the physical disk, although losing a little in performance.

Size virtual disk we install as desired, but not less than specified in the operating system requirements. Click “Create”.

The virtual machine has been created and now you can quickly go through its settings. First of all, however, go to the settings of the VirtualBox program itself and on the “General” tab change the path to the virtual machine storage directory. It is best to allocate a folder for them on drive D, where there is the most space.

Now go to the settings of the created VM and check the following parameters:
- In the “General” section on the “Advanced” tab, change the path to the VM snapshot files if necessary (it is advisable to place them in the folder with the main VM container file). Here you can enable a shared clipboard for the host and virtual machines.
- If you want to install the system in EFI/GPT mode, in the “System” section, be sure to check the “Enable EFI (special OS only)” checkbox.
- To be able to run 3D applications on a virtual machine, in the “Display” section, check the “Enable 3D acceleration” checkbox.


Setting up the Internet and shared folders

If you plan to provide access to the VM to other users of the local physical network, you should select the “Network Bridge” connection type in the VirtualBox network settings. To ensure interaction between different virtual machines The “Virtual Host Adapter” mode is used; to connect guest OSes to a single internal network, the “Internal Network” mode is used. There is also a connection type " Universal driver", but it is used much less frequently.
Of particular interest are shared folders in VirtualBox, thanks to which the user can exchange any files between the host and virtual machines. You can connect such a directory in the section " Shared folders" To do this, click on the plus sign opposite the “Machine Folders” item, select a folder on your hard drive through the overview and connect it, not forgetting to check the “Auto-connect” checkbox.

Starting a VM and installing the operating system
Now you know how to configure VirtualBox and the created VM. Next, let's see how to install the operating system on it. The procedure for installing an OS on Virtualbox is practically no different from installing it on a physical computer, except that instead of a bootable flash drive or DVD, an installation installer is used here. ISO image. Launch the created virtual machine and specify the path to bootable ISO image with the system.

It will begin standard procedure installation, during which you will be asked to accept license agreement, partition the disk, and after copying the system files, create account user.


The guest operating system is installed, but some functions, in particular, shared folders and the clipboard, will not work until you install a special plugin - guest OS additions. In addition, without these add-ons you will not be able to adjust the screen resolution, connect flash drives to the virtual machine, etc. Fortunately, you don’t need to download anything; guest OS add-ons are included with VirtualBox. All you need to do is select the option in the virtual operating system menu Devices – Mount the Guest Additions disk image.

Go to the “This PC” section in the virtual OS, open the disk drive VirtualBox Guest Additions and, if the system does not offer to do this itself, run the executable file VBoxWindowsAdditions.exe.


Install the add-ons as a regular program, accepting the security agreement, and restart the virtual computer.


The guest system is ready for use, all that remains is to check the network operation. We will not dwell in detail on how to set up the Internet in VirtualBox. If you selected NAT, the VM will connect to the Internet automatically. With other types of connections, you will most likely have to tinker a little. Remember the main thing, if the IP address for your main computer is issued automatically by the router, the same settings must be set in the parameters network adapter virtual system. If settings are assigned manually, then they must also be assigned manually in the guest system network adapter settings.

Main problems when working with VirtualBox
VirtualBox is a stable and high-quality software product, and if users have to encounter problems during its operation, the causes of the latter are most often the errors of the users themselves. Thus, those who try to launch virtual machines on VirtualBox with Hyper-V active will encounter the error “Failed to open a session for the virtual machine” (code E_FAIL 0x80004005). The reason is the incompatibility of these virtualization platforms. If you are planning to use VirtualBox, please disable Hyper-V and vice versa.


However, the disabled virtualization function in the BIOS can lead to the same error. This will be indicated by the unavailability of hardware virtualization options in the virtual machine settings (VT-x/AMD-V and Nested Paging in the section System - Acceleration). By the way, these options must be enabled even with active virtualization in the BIOS, in otherwise The VM will also not start.

A VM crashing into BSOD upon startup is a common problem caused by a lack of physical computer resources allocated to the guest operating system. When creating a virtual machine in VirtualBox, you need to ensure that the allocated resources meet the requirements of the operating system.

The Blue Screen of Death can also be caused by Hyper-V enabled on the host system and a controller type mismatch. If the virtual disk was previously connected to SATA and then you connect it to IDE, the guest OS will terminate critical error with a BSOD crash. The issue is resolved by creating a new compatible controller and connecting a container file with the guest system to it.
Accidental deletion of snapshot files by the user can result in the inability to start the VM. You need to delete snapshots correctly - through the “Snapshots” section, otherwise you will have to completely reinstall the guest system. If VirtualBox itself does not start or when you start it you get the error “Cannot access the kernel driver!”, most likely you will have to uninstall the program and then reinstall it.
VirtualBox is a virtual machine with the ability to run operating systems other than the one installed on the computer. This is usually required to test the OS, obtain information about systems and their features. By installing any OS on VirtualBox, you can perform tasks that are not possible on the main operating system. It is possible to install Windows XP on VirtualBox, as well as another OS: Linux, Ubuntu, Mac OS X and even Android.
VirtualBox is not a very complicated program. If you follow the instructions strictly, you will succeed
A guest system installed using VirtualBox within the existing one will help perform, for example, the following tasks:
- launch software products that are incompatible with the main OS;
- use old applications;
- launch old games that do not function in new versions of the operating system;
- test applications that are potentially dangerous.
To create a virtual machine, download VirtualBox from the official website. Installing the program is no different from installing any other. If the system suddenly issues a warning that the software has not been tested with this version of the operating system, ignore it. This warning appears several times, continue with the installation.
The VirtualBox interface has slight differences when installing different operating systems, but they are not so significant. The principle of creating a guest OS remains the same for both versions of Windows and, for example, Ubuntu.

Having installed the program, we create the machine. To do this, follow the algorithm:
- Activate the "Create" button.
- In the window that opens, select the OS, its type and version, and give your virtual machine a name. This name does not affect anything, it is simply reflected in the window title.
- Next, you will be asked to select a hard drive for the guest system: use an existing one or create a new one. Let's create a new one.
- The next parameter you will be asked to enter concerns the file type, which determines the format of the new disk to be used. Leave VDI.
- In additional attributes, you can select a dynamic or fixed disk. Fixed works faster, but immediately takes up all the allocated space on the hard drive. Dynamic will take up the space on the hard drive required for the guest system, applications, and will automatically expand with additions and installation of programs. It is recommended to select the fixed option for performance reasons.
- Specify the name of the new virtual hard disk, indicate the location of the folder with files, set its size - the size of the files saved on this disk. For example, for Windiws XP, according to manufacturers, 10 GB is enough; for Linux, you can leave the allocated volume by default.
- Complete the process by clicking on the “Create” button.
The creation process will take about 7 minutes. Do not disturb the computer during this time, the central processor is involved. After creating the machine, adjust the settings by clicking the "Customize" tab. However, the default settings are sufficient to launch the OS and operate the guest system.
Operating system installation
Here we will tell you how to install Windows XP on VirtualBox.
Place in the drive installation disk with Windows XP or check for a disk image with .iso format in one of the folders.
In VirtualBox, on the top tab bar, click "Run".
In the window that opens you will be asked to select a boot Windows disk XP. If you are using a disk drive, then click “Continue”; if it is an image, click on the folder icon, find the image, click on it, then also click “Continue”.
Will start Windows installation XP, similar to that downloaded on a real computer. Do not press any buttons while formatting the virtual hard drive, copying files, rebooting.
If VirtualBox has captured the mouse cursor, you cannot perform other actions during installation; to return the cursor, press Right Ctrl while clicking the left mouse button. Control will return to you.
When the system is installed, the desktop will appear, install add-ons for the guest system so that the screen resolution becomes better and the operating system works fully. The file will need to be downloaded, then, as the machine will suggest, connected to the virtual drive.
Reboot after installation.

Creating shared folders
Often you need to create a folder between the main OS and the guest OS shared access. It works like this.
Go to the “Devices” tab in the top panel of VirtualBox, select the “Shared Folders” - “Configure” link.
In the window that opens on the right, click the button to add a shared folder. You will be prompted to specify the path to the desired folder. Click on the selected folder and save.
In the guest system, open command line, enter net use drive letter: \\vboxsvr\folder name; confirm by pressing Enter.
When executed correctly, a network drive is created in “My Computer”, which has access to files located in the folder of your choice located in the guest system.
Thus, having installed Windows XP, you can use it in parallel with the main operating system, using XP for programs that do not work on versions 8-10.
Installing Mac OS
The question of how to install Mac OS X on VirtualBox is easy to solve. The process is similar to that described above. You will need installation file. A regular image will not work here; you can use a hacked OS.
- Download HackBoot 1 - installer, HackBoot 2, which runs Mountain Lion, you will also need MultiBeast 4 when working with audio.
- Having opened VirtualBox, in the Type tab, click on the already created virtual machine (how to create it was described above), in the system section, specify Mac OS X 64 bit.
- For RAM on Mac OS, 2 GB is enough.
- Create new disk VDI.
- After creating the disk, in the main menu, right-click on the virtual machine and select “Configure”. In the “System” tab, uncheck the “Enable EFI” function.
- In the "Media" section, go to the CD icon labeled "Empty", then the disk icon with right side, go to “Select disk image”. Here select HackBoot 1.
- Click OK. If you have the Mountain Lion image, we begin to boot Mac OS.
- In VirtualBox, select the downloaded Mac OS X and click “Run”.
- On the HackBoot screen that appears, find the CD icon at the bottom and select the downloaded Lion image.
- Return to the download screen, update, select the OS X Install DVD item that appears.
- Choose a language and agree to the terms of use. Your operating system starts looking for your hard drive. Go to "Utilities" - "Disk Utility".
Format the disk and exit the utility, continue installing the system.
Further installation proceeds as usual Mac installation OS, takes about 25 minutes. When completed, a window will appear informing you that the installation was successful.

Installing Linux and Ubuntu
If you have already worked with virtual machines, then the problem of how to install Linux on VirtualBox will not be difficult for you.
When creating a virtual machine, when selecting the operating system in the menu, click “Linux”. In the “Version” line we put the version you have chosen, for example, Linux 2.6. Click “Next”, and then follow the steps we described above in the sections dedicated to installing other operating systems.
We proceed in the same way if you are deciding how to install Ubuntu on VirtualBox, in the “Version” section we find “Ubuntu”, select it and install it.

Installing Android on VirtualBox
Why and how to install Android on VirtualBox - we answer your questions in this section.
For what? To test programs. You should not clutter your phone or tablet with unnecessary software if you are not sure of its operation and functionality. You can first check everything on your PC by creating a virtual machine. Installing/uninstalling programs on a PC will not affect performance, unlike smartphones with small memory.
To install Android, download required package on the VirtualBox website. When creating a virtual machine, it will be enough to allocate 512 MB of RAM. Mount the image from Android and start the installation. It is recommended to choose installation on a hard drive, then you can fully install programs and save them after a reboot. Here you need to do this:
- When prompted to create/modify a disk, press OK - Enter.
- Select Primary and press Enter several times until a new disk is created.
- Make it bootable by clicking
- Then click Write and after creating the disk, exit the Quit utility.
- The installation window opens, select the disk, file system- FAT 32 is required (otherwise applications will not be installed).
- After the procedure, you will receive Android on a virtual machine. Please note that the "Back" button is replaced by RMB. In the settings, set the Russian language and your account in com.
Please note that when Android installation the Internet is connected to the virtual machine automatically, but Android versions 4 no connection.
VirtualBox helps you test different operating systems, and installing them won't take you much time. Carefully follow the instructions, follow the algorithms step by step, and you will be able to run any OS: Windows XP, Linux, Ubuntu, Mac OS X and Android in a virtual machine.
In this article we will figure out how to install virtualbox and how to add new virtual machines. First, I’ll tell you for those who don’t know what these virtual machines actually are.
Imagine this situation - at work you have to work in a program that only works under the operating system Windows system XP, and you have Windows 7 (or Windows 8/8.1) installed. How do you get out of this situation? Someone will humble himself and set himself on windows computer xp (for which security updates are no longer released), and someone more intelligent will install a virtual machine on their computer and install Windows XP in it with the ability to work in the desired program.
That is, to put it briefly, a virtual machine is full-fledged computer(with processor, RAM, hard drive and even BIOS), which runs inside your computer using an emulator program.
Virtualization technologies, which were very expensive and resource-intensive just a few years ago, have already entered homes today ordinary users and take up space in most ordinary home computers. Here is a sample list of what virtual machines are used for:
- Application testing
- Testing network programs in closed virtual networks
- Testing applications with various PC configuration parameters
- Lack of funds for additional computers
- Consolidation of servers on one physical computer
- Training on various operating systems
and much more...
My experience with virtual machines started with virtualbox, but after working with virtualization giants such as VMware and the mega giant Hyper-V, I felt how much cooler they are. But for this coolness they ask a lot of money.
So if you are just interested in tinkering with other operating systems without reinstalling yours, or you need, for example, to run windows applications on a Linux computer, then Virtualbox should satisfy you completely.
If you are going to run serious network infrastructure projects that must work 24/7/365, then you are better off looking towards Hyper-V, which comes with Windows Server 2008/2012. Believe me, it's really worth the money.
This was a little background, and now about Virtualbox itself.
Download and install virtualbox
You can download Virtualbox from the official website, the most latest version at the time of writing – 4.3.14, which is what we will install. 
Launch the downloaded installer and click “Next”  In the next window, leave everything as default and click “Next”
  In the options window, leave all the checkboxes as default
  In the next window, the installer will warn you that during installation a new network connection will be created, which will lead to a temporary disconnection of your active network connection. Click “Yes”, and in the next window “Install”
  We wait a few minutes for the program to install. After a message appears indicating that the installation was successful, click “Finish”
  If everything went well, the program “ VirtualBox Manager“
 The “Manager” itself is just a shell with the help of which work will be carried out between the virtual machine and the physical computer.
The program settings are quite sparse, you don’t even have to pay attention to them, since everything is configured there by default, which should satisfy the vast majority of users.
Adding a virtual machine
To add a new virtual machine, click the “ Create“, enter the name of the virtual machine, select the type of operating system and its version.  In the next window, select the amount of RAM for the virtual machine. I would like to draw your attention to the fact that you cannot select more RAM than is installed on your physical computer.
  In the next window you are asked to select a virtual hard disk or create a new one. Since we are launching the program for the first time, we will create new hard selecting “Create a new virtual hard disk”
  In the window for selecting the type of hard drive, I advise you to leave the type VDI, by choosing this type your virtual hard disk will be 100% compatible with virtualbox and its operating speed will be equal to the speed of a real hard disk
  In the next window you should select the type of virtual hard disk:
- Dynamic virtual disk– the size of the virtual disk will grow as it is filled with data. It is created faster, works slower.
- Fixed virtual disk– the size of the virtual disk will be the size that will be specified when creating it. It takes longer to create, it works faster.
I think you can decide for yourself which type suits you best, but I will choose the Dynamic disk type.  In the next window you will be asked to select the name of the disk, its size, as well as the location where the disk itself will be stored
  After selecting this data, click “Create”. At this point, the preparatory work can be considered completed.
Now a program with an added virtual machine has opened in front of you  In this case, a virtual machine is a “bare” computer, without an operating system. If you need to have a disk with the operating system or bootable USB flash drive, then you can use disk images to install the operating system in virtualbox (as in other virtual machines). It is very convenient and practical.
Setting up a virtual machine
Let's move on to the settings of the virtual machine we added. Click the “Configure” button and examine the virtual machine settings window.

After setting up the virtual machine, click “OK” and click “Launch”. If you did everything correctly, then when you start the machine you should start booting from the disk image  Then everything is the same as in a regular computer!
As you can see, there is nothing complicated and you now also know how to work with virtual machines! If you have any questions or suggestions, I’m ready to discuss them in the comments.
Did you like the review? Click like and subscribe to our website updates!
Install VirtualBox easy on the computer. Configuring a virtual machine is more complicated. This article also covers VirtualBox settings.
Installing a VirtualBox virtual machine
To install VirtualBox on Windows 10, download the installer. The installer for the Windows version is universal - you can use it to install VirtualBox on Windows 7, 8, and even XP.
- Follow this link. or download from the button below. On the website, click on the line "Windows hosts". The installation file will begin downloading.

- Open the downloaded installer. Click "Next".

- In the next menu, the user selects which program components to install. Clicking the button "Browse", you can select the installation location of the program. Button "Disk Usage" shows a window with disk partitions and the space occupied on them. To continue, click "Next".

- Here you need to check or leave empty check boxes: whether to create a shortcut in the Start menu, on the desktop or in the panel quick launch. The last option is responsible for associating files with certain VirtualBox file permissions.

- This window warns you that your Internet connection may be interrupted during installation due to the installation of network drivers. Click "Yes".

- To begin installation, click "Install".

- Wait for the installation to complete.

- To run the program immediately after installation, without unchecking the only checkbox in this window, click "Finish".

Creating a virtual machine
Having installed VirtualBox, it's time to create virtual computers.
- Launch VirtualBox. In the upper left corner click "Create".

- In the window that opens, name the virtual machine, select the OS (Windows, Mac OS X, Linux, BSD, etc.) and the version of the selected OS with bit depth (Windows XP x32, Mac OS X 10.6, Ubuntu x64). After setting the virtual PC parameters, click "Next".

- The program automatically selects the amount of RAM. The amount of RAM can be changed.

- The Virtual Machine Manager prompts you to create a virtual drive. Click "Create".

- Leave the storage type unchanged and click "Next".

- The following describes the difference between fixed and dynamic storage. Stop at the one that suits you, click "Next".

- Use the slider or text field to set the drive size. Click "Create".

Settings for an existing virtual machine
To configure a virtual PC, click on it in the panel on the left side of the program. Then on the top toolbar click "Tune".

- First section - "General". The "General" section contains four tabs - "Basic", "Advanced", "Description" and " Disk Encryption".In the "Basic" tab, the name, type and version of the OS are changed.
 “Advanced” includes the functions of Drag and Drop and the general clipboard, and specifies the location for saving screenshots.
“Description” is a regular text field in which you can describe the virtual machine.

In the “Disk Encryption” tab, virtual encryption is enabled. disk, you can set a password.

- The second settings item is “System”. There are three tabs: “Motherboard”, “Processor”, “Acceleration”. In the “Motherboard” tab you can configure the amount of RAM, disk loading order, chipset, and cursor manipulator. You can connect additional functionality: I/O APIC, EFI and UTC clock.
 In the “Processor” tab you can configure how many CPUs will work on the virtual motherboard, their load limit. PAE/NX can be connected.
In the “Acceleration” tab, select the type of paravirtualization and hardware visualization.

- The third section is “Display.” “Screen” - here the amount of video memory, monitors and scaling is indicated. You can also enable 3-D and 2-D acceleration.
 Remote access" - here it is enabled and configured remote access to the virtual machine.
“Video capture” - here you can record from the virtual machine’s screen, configure the frame rate, where the video is saved, quality, bitrate and everything related to capturing video from a virtual machine.

- The fourth section is “Media”. Here the disks are connected to the virtual machine, their attributes are changed, and the connected drives are deleted.

- The fifth section is “Audio”. Here you can turn off and turn on sound playback in the virtual machine. You can select an audio driver, audio controller and enable audio input or audio output separately from each other.

- The sixth section is “Network”. There are four tabs with adapter settings. The settings inside each tab are the same - connection type, adapter type and MAC address.

- The seventh section is “COM port”. The virtual machine supports up to four COM ports, for each of them you can select the number, port mode and path to it on the user storage.

- The eighth section is “USB”. Here you select the USB generation, from the first to the third, you can add USB filters.

- The ninth section, “Shared Folders,” specifies the path to folders that more than one virtual machine has access to.

- The tenth section is “User Interface”. Here it is configured appearance virtual machine.

- First section - "General". The "General" section contains four tabs - "Basic", "Advanced", "Description" and " Disk Encryption".In the "Basic" tab, the name, type and version of the OS are changed.


