Google sync doesn't work. How to set up synchronization with accounts on Samsung Galaxy
Mobile operating room Android system, like almost any modern platform, provides functionality that ensures the safety of the user’s personal data. One of these tools is synchronization of contacts, passwords, applications, calendar entries, etc. But what if such an important element of the OS stops working properly?
One of the common problems in in this case is precisely the lack of synchronization of the user's contact list. Such a failure may be short-term, in which case after a certain time the exchange of data with the Google cloud is restored.
It's another matter when the termination of contact synchronization is permanent. We will talk further about how to correct such an error in the system.
Before performing the steps described below, you should double-check whether the device is connected to the Internet. Just open any page in your mobile web browser or launch an application that requires network access.
You should also be sure that you are logged into your Google account and there are no problems with its operation. To do this, open any application from the “Good Corporation” mobile application package, such as Gmail, Inbox, etc. Better yet, try installing any program from the Play Store.
And the last point - auto-sync must be turned on. If this function is activated, the necessary data is synchronized with the cloud automatically without your direct participation.
To find out if this option is enabled, you need to go to "Settings" — "Accounts" — "Google". Here in the additional menu (vertical ellipsis at the top right) the item should be checked "Auto-sync data".

If all of the above points are in perfect order, feel free to move on to ways to fix the contact synchronization error.
Method 1: Manually synchronize your Google account
The simplest solution, which in some cases can be effective.

If after performing these steps, synchronization begins and completes successfully, the problem is solved. Otherwise, we try other ways to resolve the error.
Method 2: Removing and Re-Adding Google Account
This option with more likely will fix the problem with synchronizing contacts on your Android device. You just need to delete the one authorized in the system account Google and log in again.

Our next step is to add the newly deleted Google account to the device again.

By adding a Google account again, we start the data synchronization process from scratch.
Method 3: Force Synchronization
If the previous troubleshooting methods do not work, you will have to, so to speak, “cheat” and force the device to synchronize all data. There are two ways to do this.
The first method is to change the date and time settings.

As a result, your contacts and other data will be forcibly synchronized with the Google cloud.
Another option for forcing synchronization is using a dialer. Accordingly, it is suitable only for Android smartphones.
In this case, you need to open the Phone application or any other “dialer” and enter the following combination:
As a result, you should see the following message in the notification bar indicating a successful connection. 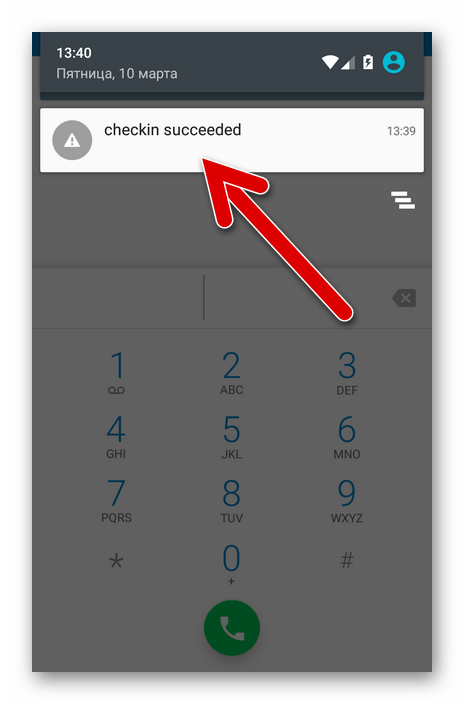
Method 4: Clear cache and delete data
A very effective method of dealing with contact synchronization errors is to complete removal and cleaning associated data.

Now let's start clearing the cache and contact list.

Method 5: Third Party App
It may happen that none of the methods described above will fix the problem with contact synchronization. In this case, we recommend using it from a third-party developer.
The “Fix for contact synchronization” program is able to identify and correct a number of errors that lead to the inability to synchronize contacts.

All you need to do to fix the problem is press a button "To correct" and follow further instructions of the application.
Full use of all functionality It’s hard to imagine an Android device without a Google account connected to it. Having such an account not only provides access to all the company’s proprietary services, but also ensures the stable operation of those elements operating system, which send and receive data from servers. This is only possible if synchronization is stable, but if problems arise with it, normal interaction with a smartphone or tablet is out of the question.
Most often the error Google sync-account on Android turns out to be a short-term phenomenon - it disappears itself a few minutes after it occurs. If this does not happen and you still see a message like and/or icon (in the synchronization settings, and sometimes in the status bar), you need to look for the cause of the problem and, of course, resort to eliminating it. However, before taking active steps, you should check the obvious, but important nuances, which we will discuss below.
Preparing to restore data synchronization
It is likely that the cause of the synchronization error is not dictated by serious problems, but by user inattention or minor glitches in the Android OS. It is logical to check and find out this before you and I take more decisive action. But first of all, try simply rebooting the device - quite possibly, this will be enough to restore synchronization.

Step 1: Check your internet connection
It goes without saying that to synchronize your Google account with servers, you need a stable Internet connection - preferably Wi-Fi, but a relatively stable 3G or 4G will also be enough. Therefore, first of all, check whether you are connected to the Internet and whether it works well (coverage quality, data transfer speed, stability). The following articles on our website will help you do this.

Step 2: Attempt to login to your account
Having sorted out your Internet connection, you should determine the source of the problem and understand whether it is related solely to the device you are using or to your account as a whole. So, if there is a synchronization error, you will not be able to use any of the Google services, at least on mobile device. Try logging into Gmail, for example. cloud storage Google Drive or YouTube video hosting through a browser on your computer (using the same account). If you manage to do this, proceed to the next step, but if authorization on the PC fails, immediately proceed to step No. 5 of this part of the article.

Step 3: Check for updates
Google quite often updates its branded products, and smartphone and tablet manufacturers, whenever possible, release operating system updates. Often various problems in Android work, including the synchronization error we are considering, may occur due to the obsolescence of the software component, and therefore it should be updated, or at least checked for such a possibility. This must be done with the following components:
- Google app;
- Services Google Play;
- Contacts app;
- Android operating system.

We have described in more detail the procedure for updating both applications and the operating system in the materials provided at the links below. 
More details:
How to update apps on Android
How to update Android OS on a smartphone or tablet
Step 4: Enable Auto Sync
Step 5: Troubleshooting
In the event that an attempt to log in to one or more Google services through a browser on a computer was unsuccessful, you should go through the procedure for restoring access. After its successful completion, with a high degree of probability, the synchronization error we are considering today will also be eliminated. To solve the problem with authorization, follow the link below and try to answer all questions from the form as accurately as possible. 
In addition, if the inability to log into your account is due to such obvious reasons as forgotten login or password, we strongly recommend that you read the separate articles on our website dedicated to these problems and their solutions. 
More details:
Recovering your Google account password
Restoring access to your Google account
If, after following all the recommendations suggested above, the account synchronization error does not disappear, which is unlikely, proceed to more active steps described below.
Restoring Google Account Sync
It happens that a data synchronization error has much more serious reasons than those we discussed above. Among the possible factors causing the problem under study, the most common are failures in the operation of the operating system or its individual elements (applications and services). There are several possible solutions here.
Note: After completing all the steps in each of the methods discussed below to resolve the synchronization error, reboot mobile device and check the operation of this function.
Method 1: Clear cache and data
All mobile applications in the process of using them, they become overgrown with so-called file garbage - cache and temporary data. Sometimes this causes various errors to occur in the Android OS, including the synchronization problems we are considering today. The solution in this case is quite simple - you and I must remove this “garbage”.

Method 2: Force account synchronization
For the operation of the Android OS in general, and in particular for synchronization, it is extremely important that the time and date are set correctly on the device, that is, that the time zone and related parameters are determined automatically. If you specify obviously incorrect values and then return the correct ones, you can forcefully activate the data exchange function.

Method 3: Login to your account again
The last thing you can do to restore data synchronization is to shake up your Google account, because, in fact, it is with it that problems arise.
Note: Make sure you know the login (address email or phone number) and account password Google posts, which is used as the main one on your Android device.

Conclusion
Google account synchronization error is one of the most annoying problems in the Android OS. Fortunately, almost always its solution does not cause any particular difficulties.
Google, together with Android, has created a whole group of various services that significantly expand the functionality of the device. The function is very popular Android sync, thanks to which you can quickly and conveniently move data between several phones, including contacts. You can activate synchronization on Android in your account settings in just a few steps.
Advantages of synchronization: how best to enable synchronization on Android
Most people change phones frequently. Buying a new gadget is a pleasant event, but it brings with it one common problem. There is a need to transfer all your contacts from Android to new gadget. This can be done manually by simply rewriting the list of required numbers and then entering them one by one. If in your notebook tens or even hundreds of numbers, this method will not work.
An equally big problem is restoring numbers if you have lost your phone. Restoring your entire contact list will take a very long time, and some important numbers may be lost forever. Synchronizing the contacts of Android devices with Google will help solve all these problems. Once you activate it, all data ( telephone numbers, calendar and even, if necessary, photos) are synchronized with Google, and you can always restore this information on a new device. You don't even need a computer for this operation.
All you need is a Google account on Android that is directly linked to gmail. You must log in to this account on the phone from which you want to read information. Next, you should log into the same account, but from a different smartphone, and then activate synchronization. After this procedure, you can delete your account from your old device for additional security. However, not all users of Android devices know how to enable synchronization Google account on Android.
Activate synchronization: synchronize android OS contacts with google
The inclusion procedure is not particularly difficult. You will only need to activate contact synchronization once. Once the phone is synced, you can remove it. To activate, follow the instructions provided:
After this, contacts from Android will be recorded on the cloud, and you will only need to download them to another phone. Now you know how to enable synchronization on mobile phones and tablets on Android. If you are wondering how to disable synchronization, then you just need to uncheck the items that do not need to be synchronized. These are all the steps required to disable it.
Activate the display of contacts
The next logical question is how to synchronize Android contacts with Google on a new device. To do this, you must first perform a similar procedure. If this doesn't work, you may need to reset the display. To do this, follow a few simple steps:

All the necessary numbers will appear in the address book, and you will be able to use the synchronized data. If you have multiple Google accounts, make sure you use the same one for both phones. Register in Google system You can do it either from your phone or through your personal computer.
If you don’t have Google account synchronization enabled on Android, then you can forget about such a convenient feature as accessing contacts from any device with Internet access, or creating backup copy data.
This article is suitable for all brands that produce phones on Android 10/9/8/7: Samsung, HTC, Lenovo, LG, Sony, ZTE, Huawei, Meizu, Fly, Alcatel, Xiaomi, Nokia and others. We are not responsible for your actions.
Attention! You can ask your question to a specialist at the end of the article.
Reasons why Google and Android synchronization fails
Enable Google synchronization with Android
To understand the synchronization options, you first need to know where to enable this feature.
- Go to "Settings".
- Open the “Accounts” section (“Personal data”, “Accounts”).
- If you don't have a Google account inside, you need to add one. You can create a new account or add data from an existing Google profile - login and password.
- Click on the added account to open its settings.
- To enable synchronization, move the switches next to necessary services- contacts, Google Play Music, Google Fit, Google Photos, etc.
- To start synchronization right now, call up the additional menu and select “Synchronize” in it.
 Increase
 By default, app data, calendar, and contacts are synced. If you want to automatically sync with Google server photo, you will have to install Google app Photo. In its settings there is an item “Startup and synchronization”, after activation of which the photos will be sent to cloud storage.
Automatic photo synchronization will work even after Google removal Photo. To disable it, you need to go to the application settings and move the “Startup and synchronization” switch to the inactive position.
 Increase
 Additional manipulations will also be needed to synchronize mail from the Gmail application. In order for data to be sent to the server, you need to check the “Gmail synchronization” checkbox in the client settings. If mail synchronization isn't working, cleaning it up will help. internal memory phone from unnecessary files (if the storage is full) or deleting Gmail data.
From the article “What is an account” we know that an account is a place on the Internet and you can store your data there. You can think of an account as a virtual box into which various information is stored. In our example, we will consider a Google account as the most common.
One of the capabilities of a Google account is to store contacts from your smartphone’s phone book. It does this using synchronization: add to phone book new contact- the smartphone copies it to the account, change the existing contact in the smartphone - the changes appear in the account.
Synchronization in our example is convenient because:
- Contacts on all devices with this account are always the same - if you change something on one, it automatically changes on all the others;
- If you buy new smartphone, just add an account and all the contacts that were on the old one appear. There is no need to manually save and transfer contacts, everything happens automatically.
Each account can only synchronize certain information. Some synchronize browser bookmarks and contacts, some also synchronize calendar entries, and some do not synchronize anything at all.
How to choose what information to sync with your account
Can't select data to sync


