Create a bootable USB flash drive from a Linux ISO using UNetBootin. UNetbootin to create a bootable Live USB
Boot Windows flash drive very easy to do. This article will describe three simple quick ways creation bootable flash drive from a ready-made ISO image. All methods are free and popular, although among them there are simpler and more complex options, using different software. Also, all utilities work fully in Windows XP.
If you have a new laptop or computer with BIOS UEFI, A hard drive which he uses GPT style placement of tables, then on such a computer you can also install Windows 7 using a different algorithm. Also, if the device, computer, laptop, netbook, etc. has a USB 2.0 port and USB 3, and you decide to install from a bootable USB flash drive to such Windows device 7, then undoubtedly you should connect the flash drive to USB 2.0 port because Windows 7 itself does not support the USB 3 port type, which are usually marked in blue.

If the bootable USB flash drive is connected via USB port 3, then try Windows installations 7 will end with the following error:
"Not found required driver optical drive. If you have a flash drive, floppy disk, DVD or CD with such a driver, please insert this media."
Creating a bootable USB flash drive
Now the first thing you definitely need is an ISO image of the operating system. Secondly, this is the need to take care of the flash drive itself. Since this media will be formatted, the data from the flash drive must be moved to a safe, secure location. It is also important to note that the size of the flash drive must be strictly at least 4 gigabytes.It is imperative to check and make sure that the specific motherboard definitely supports loading such a plan (from a flash device).
- Creating a bootable USB flash drive using means (recommended last, since it is not a very effective method);
- Created by ;
- Utility ;
Creating a bootable USB flash drive using UNetBootin
You need to download the program and run it (the program is portable and works without installation).
You need to check the box called ISO image, and then select the letter of the USB drive.

The location of a specific image must be specified manually.

Next, click open.

Now just click OK.

There is a short process of copying system files to the flash drive.

After a short extraction of the necessary files, our bootable USB flash drive is completely ready.

Creating a bootable USB flash drive using UltraISO
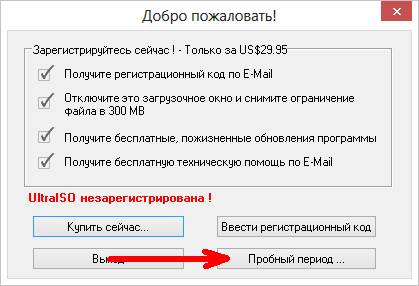
A slightly complicated solution, unlike the one described above, is to use the program Ultra ISO. However, you can quickly understand the program by following the instructions. The functionality of the program is written in understandable Russian, and the trial period under the license is completely functional and suitable for our purposes.
Next, you need to select the Russian language and download the program, which is very simple. Run as administrator, then select a trial period of use.

In front of us is a regular program window.

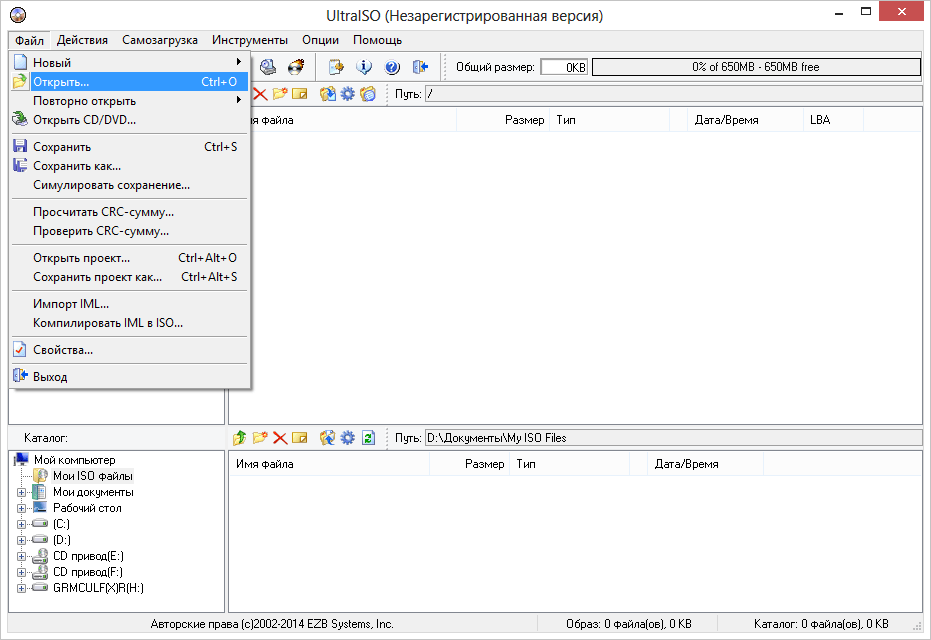
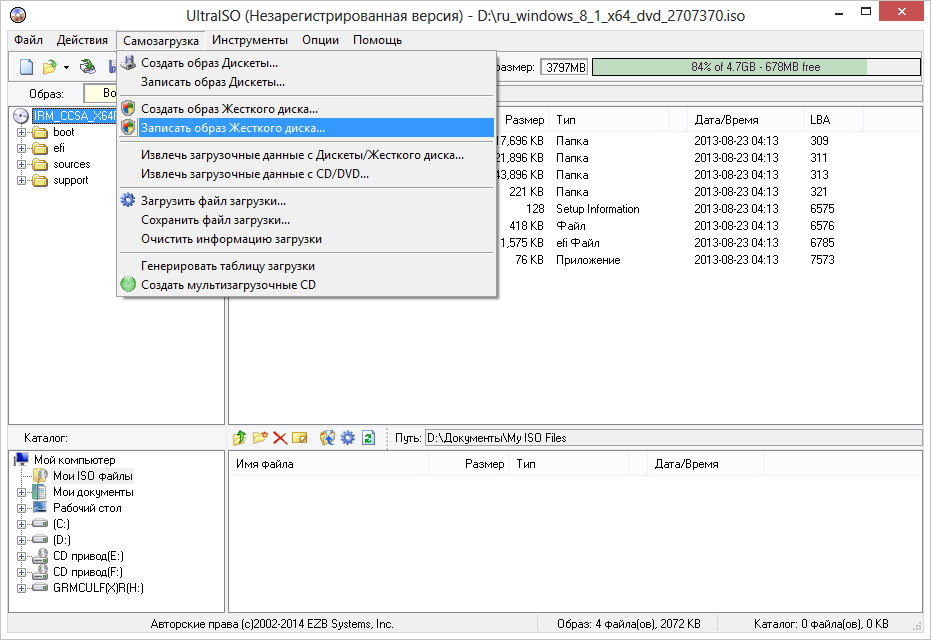
The next step is to find our ISO image on your hard drive, which contains the operating system. It is worth recalling that such an image can be created by any other program, and then specified here. In the main UltraISO window, click right click to the file, and in the menu that opens, select the open option.

Next, we indicate our image with the system, in our case it is Windows image 8.1, which is located in the installation folder. Find the image in your place and click open.

You can also now place a flash drive in the slot of a netbook or laptop. You must select the Boot menu in the main window of our program and click on record image hard drive. The inserted flash drive should be present in this window.

Next, click record.

A prompt will appear indicating that your flash drive will be erased, we agree.

Next, we wait for the recording process to finish.

Now you can carry our operating system in your pocket.
Bootable flash drives are always useful. The computer is broken, the OS is running slowly, you need to install Linux... There are thousands of such situations, but there is only one solution. In this article we will look at how to make a bootable Linux USB flash drive.
Rufus is the most common and secure recording option. The second one behind it is UltraISO - if any problems occur, you should use it. Well, if he didn’t help, then UNetBootIn will come to the rescue.
Rufus is a program for Windows that allows you to create a boot disk, including Linux. In order to create a bootable USB flash drive, first download Rufus. Now you need to download the required Linux distribution in the form ISO image A. After the download is complete, launch the program.
We leave all the parameters as default, just select the disk we need and instead of FreeDOS, select the ISO image and indicate the path to it with the button to the right of the list. For example, Ubuntu installation 16.04 will look like this:

Click “Start”. All! Now you have your own bootable USB flash drive. Read below for information on how to launch it.
Making a bootable USB flash drive via UNetBootIn
UNetBootIn is a cross-platform application designed to create boot disks for Linux distributions. You can download it.
In order to create a bootable USB flash drive, there are two ways. The first is to select a distribution from the list above:
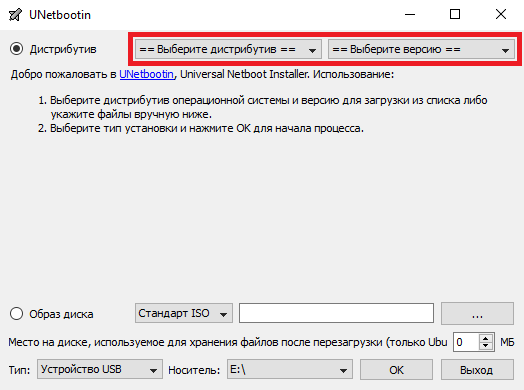
The second way is to download the image and select it in the field below:
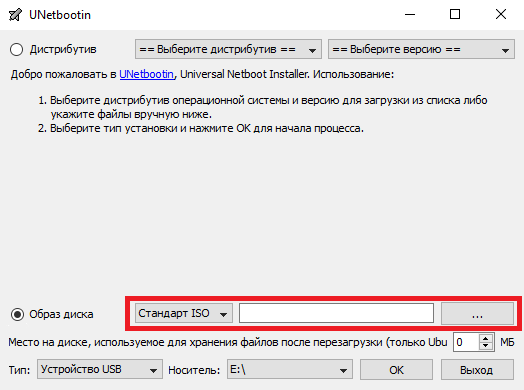
After selection, click “OK”. The bootable flash drive will be installed.
Important! It’s better to download the ISO image of the system yourself, otherwise the program does not guarantee its newness and relevance!
Creating a bootable USB flash drive using UltraISO
UltraISO is a paid program for working with ISO images. To create a bootable USB flash drive, you can use trial version programs.
Download the program from the official website. After installation, we will choose to use the 30-day trial period.
Now let’s open the pre-downloaded ISO image:
To create a bootable USB flash drive, you need to find the “Boot” menu and select “Burn” in it. image of a tough disk":
Here we select required disk, and also select the USB-HDD+ v2 recording method - it guarantees the flash drive will work in almost any BIOS:
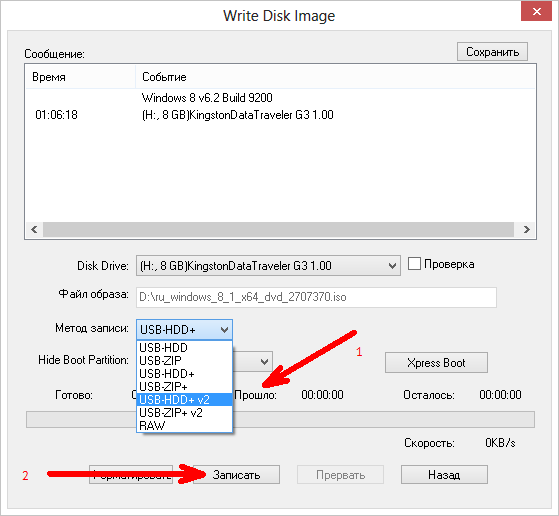
Click “Record”. A warning about formatting the flash drive will appear. Click "OK".
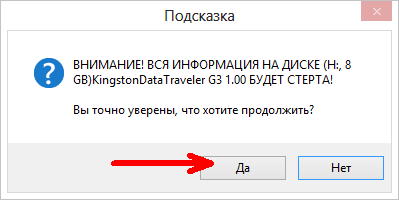
That's it, the process has begun. We are waiting for the recording to finish.
How to boot from a flash drive via BIOS
To launch the BIOS, use one of the following keys (listed in order of decreasing probability of operation).
- DELETE
Important! If you have Lenovo laptop, then try using the combination Fn + F12!
UNetbootin is a small application that allows you to create boot disks on USB flash drives or other optical media different versions Linux operating system.
Just a couple of years ago, laser discs were mainly used to install operating systems. However, such media have some disadvantages. Laser discs are very susceptible to mechanical damage, which leads to the inability to read some files and incorrect installation of the operating system. In addition, the speed of reading small files from disks was quite slow.
Today the situation has changed significantly. This was due to the rapid growth in the capacity of flash drives. You must have a USB drive of at least 1 GB to install the operating system on your computer. To turn a flash drive into an installation disk, you need to use the UNetbootin application. You can download the program completely free of charge.
How the program works
Initially, you need to download and install the UNetbootin application, after which you can begin to familiarize yourself with the program. The purpose of the utility is to create installation disks on portable drives and hard drive partitions. To do this, you need to select an ISO image, specify the disk on which the operating system will be installed and click OK to start the process.
If there is no image on your PC, you can choose any Linux version or BSD on the site that offers the program. You can work with the application on almost all Windows operating systems.
Application features
The program allows you to use various ISO images of Linux and BSD OS. In addition, the application displays resources from which you can download necessary files. In addition, the UNetbootin utility provides a choice of disk or portable drive for installing the operating system. It is also possible to select the amount of disk space to save space after a reboot.
Advantages and disadvantages of the application
The UNetbootin application allows you to create bootable disks from flash drives for installing Linux and BSD operating systems. In addition, the program is able to install different versions operating systems.
The utility has Russian-language localization. Thanks to simple interface, operating the application is quite simple. In addition, you can download the program absolutely free, which will allow everyone to install it on their computer.
One of the negative aspects is the lack of ability to create installation USB drives for the Windows operating system.
In general, UNetbootin is a good application that allows you to create installation disks from any portable drive or hard drive partition. The utility is perfect for users of Linux and BSD operating systems. The source can be an existing ISO image on the computer. In addition, download the operating system distribution from the network.
The application can be installed on any version of the operating system. Windows systems. If you need to install Linux or BSD OS on your computer, you should use this application. However, it is worth noting that the program does not allow you to create bootable disks for Windows operating systems.
You must download the application from the developer’s official resource or a reliable site in order to be able to create bootable disks from flash drives for Linux and BSD operating systems. It is recommended to run a computer security system that will prevent all attempts by viruses and malicious elements to penetrate the operating system.
Discs are increasingly falling out of use, giving the palm to USB drives. To install an operating system on a computer, it is also easier to use a flash drive rather than a disk. Today's article will tell you how to create a bootable USB flash drive with Windows or any other OS.
Program for creating a bootable USB flash drive
There are a sufficient number of programs that can create a bootable USB flash drive. One of them is the UNetbootin program.
This is a great free program available for Windows users, macOS and Linux. With it, you can create a bootable USB flash drive with Windows and any other OS in three clicks.
Where to download?
I've been using this program for 10 years now and haven't experienced any problems with it yet. The program is still supported by the developers.
The latest version of the program can be downloaded from official website . The program weighs less than 5 MB.

Creating a bootable USB flash drive in UNetbootin
Before making a flash drive bootable, it is advisable to format it. However, for the sake of interest, I checked the possibility of making a bootable USB flash drive on which the files were already present.
If there is enough space on the flash drive, there should be no problems. The flash drive will successfully become bootable, and the files will be saved. But still this is not advisable.
The program starts without installation. It looks somewhat primitive, but it does its job perfectly well.

UNetbootin allows you to use either a downloaded iso disk image of the system or download it from an external server directly from the program itself.
To download an image from the drop-down menu ==Select distribution== you need to select the OS you are interested in, and then select the version in the list to the right. The system will be downloaded from the official server of its developers.

Bootable USB flash drive from disk image
Personally I prefer to download iso file and feed it to the program. To do this, put a dot next to the inscription Disk image.
Now we specify the path to the image file. In my case it was a Linux image. But it can also be an image of any other operating system.
If the flash drive was already inserted when the program was opened. Then the program itself will determine it, displaying it in the window Carrier.

Also for Linux Ubuntu it is possible to reserve part of the flash drive space for data storage. This is very convenient, because... Ubuntu can start without installation
Ending the process
Click OK and watch the process of turning our flash drive into a bootable one.

The progress of the installation process will be displayed in the program; do not be alarmed if the download bar freezes. Usually this procedure takes 10-15 minutes. It all depends on the recording speed of the flash drive and the size of the iso file.
As soon as the bootable USB flash drive is created, the program will notify you about it.

All you have to do is press the button Exit and remove the USB drive.
When installing the system, in order for the computer to see the flash drive when booting, you need to set it to boot first in the BIOS and when the computer boots, it will boot from the flash drive.
The material was prepared exclusively for the site
In this article I will look at the creation process Bootable USB flash drive(LiveUSB) in operating systems- Linux, Windows and MacOS. I will burn an ISO image of a Linux distribution onto a flash drive, but you can use the programs described below to burn any Live images.
As a rule, the user is faced with the task of writing an ISO image to a flash drive in order to obtain a LiveUSB as a result. For example, let's say you decide to install Ubuntu. To do this, you download an ISO image with the system, write it to a flash drive, boot from the flash drive, and the Live system or installer starts.
To boot from a LiveUSB flash drive, you must set boot from USB to first place in your computer's BIOS settings. For many motherboards When you turn on the computer, you can call up a menu in which you can choose which device to boot from. In this case, change BIOS settings not required. For example, for me this menu is called up by pressing a key F12.
Creating a bootable USB flash drive (on Linux, Windows and MacOS)
To create a bootable USB flash drive I will use free program Etcher. This is a very simple and understandable program. Creation bootable media it is done extremely simply.
The program is cross-platform and can be used to create bootable flash drives in Linux, Windows and MacOS. It works the same on all systems.
The program can be downloaded from the official website https://etcher.io
Note: IN Linux installation not required, just download the file etcher-1.2.3-x86-64.AppImage and run it.
Let's look at the process of creating a bootable USB flash drive in the Etcher program.

Video - How to create a bootable USB flash drive in Etcher
Creating a bootable USB flash drive using UNetbootin
There is a fairly popular program for Linux UNetbootin, which allows you to create bootable USB flash drives. It can burn disk images, as well as automatically download images of popular Linux distributions (although very old versions of distributions are available for download, so this function is unlikely to be useful to you).
The program is cross-platform and can be used on both Windows and MacOS. I only tested it under Linux. But she has one big drawback! Some flash drives created by her simply refuse to boot. For example, nothing worked for me until I formatted the flash drive in FAT16. I formatted the flash drive in the GParted program, the size of the partition on the flash drive was automatically set to 4GB, the rest free space it was simply not involved.
The process of creating a bootable USB flash drive in UNetbootin is described below.

Possible problems
Missing Operating System error
If you receive the message " Missing Operating System ", then most likely the flash drive does not have the flag set Boot. To install it, restart your computer and log into your system. After this, run the command in the terminal (the flash drive must be connected):
Parted /dev/sdb set 1 boot on
Now restart your computer again.
Error No default or UI configuration directive found
I encountered another error while booting the computer - “No default or UI configuration directive found”. This problem was solved only by formatting the flash drive in FAT16 and re-creating LiveUSB.
Video - How to create a bootable USB flash drive in UNetbootin


