Installation and configuration of Comodo Firewall. Installing and configuring programs (review): firewall (firewall) Comodo Firewall (end) Is it worth installing a Komodo firewall
This lesson is a continuation of the article: Firewall.
So, we found and downloaded latest version Comodo Firewall. Only one firewall can be installed on a computer. Therefore, to avoid inter-program conflicts, the built-in Windows firewall should be disabled. You can see how to turn off the firewall in Windows XP and Wiindows 7 in previous lessons: and. But when we install Comodo Firewall, this is not necessary. The Firewall Setup Wizard will automatically disable the built-in Windows firewall.
A firewall controls attempts by applications to communicate over the network. The illustration shows how the firewall intercepted the attempt software Nokia phone to go online. This the right application, so click the "Allow" button:

One of the first to allow connections to the system components “Windows alg.exe” and “svchost.exe”. They are needed to connect to the network. Once installed, Comodo Firewall will issue alerts for various programs over and over again. If the application is known to us, we allow the connection request. If there is any doubt and the program seems suspicious, click the “Block” button. By checking the “Remember my choice” checkbox, we confirm our choice for this application. And the next time you connect, the notification window for this program will not appear. You need to act carefully. Only programs known to us can allow connections and secure selections. If you click on the application name, the program properties window will open.
Also, the firewall notifies about incoming connections:

The following illustration shows how Comodo Firewall intercepted incoming package For popular client peering networks:

At first, the firewall notifications are a bit annoying. But we make our choice and over time there are fewer and fewer of them.
Malicious programs can disguise themselves as harmless software in order to deceive the firewall and gain permission to connect. Therefore, you need to regularly scan your machine with an antivirus program. You can read more about choosing and working an antivirus.
Let's move on now to the firewall settings.
We open Comodo Firewall, like any other application, by double-clicking on the icon on the desktop or on the icon in the notification area. The main program window appears with the "Summary" tab open:

This displays traffic information and system status. By clicking on the connection numbers, you can view details of active network connections. Clicking the "Stop all connections" button will stop all network activity. This function can be used in case of inappropriate system behavior - suspicion of interference with the operation of programs. For example, the system freezes for a long time and does not respond. This may be a consequence of the network activity of some malicious application. By blocking traffic, you can find out the reason and identify the program that poses a threat. All connections are turned on by clicking the same “Restore all connections” button.
The firewall operating mode can be changed by opening the drop-down list with the "Safe Mode" button.
"Block all" is a mode that does not allow any network activity - the equivalent of the "Stop all connections" button.
"Custom Policy" is a hard mode in which the firewall will display an alert for each program connecting to the Internet. Here, you need to create program policies yourself - clearly understand which applications can be allowed to connect.
"Safe Mode" is installed by default and is universal. The firewall applies user policies - it carries out user settings for individual programs, and also allows network traffic to applications that it considers safe. There will be few notifications and the firewall will not be too distracting.
We assign “learning mode” when you need to observe various applications without interfering with their operation. Here, Comodo Firewall independently determines program policies without displaying any alerts.
In Inactive mode, the firewall is disabled. You have to turn off the firewall in case of an obvious inter-program conflict, for example, with an anti-virus program or another firewall.
The next tab "Firewall" contains firewall settings. "Firewall Event Log" - the "log" reflects all events - the firewall's reactions to the network activity of various programs.
"Add trusted application" allows you to select the desired application and add it to the allowed ones.
“Add blocked application”, on the contrary, makes it possible to add the selected application to those blocked for connections.
Section "Policies" network security" opens a window where you can select one of the predefined application policies or create your own.
In the "Active" window network connections"programs showing in at the moment network activity.
"Hidden Port Wizard" - with these settings you can hide certain ports and make the computer invisible on selected networks.
"Firewall Settings" is a window for selecting an operating mode, duplicating the drop-down list on the "Summary" tab. Also, set the “Safe Mode” slider and check the “Create rules for safe applications” checkbox:

The next tab, "Protection +", contains functions for managing proactive protection. When installing a firewall, proactive protection is enabled by default. Proactive protection is another layer of protection that controls the behavior of programs and prevents infection of the system. Proactive protection settings are basically similar to firewall settings.
The “Run program in Sandbox” option makes it possible to run a dubious application in a kind of “sandbox”. Working in isolation in this protected area, malware cannot harm the system:

The "Proactive Defense Settings" item opens a window of proactive defense operating modes. And, briefly, let's go through these settings.
The "Paranoid" mode implies a paranoid suspicion of the protection towards any network activity. Proactive protection will issue an alert every time any application attempts to establish a connection.
In safe mode, protection applies policies user installed, and also allows applications that it considers safe to be active.
In Clean PC mode, protection unconditionally trusts all programs installed on the computer and requests connection permissions only for newly installed applications.
"Training mode". In this mode, the protection does not issue alerts and performs monitoring independently.
"Protection disabled." In this mode, proactive protection is disabled. There is no need to disable protection. The optimal solution protection will be set to safe mode.
On the "Miscellaneous" tab there are additional settings firewall. You can watch them yourself. The review turned out to be voluminous. The main thing is that Comodo Firewall is a very reliable, flexible, Russian-language and free firewall. Comodo Firewall, combined with a good antivirus program, will ensure comfortable and safe browsing.
In detail, about work and choice antivirus program read .
We thank him and provide instructions on how to configure the Comodo firewall for maximum protection.
Introduction
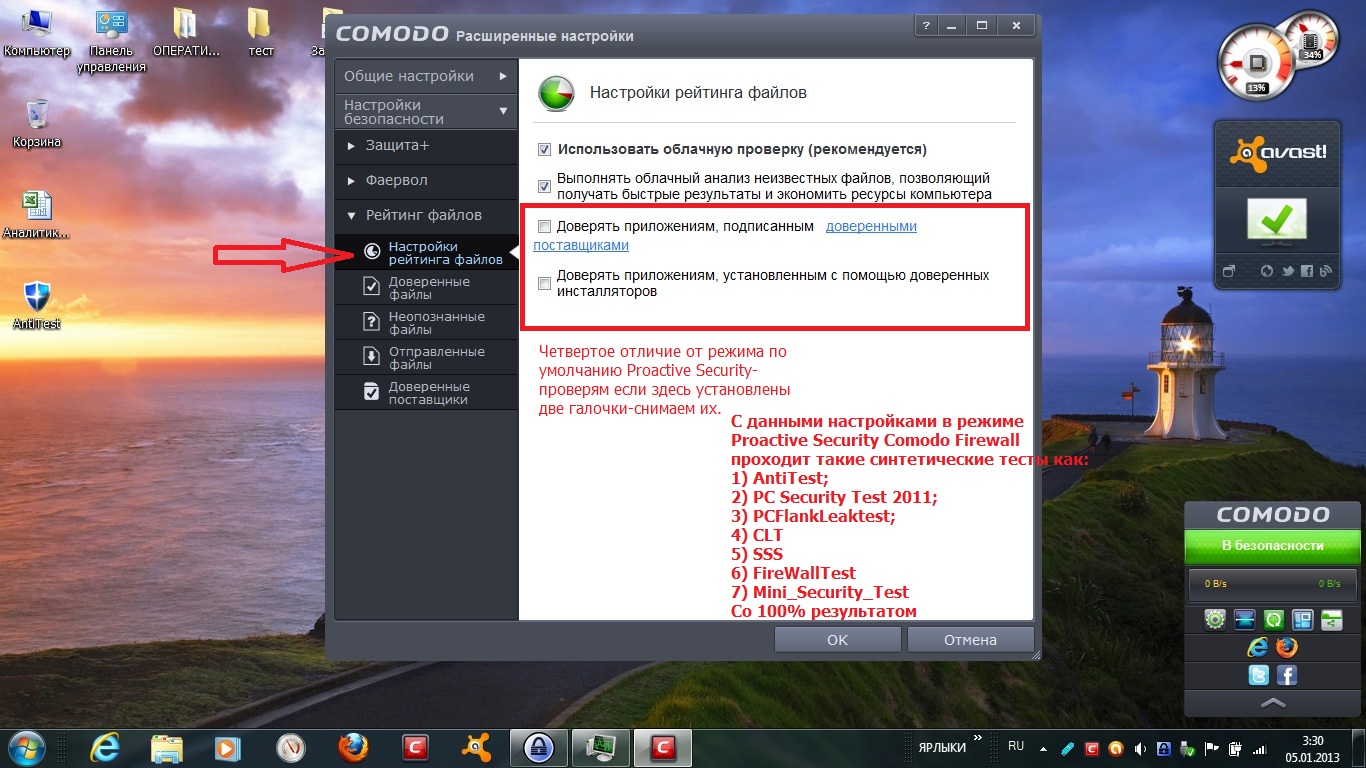
Regarding these settings, I would like to note that, despite their “maximum” nature, working on a computer does not make you especially paranoid - everything is quite moderate: once you create rules for a program/application, requests no longer come for configured programs. It is clear that this mode is more suitable for experienced users.The second point is that testing was carried out in tandem with avast! Free Antivirus, and without it. The result, as noted, was 100% in both cases (even though the screenshots have avast antivirus!, and without it the Comodo firewall passed all tests 100% on these settings).
Moreover, with avast enabled! and using these settings for Comodo Firewall - the antivirus simply does not have time to start working, since all the blocking is performed by Comodo Firewall.
In addition, in the PC Security Test 2011, Comodo Firewall blocked the first stage of the Antivirus Protection Test, preventing the possibility of placing virus files on the system, although this is essentially the work of an antivirus (for example, in the combination Online Armor + avast! this work After passing the first part of this test, Avast!) performs it.
As a result, Comodo Firewall, so to speak, prevents the antivirus from working, since it simply blocks the possibility of viruses entering the system. Those. It can be noted that Comodo Firewall’s response to threats is very fast (although it is clear that it is synthetic). However, I have not yet had a single product from many vendors (such as Kaspersky) pass the PC Security Test 100% (as well as other tests passed). Internet Security, Norton Internet Security, Emsisoft Internet Security, McAfee Internet Security, Bitdefender Internet Security, avast! Internet Security, etc.). I think that even though it is synthetic, it is still very significant.
System used in testing settings: Windows 7 PRO 64-bit SP1, 1.65 GHz Dual-core AMD processor, 4GB memory (3.6 GB available).
With these settings in Proactive Security mode, Comodo Firewall passes the following synthetic tests with 100% results:
1) Anti-Test
2) PC Security Test 2011
3) PCFlank Leaktest
4) CLT
5) SSS
6) FireWallTest
7) Mini Security Test
Comodo Firewall 2013 Settings
1. Advanced settings -> General settings -> Configuration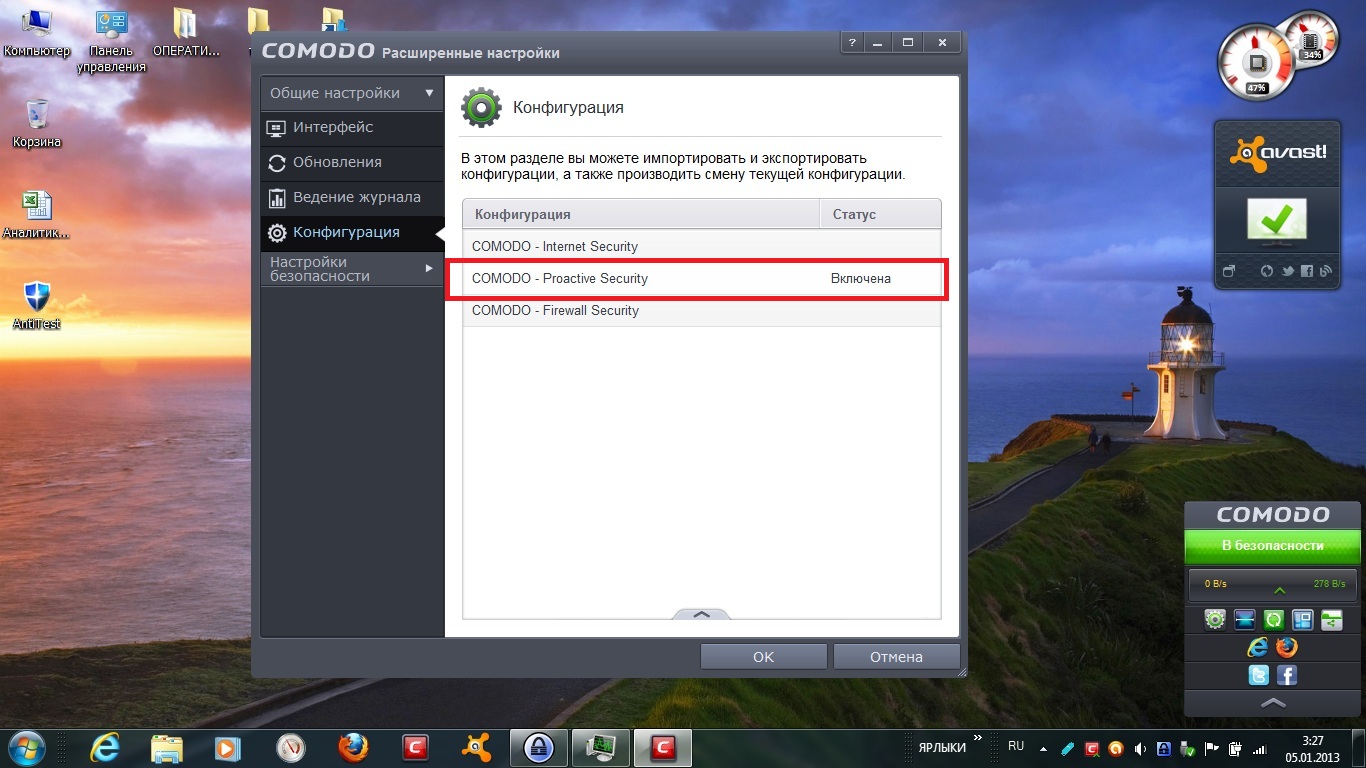
Uncheck "Automatically launch detected unknown applications in Sandbox and process them as"

Click to enlarge image
We switch the firewall to the “Custom Rule Set” mode so that any network event in the system prompts you to set your own rules manually.
In the "Advanced settings" field, check all the boxes opposite:
- Enable IPv6 traffic filtering
- Enable loopback traffic filtering (for example, 127.x.x.x, ::1)
- Block fragmented IP traffic
- Analyze the protocol
- Enable ARP spoofing protection

Click to enlarge image

Click to enlarge image
Trust applications signed by trusted providers
- Trust applications installed using trusted installers
Click to enlarge image
Antivirus with advanced network protection Comodo Internet Security is loved by many advanced users, but is traditionally considered complex and inconvenient to set up initially. And the number of alerts that require immediate resolution significantly exceeds that of automatic security packages like Norton Security or Bit Defender. But if you spend a little time on the initial fine-tuning Comodo, they can also work with it regular users who do not want to delve into the intricacies of work network protocols or antivirus protection technologies. This is what we will try to figure out today.
After Comodo is finalized, ordinary users will be able to work with it
What to pay attention to when installing
- Check the box “I want to use cloud-based application behavior analysis...”. Thus, you will delegate routine decisions about allowing/prohibiting many operations to the user community. This will somewhat reduce the level of safety, but will make the work much more comfortable.
- Whether or not to send statistics about the use of the application depends on your desire. But many users prefer to do without it.
- On the screen for selecting components to install, check the boxes for “Comodo Antivirus” and “Comodo Firewall”. The rest can be safely turned off.
- Be sure to disable the "If possible, do not show alerts that require the user to make a security decision" option.
What to do immediately after installation
- Update your anti-virus databases (the “Update” icon at the bottom of the main screen).
- Select the “InternetSecurity” configuration (“Basic settings” – “Configuration”), then click the “Enable” button in the bottom pop-up panel.
- There, click the “Export” button and save the settings in a safe place.
- After that, click "Import", select the settings you just saved and give a name to your own option. Then select it in the list and click “Enable”. This is necessary so that the original configuration from the manufacturer remains intact.
After updates, restart your computer
- Disable the desktop widget that is of little use (click right click mouse on the tray icon, select “Widget”, uncheck “Show”).
- Reboot your computer.
"Security Settings", section "Antivirus"
Leave the heuristic analysis level at “Low”
- Selecting the “Do not show notifications” option will help inexperienced users quickly get used to the program settings, but it is better not to use it constantly.
- Leave the heuristic analysis level at “Low”, otherwise you risk drowning in a heap of messages and warnings.
- Add the folder that contains files downloaded from the Internet, the working directory of the torrent client, and the section with installation packages as an exception. To do this, in the lower pop-up panel, select “Add”, “Folders”, select the desired directory and click “OK”. This will significantly increase the comfort of work during an active online life.
Canceling the desired directory will increase the comfort of work
“Security Settings”, section “Protection+”
- "HIPS Settings". Recommended operating mode is “Safe”. It is better to leave the “Create rules for secure applications” checkbox enabled.
- "Sandbox Settings". If you are confident in the security of certain executable files, you can add them to the exception (click the line “Do not virtualize access to specified files and folders"). It is better not to touch the remaining settings.
If you are sure that your files are safe, add them to exceptions
- Viruscope. A useful and necessary dynamic behavior analysis system running programs. Sometimes it may not work entirely correctly, then until the reasons for the failure are determined, it is better to disable it (uncheck “Use Viruscope”).
Useful dynamic analysis system
“Security Settings”, section “Firewall”, block “Firewall Settings”
This point should be given maximum attention, since one incorrectly set option can lead to serious consequences.
- A custom set of rules for filtering traffic provides maximum protection, but at the initial setup stage it requires increased attention from the user. "Safe Mode" provides a slightly lower level of protection, but displays far fewer warnings.
- The “Create rules for safe offers” checkbox will turn Comodo into a complete automatic machine, so if you are not ready to carefully read every warning, you can check it. In all other cases, the field should be left blank.
- Activated advanced settings (“Enable IPv6 traffic filtering”, “Block fragmented IP traffic”, “Analyze protocol” and “Enable ARP spoofing protection”) provide additional security, but sometimes lead to problems. Use at your own risk.
Pay maximum attention to setting up this option
“Security Settings”, section “File Reputation”
- Block “File reputation settings”. Here it is better to trust the default settings, and if you want to get rid of some requests, check the “Do not show alerts” checkbox.
Leave the settings as default
Additional settings
They are not necessary, so they should be used with some caution, and in case of unstable operation, everything should be returned to its original state.
“HIPS” tab, “HIPS Settings” section:
- We increase the notification time to a maximum of 999 s.
- Activating the item “Adapt operating mode when system resources are low” increases stability, but negatively affects the speed of the program.
- The item “Enable enhanced protection mode” makes sense only for 64-bit OSes.
- If you use software emulators (Daemontools, VMware, Alcohol), add the corresponding directories to exceptions: the “Detect shell code injection” item.
“Security Settings”, “Protection+”, “Auto-Sandbox”:
The efficiency of virtualization technologies implemented in Comodo is quite high, but due to the high resource intensity on weak computers problems are possible. In this case, we do the following:
- For all objects with the “Unidentified” reputation, select the “edit” item in the pop-up panel, and in the “Action” line select “Block”.
Using a torrent client
For him normal operation It is required not only to give the executable file full access, but also to add a special global rule. Select sequentially “Security Settings”, “Firewall”, “Global Rules”, then click “Add” on the pop-up bottom panel and assign a policy:
- Action: “Allow”, the “Register trigger in the log” checkbox should remain unselected.
- Protocol: check the “TCP or UDP” box.
- Direction: “Outgoing and Incoming”.
- Description: not important.
- Destination Port tab. Specify the number specified in the uTorrent settings.
- When everything is ready, move again this rule to the very top of the list.
review, we examined in detail and with “pictures” the process of installing the freeComodo Firewallto the computer. Now, as promised, I will tell you howoptimal firewall, with a minimum of pop-up notifications, quickly and independently configured. The author's version of the program's advanced settings largely coincides withrecommended in the Russian part InternationalCOMODO Forums(branch " CIS/CFP for firewall newbies"). These forums can be visited by clicking on the " tabMiscellaneous" paragraph " Visit the support forum "The only thing is that you will be taken to the main English page, so in order not to search, here is a direct link to the forum" In Russian / Russian "(clickable!). Useful information There is a lot on the topic - those who wish, of course, can “dig into it.” And I, as usual, for convenience point by point I'll start what I promised.Attention! If, as a result of erroneous actions, the program ceases to function normally, select “General Settings”, “Configuration”, check the “COMODO–Internet Security” item and click “Enable”.
Comodo Firewall Advanced Settings
1. At the beginning, I suggest changing the default (default) grey-cheerful “face” Comodo Firewall for something more interesting. To do this, in the same “Miscellaneous” tab, click “ Settings" → "Appearance " → in "Theme" change the "gray" theme "COMODO Default Normal" to, for example, "COMODO Blue Norma" (first screenshot) and, "dressed up", move on.

2. The first of the program's advanced settings will be to enable the "invisibility" mode of your computer on the network. To do this, in the tab " Firewall"click applet" Hidden Port Wizard "→ select" Block all incoming connections and hide my ports for all incoming connections "(screenshot above) and confirm your choice via " OK ".

3. Further, in the same tab " Firewall"let's go to" Firewall settings " and on the "General settings" tab we activate " ". Now allowing rules will be automatically created for all applications from the list of trusted ones, which will save you from unnecessary permissions manually. In addition, check the checkbox next to the item "Automatically discover new private networks " (which can be removed after detecting your network) and, most importantly, " Firewall mode "we leave unchanged" Safe ".
Confirm all changes in settings with the " OK".

4. Let's move on to the mode settings" Proactive Defense". To do this, in the tab " Protection+"click" Proactive Defense Settings " and, by analogy with the previous settings item, activate " Create rules for secure applications ". If you are confident that the system is clean from viruses and have an effective anti-virus scanner (the need for which I wrote in the note " ") like free, then feel free to put " Clean PC mode " – again, to get rid of “annoying” alerts. Also check that there is no checkbox next to " Enable enhanced protection mode " and presence - opposite the point " A adapt the operating mode at low system resources " (no comments).

5. In the same settings of Proactive Firewall Protection in the " tab Application execution control settings "check that unrecognized files are treated as " Partially limited " (default) or " Suspicious " – under other settings, some applications will refuse to launch.

6. For users of older versions Comodo Firewall< 5.3 рекомендуется отключить в программе режим "Sandbox " ("Песочница"), по отзывам, работающий некорректно. Лучший вариант – просто перейти на последнюю стабильную версию брандмауэра (на данный момент – v. 5.10), которую можно скачать, например, из Каталога избранного софта. В этом случае отключение режима "Песочницы" не требуется.
And don't forget to confirm changes in settings with the " OK ".
Note: When Proactive Defense is completely deactivated, this option ("Sandbox") is automatically disabled.

7. The final tweak from the "optional" category: in the " tab Miscellaneous " → "Settings"→ on tab" General"Uncheck the box next to the item" Automatically check for program updates" (penultimate screenshot), especially since the option " Check for updates "always "at hand" (last screenshot).

Another click on the " OK" and you can close the appropriately configured Comodo Firewall- after reboot Windows, with this configuration, “comfortable” for the user, the program reliably protects the computer from network threats.
The main firewall modes in the advanced settings window: Custom set of rules, when all programs that do not have a network rule will receive an alert, and Safe mode, when trusted programs are allowed outgoing connections by default. Detailed procedure for applying the rules. Additional, little-used modes: Full blocking, when any network activity is suppressed, regardless of the rules, and Learning Mode, in which any connections are allowed and allowing rules are automatically created.
The option “Create rules for secure applications” instructs in “ Safe Mode» not only allow network activity for trusted programs, but also automatically create rules for them. I don’t recommend turning it on, just like . This option does not affect work in the “Custom Rule Set” mode.
If the “Do not show alerts” option is checked, the selected action will be applied instead of the alert: allow or block. No new rules will be created. I recommend setting the “Do not show alerts: Block requests” mode after creating all the necessary rules.
If, when responding to an alert, you check the “Remember my choice” option, a corresponding rule will be created. The Alert Frequency Level option determines how granular this rule will be. If, for example, you set the level to “Very Low,” the rule will allow or immediately prohibit any network activity. I recommend the “Very High” level: then the rule will contain the IP address and port.
If the "Automatically detect private networks" option is enabled on the "Network zones" tab, then when connecting to new network will appear prompting you to indicate its status. This will create new entry in the list of network zones, and if you select the status of “home” or “work” network, allowing rules will also be created for it. If, at the same time as this option, the “Do not show alerts, assuming that the location of the Internet connection...” option is enabled, then new entries about network zones and allowing rules for them will be created automatically, without alerts. I recommend disabling both options: in this case, the connection will occur without notification and without creating new rules, i.e. the network will be silently accepted as “public.”
When connecting to an unsecured Wi-Fi networks notifications appear asking you to use paid service Trustconnect. The display of these alerts can be disabled using the corresponding option.
To control connections within the computer (for example, prohibit certain programs from accessing the Internet through a local proxy server), you will need to check the “Enable loopback traffic filtering” option (I recommend).
To control connections via IP protocol versions not only IPv4, but also IPv6, you should check the “Enable IPv6 traffic filtering” option (I recommend).
The “Block fragmented IP traffic” option protects against an attack based on sending a TCP packet that is so fragmented that its header and TCP session membership cannot be determined. I recommend turning it on.
The “Analyze protocol” option instructs each packet to be checked for compliance with protocol standards, and counterfeit packets are blocked. I recommend turning it on.
Finally, the "Enable ARP Spoofing Protection" option protects the ARP table from being modified by an attacker sending a "spontaneous ARP response" (response without a request). I recommend turning it on.
Creating firewall rules
Application Rules
The usual procedure for creating a rule for an application is:
- open the “Application Rules” tab, click “Add”;
- specify the application, this can be done in different ways:
- press Browse → Files and specify the file;
- press Overview → Running Processes and select the application;
- press Review and select a group of files;
- directly in the “Name” field enter the path (or a pattern using the symbols * and? and environment variables);
- set rules:
- or click “Use rule set” and select from the list the right set;
- or click “Use your own set of rules” and add your own rules (you can copy any set);
- Click "Ok" and organize the rules for applications using the "Up"/"Down" buttons.
When adding your own rule, you will need to specify:
- action: “Allow”, “Block”, or “Ask”;
- direction: incoming (i.e. initiated remotely), outgoing (i.e. initiated on this computer) or any;
- description: text representing this rule; if not specified, then the list of rules will display detailed description;
- departure address and destination address;
- protocol:
- IP, in this case it will be possible to specify the protocol on the “IP Details” tab;
- ICMP, in this case on the “ICMP Details” tab you can specify the type and ICMP message;
- TCP and/or UDP, in this case it will be possible to specify the source port and destination port;
- option whether to log network activity in the log.
I note that the origin/destination address can be not only a single IP address, but also a network zone and many other objects, and you can also invert the selection using the “Exclude” option. Similarly, source/destination ports can be sets of ports, incl. inverted. It should be taken into account that remote address for an outgoing connection it is the “Destination Address”, and for a remote connection it is the “Departure Address”; similarly with ports. Therefore, generally speaking, the simultaneous resolution of incoming and outgoing connections with any remote node is specified by two rules:
- one rule allows incoming messages from a remote node to any address;
- the other allows outgoing messages from any address to a given remote node.
When specifying a set of several rules, you should order them so that the rule located above has priority.
Global rules
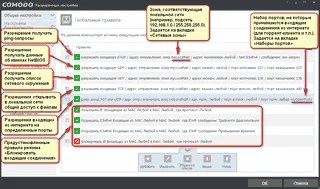
Global rules determine the network activity of the computer as a whole; their restrictions take precedence over application rules. Restrictions specified in global rules are more effective than in application rules. In particular, global port hiding makes the computer invisible when trying to scan them.
There are predefined sets of global rules. The interface for switching between them is presented as a choice of the computer’s visibility mode on the network: “Block incoming connections” or “Notify about incoming connections” ( Main window → Tasks → Firewall tasks → Hide ports).

Selecting the “Notify about incoming” mode removes the global ban on incoming connections and places further control on application rules. However, it is safer to allow incoming traffic only on certain ports and/or from certain networks, and block others. Thus, the screenshot shows a sample of global rules with minimal permission for incoming connections, necessary only for responding to ping requests from local network, opening access to files from it, seeing the names of the network environment and for working as a torrent client. There are approaches for .
Creating your own global rules is done in a similar way, the only difference being the absence of the “Ask” action.
File groups, network zones, port sets, and rule sets
You can reduce many of the same type of operations and achieve a more visual representation of the rules if you create your own file groups, network zones, sets of ports and your own sets of rules.
Groups of files are formed on the tab File rating → File groups, these are named sets of their template paths using the wildcard characters * and ? and environment variables. For example, their use allows you to create rules for the operation and auto-update of a Flash player or Java, since these processes change file names and use temporarily created loaders. You can specify name templates without using file groups, but groups are preferable due to their clarity, compactness, and the ability to assign certain types of restrictions simultaneously in different protection components. For example, you can create a “NoInternet” group, which will simultaneously be prohibited from making direct Internet connections, DNS queries, using the BITS service, launching the browser, and accessing its memory.
On the Rule Sets tab, you can see which rules are contained in predefined firewall policies, and you can change these policies or create your own. In the future, you can assign these policies to applications: through the “Application Rules” tab or through firewall alerts. I note that the alert will only offer those policies that specify an unambiguous action for a given network activity: allow or deny. For example, if an application tries to access a web server on port 80, the alert will not offer the policy " Mail client", but the policies "Web browser", "FTP client", etc. will be.
On the Port Sets tab, you can group any combination of ports into a named set, which you can then use in rules as an origin or destination port. When creating sets, you can combine single ports, ranges of ports, and their inversions.
The “Network Zones” tab has the following feature: on it you can not only group addresses into named “zones” for their further use in rules (as a departure or destination address), but also set the status of these zones. For example, if you create a zone and then add it to the Blocked Zones tab, all connections to it will be blocked, regardless of the rules. In addition, a network zone can be marked with the status “Network public access».
How to apply firewall rules
When network activity is detected, it first checks whether the remote address belongs to any . If belongs, then connection blocked. If not, the review begins. global rules.
Global rules are viewed from top to bottom. If a rule with the action "block" is found first for the requested type of connection, the connection prohibited. If no suitable rule is found or the allowing rule is discovered first, the review begins application rules.
When any program tries to establish a connection (allowed by global rules), a list of applications and the rules for them is scanned from top to bottom. At the first match found (i.e. when this program or the program group containing it and the requested type of connection), the action specified in the rule will be performed: allow, block or show notification(if the “Do not show notifications” option is enabled in the setting, then instead of a notification the action specified in this option will be performed: allow or block).
If there is no suitable firewall rule in the list, the connection will be automatically allowed in the following cases:
- when the firewall is running in “Learning Mode” (in this case, an allowing rule will be created);
- when the option “Do not show alerts: Allow requests” is enabled;
- when the firewall is running in “Safe Mode”, the “Do not show alerts” option is disabled, and the program is trusted and runs in a real environment;
- When the firewall is running in "Safe Mode", the program is trusted and running in the real environment, and the requested connection is outgoing.
In other cases, an alert appears or, if the “Do not show alerts: Block requests” option is enabled, the connection is denied.
In particular, I note that programs running virtually are controlled by the firewall, regardless of their rating. Therefore, even if the firewall is running in Safe Mode, you will need to create allowing rules in order to use browsers.
You may notice that in “Safe Mode” the firewall somewhat illogically processes inbox connections of trusted programs. This is probably a bug.
Access to local network resources
By default, firewall rules do not have permissions to obtain information about the network environment, open file sharing on the local network, etc. These permissions are not needed if the network is used only for Internet access.
Trusted network status
Permissions for a local network are most easily created by assigning it the “trusted” status. This can be done in different ways.
If the “Automatically discover new private networks” option is enabled on the “Network zones” tab, then when you connect to a new network, an alert appears in which you need to indicate your location. The “trusted” status is assigned by selecting the “at home” or “at work” options. This will create a pair of global rules allowing any outgoing and any incoming connections to this network, and a pair of similar rules for the System process. Selecting the “in a public place” option does not create new rules.

If discovery of new networks is disabled or the network was previously assigned the “public” status, you should open the “Manage Networks” window ( Main window → Tasks → Firewall tasks), select the “Trust networks” option and click “Ok”. The result will be similar to the previous one.
To return the network to neutral status, the easiest way is to check the “Block network” option in the “Network Management” window, and then open the tab in the settings window Network zones → Blocked zones and delete this network from there.
There is a bug: when a network zone has not been created for an active network and in fact this network is treated as “public”, then in the “Network Management” window the “trusted” status will be indicated for this network.

Attention! If you click the “Ok” button in such a window, the active network will indeed become “trusted”, i.e. A corresponding entry will appear in the list of network zones and firewall rules will be created that allow connections on this network. If network trust is not required, then you should close the “Manage Networks” window with the “Cancel” button.
Example of permissions for accessing a local network
You can establish trust in a local network only if it is completely secure. Therefore, it is recommended to assign the network a neutral status (“public place”), enable , and then add necessary permissions. Typically, to access network resources, it is necessary, in addition to the initially existing rules, to allow the System process the following incoming connections (everywhere the “sending address” is the local network):
- UDP connections with source port 137 and destination port 137: so that you can access computers by NetBIOS names;
- UDP connections with source port 138 and destination port 138: so that you can see network environment;
- TCP connections to destination port 445: to open file sharing.
To specify “System” as the application when creating rules, you need to select it from the running processes.
All these permissions must be duplicated in global rules. They should also allow incoming ICMPv4 connections sent from the local network with an “echo request” message; This is necessary not only to be able to respond to ping requests, but also to open file sharing. An example of a set of global rules.
Firewall Features
The Comodo firewall does not control incoming loopback connections (but does control outgoing ones). So, when using a local proxy, it is enough to allow only outgoing connections to the Internet for the proxy server and outgoing connections to “localhost” for the browser (whereas many other firewalls would also require allowing incoming connections from “localhost” for the proxy server).
It works in a peculiar way: if you specify it as an address in the rule domain name, then CIS will find the minimum and maximum IP addresses for this name, and then all intermediate IPs will be considered to belong to it.
A feature of the CIS 10 version, which can be called an advantage, is that the belonging of ICMP traffic to various applications began to be determined. Previous versions of CIS (as well as, for example, Windows Firewall) perceived this traffic as belonging to the System process.
Content filter
The Content Filter component restricts access to websites based on their addresses. Comodo's updated lists are used to determine the security of addresses, and custom lists can also be specified. When trying to open a prohibited site, the user will see a page with a message about blocking, and also, depending on the settings, with a proposal to temporarily ignore the ban or add this site to exceptions.
Categories. Importing custom lists
Lists of addresses or them (using the symbols * and ?) are called categories. Comodo's own categories are "Safe Sites", "Phishing Sites" and "Malicious Sites". They are updated automatically and cannot be viewed or changed. The remaining categories - available for modification by the user - are set on the "Content Filter" > "Categories" tab. Initially, the “Exceptions” category is located there; sites excluded from blocking through browser notifications fall into it.
It makes sense to add categories with lists of malicious sites from other sources. Lists and Symantec WebSecurity are recommended. To obtain the latter, go to the MalwarePatrol website.
To use additional list, follows on the “Categories” tab via context menu create a new empty category and then import the list from the file. When selecting a file, you must specify the list format, otherwise the content filter will not work correctly ( typical mistake users).

Post format in content filter categories
A template entry covers addresses that entirely match the template. For example, the entry *.example.com matches the address http://test.example.com, but not http://test.example.com/404 or http://example.com.
An entry without wildcards is identical to the pattern created by appending the * character to the end. For example, the entries https://example.com and https://example.com* are identical; they correspond to the addresses https://example.com, https://example.com/404 and https://example..example .com. Thus, an entry in the form of a site's domain name also covers its directories, but not its subdomains.
The HTTP protocol designation in the content filter is absence protocol. For example, an entry like example.com matches the address http://example.com, but not https://example.com. An entry like example.com/* corresponds to the address http://example.com/404. Attention! The address http://example.com does not match the entries http*example.com* and */example.com* , i.e. containing at least part of the protocol indication.
The HTTPS protocol is designated either explicitly or using wildcards. For example, the entries https://example.com correspond to the addresses https://example.com, https://example.com/404, etc. The *//example.com entry matches the address https://example.com, but not http://example.com or https://example.com/404.
It should be said that the content filter blocks HTTPS pages without notifications or offers to cancel the ban. Moreover, blocking HTTPS pages may not work, depending on the browser you are using.
So let's assume it is required to block example.com site simultaneously for HTTP and HTTPS protocols, with directories, but without subdomains. To do this in the most targeted way, let’s add 4 entries to the blocked category:
- example.co?
- example.com/*
- https://example.co?
- https://example.com/*
(Using the ? sign instead of any letter prevents the * character from ending in the line.)
Alternatively, you can get by with a single entry like *example.com*, but then not only the required addresses will be blocked, but also https://www.example.com/404, https://myexample..common.html.
Content filter rules
Each content filter rule contains a list of categories to which it applies and a list of users or user groups with their restrictions. The interface for changing the list of categories is obvious.

Users and their groups are added through the context menu in the “Restrictions” field: “Add” > “Advanced...” > “Object types” > check all > “Ok” > “Search” > select the desired entry > “Ok”.
Typically the user group is Everyone. If you need to set different restrictions different users, should be sure to indicate restrictions for each of them. Otherwise, it is possible that a user not specified in the rule will gain access to sites from the listed categories, even if there is another prohibiting rule.
According to, for Windows 8 and higher, in each rule, the entry “ALL APPLICATION PACKAGES” should be added to the list of users with the same restrictions as the users. Otherwise the blocking will not work for Internet Explorer 11.
To work correctly with exceptions from blocking, the “Allowed sites” rule must be located above the “Blocked sites” rule.


