External DVD drives connected to a laptop. External drives for computers and laptops
The market has been filled with netbooks - devices that fundamentally do not have a CD or DVD drive. Even Apple is moving away from these bulky and outdated devices, but the company at least includes a USB flash drive to reinstall the system or run utility utilities. A regular users they get a non-book with an already installed system.
All installation instructions or reinstalling windows to a netbook without using a DVD drive (from a flash drive) are so overloaded and intricate that it’s not easy to understand them. It used to be simpler: put the disc in the drive and off we go. Now this is also possible, but you need an external drive.
External DVDRW drives for laptops with connection via regular USB are prohibitively expensive. Today the price starts from 1,650 rubles, and the upper threshold reaches three thousand. A lot of money for something that will be needed a couple of times a year.
Therefore, today we will assemble an external USB-DVD drive from matches and acorns, which will be much cheaper. How significant depends on your ingenuity and resourcefulness.
I purchased the drive itself in the discount department of the DNS store - one laptop drive cost me only 35 rubles. Yes, yes, yes, thirty-five rubles for a DVD cutter! Here are the models that are available right at the time of writing:
It has become a little more expensive, but you can always buy any laptop drive at a flea market or secondhand. If only it worked and had an interface SATA connections. The presence or absence of a front panel does not matter - it is purely a decorative element.
The second part that we definitely need is a USB box for the HDD. We need a box for a laptop drive with a SATA connection. A new box costs from 400 rubles, but you can find it cheaper if you look for this product second-hand.
 It is more profitable (in terms of price) to buy the box not in a store, but at a flea market, from your hands. You won't need a store warranty anyway - we'll disassemble the box down to the screws and improve the design a little.
Why do we choose SATA? This is a more current, faster and less expensive connection method (you have to pay extra for the retro IDE format). In addition, the IDE connection connector on the DVD drive is completely non-standard, and unnecessary problems are unnecessary. In general, SATA!
In addition, you need two pieces of wire (MGTF will do), a stationery knife, (nail clippers), one thin Phillips screwdriver, a toothpick, wire cutters, pliers, a soldering iron and the necessary soldering supplies.
Let's get started!
First you need to gut the drive box and remove the USB to SATA adapter board from there. Each model is understood differently, so I won’t give general advice here. We only need the board, the rest can be thrown away.
The main problem is the power connectors. For some reason, CDs made it shorter and with a different pinout. Although in laptop drives the 12V and 3V lines are not used. In general, we will do the food ourselves. Here is a diagram of the power connectors for the optical drive and hard drive.
 Now let's move on to modifying the drive. It needs to be disassembled to gain access to the board. Disassembly is not difficult: unscrew the screws (there are three of them) on the top cover and remove it.
 The board we need to access is safely hidden under the drive tray. But, as with conventional large drives, the tray can be extended mechanically. To do this on a laptop drive without a muzzle, you need to poke a toothpick into the hole slightly to the right of the eject button. If there is a decorative face on the drive, then there is a hole on it where you need to poke. Although it will probably be a little narrower, so instead of a toothpick you will have to use an unbent thin paperclip.
 Once access to the board is obtained, we will begin finalizing it with a file. We need to gnaw out a hole large enough in the connector and in the lid so that our adapter from the box can fit in there freely. Depending on the accuracy and tools used (I chewed with clippers, wire cutters and pliers), it should look something like this:
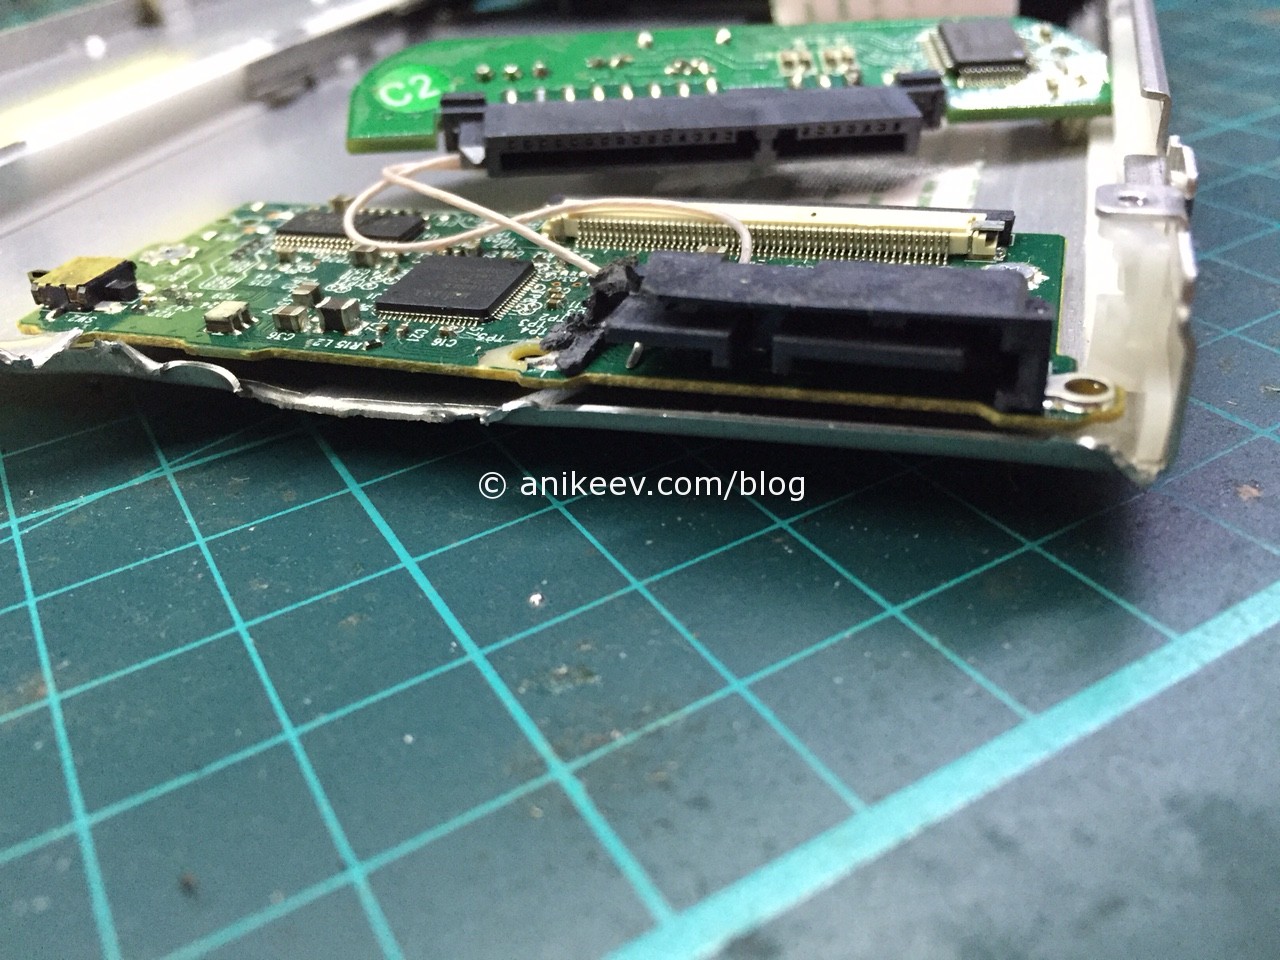 Now take a utility knife and cut the tracks on the back of the power connector on the drive. For reliability, you can make two cuts to cut out a whole strip and certainly open the contact. We do this because the pinout of the power connector for SATA-HDD and SATA-DVD is different. Below you can see that the tracks are cut: compare with the contacts of the SATA data connector (left)
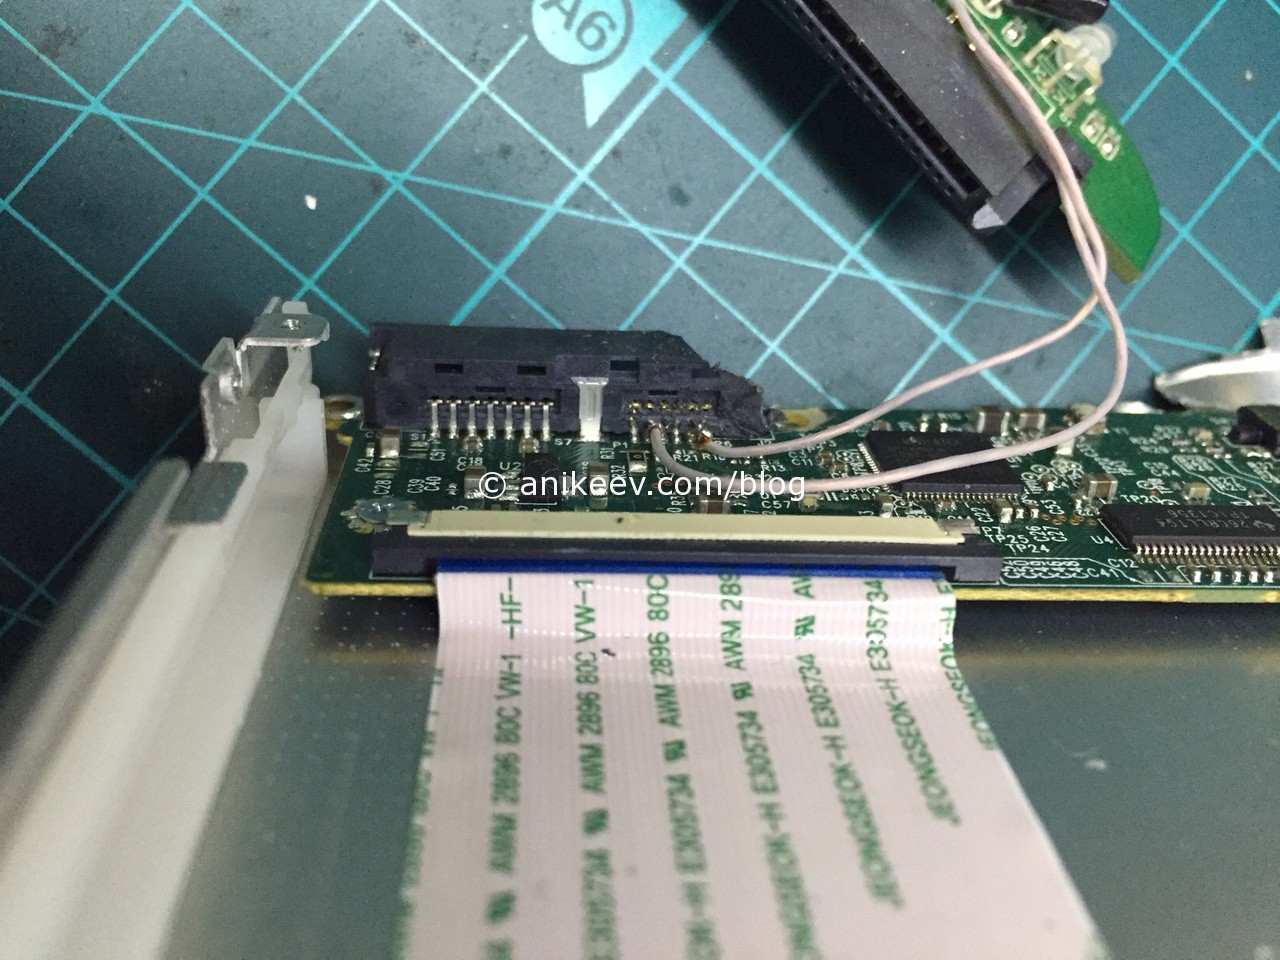 We will supply power with separate wires in accordance with the pinout of both connectors (we need one GND and one +5V). By the way, if you want, you can add a detachable connection to the wires to completely disconnect the drive from the board.
This is how you get an external DVD drive from which you can install windows in case of problems. And no dancing with flash drives. True, you need to be able to hold a soldering iron in your hands. For those who do not have this problem, they save.
 Do you need to make a USB-DVD drive even cheaper and without a soldering iron?
Thank you Chinese brothers! You can buy on Aliexpress
No laptop is immune from optical drive failure. Repairing it can take quite a long time. To immediately open a disk on a laptop, you can use the disk drive of your home PC. There are several ways to connect a disk drive to a laptop, depending on the device’s drive interface.
If the drive has a USB interface, you need to connect it to the USB port, and then turn on the laptop. After the system detects new equipment, it will install necessary drivers for the device. After connecting the drive, a notification will appear indicating that it is ready for use. The drive can be used after the corresponding icon appears in "My computer." If the drive is equipped SATA interface, you will need an adapter " USB-IDE/SATA ", which can be purchased at a computer store. You can connect any device that supports the SATA interface to the adapter. Complete with adapter " USB-IDE/SATA "Additional power supplies are available. “USB-IDE/SATA” needs to be connected to the laptop’s USB port, then connect optical drive to the adapter, then the disk drive. Plug the adapter into AC power. After turning on the laptop, you need to wait until it boots operating system. New equipment should be discovered. Once you are notified that the equipment is ready for use and the icon appears, you can begin using the drive. The system may not be able to immediately detect the new device. In this case, you need to open context menu “My Computer”, select “Properties”. A list of equipment will be displayed in the “Device Manager” tab. Click right click mouse on the top line and “Update configuration”.

If found in the list « Unidentified device», need to “Update drivers” by right-clicking on the device. In the next window, select “ Automatic search drivers." You can use the Internet to search for drivers.
The disk drive, until recently a mandatory element in any computer, is today losing ground to flash drives and retiring. Manufacturers have caught on to this trend and are now happy to follow it, refusing to install a drive in computers and laptops. But what if you need a disk drive? This is discussed in our article.
First we need to decide why we need a disk drive. It's not about his type - by default he should be able to read and write DVDs, that's just the time. But there is such a thing as a connection type - the interface that our drive connects to the computer. It is up to him to be chosen.
The easiest way to determine this is to visually inspect the motherboard and determine the available connection locations.

Let's figure it out in order:

Have you considered the motherboard? Let's evaluate the availability of free ports. If there are several free SATA ports and an IDE port, then you definitely need to choose the first option. It has seriously more advantages, and it’s easier to connect. If there is only one free SATA port, then you can think about whether you suddenly want to connect another one to the computer hard drive? He needs this port more. Well, the easiest option is if you have either SATA or IDE ports. You have no choice, act according to the circumstances.
Removing the old drive
To do this, you will need a medium-thick Phillips screwdriver with a good slot and a vacuum cleaner.
Note! Take care in advance to collect the mounting hardware in a separate place - it will be very helpful during reassembly. It is very unpleasant to look for bolts throughout the apartment.
- Remove the side covers from the system unit. To do this, unscrew a pair of screws from the back on each side and pull the covers back. After moving them a couple of centimeters and freeing the grooves, remove the covers.

- It's vacuum cleaner time. Carefully, without touching the electronic components (this is important!), remove the top layer of dust. It is better to remove residues using a compressed air cylinder - there is less risk of damaging the components.

- Locate your drive from the inside. Remove traces of hot melt glue from the cables using a screwdriver. Be careful!
- Carefully remove the cable from the connectors of the drive and motherboard. Then pull out the power.

- The drive is secured with fairly thin screws on the sides - their number ranges from two to four on each side. Unscrew them and remember the approximate position.

- Now remove the drive. Pull it inside the system unit and pull it out, being careful not to touch the rest of the computer components. If the drive does not pull in, push it from the inside out and pull it towards you.

Note! Some models of system units do not allow you to pull out the drive inside. The front panel prevents pulling out - for example, the drive bays have rounded edges to which the drive clings. In this case, you need to remove the front panel by unscrewing the four bolts or slightly bending the latches in four places. Do this with extreme care: system unit with an insecurely fastened front panel, it will finally lose its presentability.

Installing a new drive in the system unit
In addition to a screwdriver, you may need pliers.
Note! If you replaced the drive and followed the previous step to remove the old one, then you have already prepared everything for installation.
Now we will look at what to do for those who want to install a disk drive in new computer, where it has never been, or wants to install a second drive in addition to the old one.
- Using the instructions from the previous paragraph, open the system unit and remove the front panel.
- Carefully remove one of the plugs for five-inch devices from the front panel. Be careful not to break the grooves, as it may come in handy in the future if you want to get rid of the drive.

- Using pliers, break out the metal plate opposite the selected plug on the front panel. The plate will definitely not be useful anymore, so just break it out. Can be bent.

- Pull out new drive from antistatic packaging. Remove all shipping stickers. Carefully insert the drive into its place in the system unit.

Note! It would be nice to find complete bolts from the system unit, but there are none; buy four or eight bolts together with the drive to secure it.
- Secure the drive with screws. Watch its position: it is important that it fits neatly with the front panel. One way or another, its position can be adjusted later.

- Reinstall the front panel. If the drive does not align with it, loosen the screws and slide it into position. Tighten the screws.
Connecting the installed drive to the motherboard
Let's first consider the option with IDE

IDE is an old format with its own configuration rules. The loop involves the installation of two devices, so it turns out that one device is always the master (“Master”), and the other is always the slave (“Slave”). This may be the problem if the connected drive is not detected. To eliminate it, check the position of the jumper on the back of the drive. Pay attention to the screenshot.

Universal case: if you have only one disk drive on the cable and it is connected with the outermost connector, then put the jumper in the left position (“Cable Select”, or auto-detection of the connection type). If there are two disk drives or devices in general on the cable, then the jumper should take a position based on the position of the device: if the outermost connector is “Master,” that is, the right position, if the middle one is “Slave,” that is, the middle position. However motherboards IDEs have been around for a very long time, so they can easily not meet the standards. In this case, there is only one piece of advice - refer to the instructions.
Now an option with SATA

All that remains is to close the side covers, tighten their mounting screws and start using the computer. Ready!
Video - Connecting (installing, replacing) a PC drive
Probably, some time ago, such a device as external disk drives could have puzzled a computer scientist a lot. Indeed, often the very presence of a CD drive inside the PC case automatically made this device“elite”: not everyone could afford it.
However, time did not stand still. Pretty soon, laserdisc drives became commonplace. And then external disk drives appeared on the scene.
External disk drive - what is it?
Probably, even without any definitions, it is clear to many that an external drive is a compact device designed to work (read and write) with all kinds of disks, which is connected to the computer through one of its ports.

The device is called external precisely because it is located not inside the system unit, but outside. That is, you can simply take and disconnect an external drive at any time, connect it to another computer or drive, or take it with you on the road or anywhere else.
When might an external drive be needed?
There are many situations when such a drive may be needed, or even when you cannot do without it.
For example, for a netbook. For the sake of compactness, netbook manufacturers did not place a laser disk drive in the case. So the user lost the opportunity to work with such disks. And things would have been really bad if it weren’t for the external CD drive. It simply connects to the device via a USB port - and you can start working with laser discs. Therefore most often external drives purchased in conjunction with a netbook.

An external drive may also be needed if the main drive on the device fails. Or if you need to quickly copy information from one laser disk to another without first transferring the data to a hard drive (many will probably remember the once common two-cassette drives).
In short, there are simply too many different situations when you might need an external drive for a computer.
What types of external drives are there?
External drives can be classified in different ways: depending on the connection port, on the ability or impossibility of recording, by the method of power supply, by the types of discs readable, and by other characteristics.
However, external drives are most often divided into:
- CD drives are those that can only read and write CD blanks (they are practically never found these days);
- DVD drives are the most common type of drive that "sees" both CDs and DVDs;
- Blu-Ray - accordingly, in addition to CDs and DVDs, such devices can also work with Blu-Ray discs;
- writing and non-writing - those that can not only read, but also write information to a disk, or only read (the latter are also practically not used today);
- powered via USB and via an external power supply.

Are there laptop-only or desktop-only models? No, there are no such things. External drives are universal; they work equally well on netbooks, laptops, and paired with
Pros of external drives
Of course, an external drive has a number of advantages, both as a standalone device and over its built-in “colleague”.
- External devices for working with disks can be simply disconnected from the computer at any time and, for example, given to a friend. In order to perform such a trick with the built-in drive, you will need to disassemble the system unit or laptop case.
- An external drive will help out if the main drive on the device breaks down.
- It will help you work with disks even on devices where such drives are simply not structurally provided. For example, in lately External disk drives for tablets appeared.
- External drives are compact, easy to connect, and easy to replace.
Disadvantages of external drives
But, as always, there were some downsides:
- Speed is the main weak point of any external drive. Whatever one may say, but USB port still slower than internal system ports.
- Often an external drive for a laptop requires a separate power supply. Moreover, it can be carried out either via USB or through a regular outlet. Low-quality power supplies burn out quickly, but it is almost impossible to find another exactly the same one - it’s easier to just buy another drive.
- An external drive is more expensive than its built-in counterpart.
How to connect an external drive
Fortunately, there is nothing difficult about how to connect an external drive. Typically, all that is required is to plug the USB cable into the appropriate connector on the computer and the power supply plug into the outlet.

If necessary, you can also install additional software and drivers. But often you don’t have to do this - the system simply recognizes the device as a new drive and works with it quite correctly using standard tools.
How to choose a removable drive
When choosing an external drive, you need to take into account the following points:
- If your computer has a USB 2.0 port, then you need to purchase just such a drive. The reading and writing process will be much more vigorous.
- If possible, you should choose a model powered by both USB and a wall outlet. If the power supply burns out, the device can be powered directly from the computer. In addition, such external drives will allow you to work in offline mode. For example, on the road with a netbook.
- If possible, the drive should read and write to most common disc formats. For the sake of versatility, you can neglect other minor functions, which are most often used only a couple of times during the entire time and then only out of curiosity.
- The appearance of the drive also plays a role. A beautiful device looks stylish on the table and will attract many curious glances.
- As for speed, there is no need to purchase the highest speed ones. Standard 52 speeds are enough for all occasions. Moreover, the recording on high speeds More often than not it happens incorrectly. And the drive motor itself can quickly fail if you overuse it too often at high speeds.

Regarding the manufacturer, there are no clear recommendations here. In principle, all companies today produce external drives of good quality. Every company has both successful and not so successful models. But you won’t find frankly bad ones today.
There are times when a laptop's optical drive fails. Warranty repairs or replacement may take some time, and on a laptop you need to open the disk urgently. Of course, you can go to your friends, make a virtual disk image, copy it to a flash drive, download a program for mounting virtual images and use it to open the disk. But you can do it differently. Take drive With home computer and temporarily connect it to laptop. The second method will be much faster and more convenient.
You will need
- Laptop, drive with USB or SATA interface, USB-IDE/SATA adapter
Instructions
The way you connect the drive to your laptop depends on the interface of your drive. If you have a USB drive, connect it to any USB port and turn on your laptop. Wait until the system detects new connected equipment and installs drivers. After the “Device is connected and ready to use” window appears, go to “My Computer”. The connected drive icon will be there. Now you can use it.
If you have a drive with a SATA interface, you will have to purchase a special USB-IDE/SATA adapter to connect it to your laptop. In addition, through this adapter you can connect not only optical drives, but also hard drives and other equipment that supports these interfaces.
Connect the USB-IDE/SATA adapter to the USB port on your laptop. Now connect your optical drive to the USB-IDE/SATA adapter. These adapters come with additional power supplies. Connect the drive to the power adapter, and plug the adapter into the mains.
Turn on your laptop. Wait for the operating system to start. The wizard for connecting and setting up new equipment should work, as in the case of a USB drive. The further procedure is the same.
If the device was not detected automatically by the system, right-click on the “My Computer” icon and select “Properties”. Next, select the “Device Manager” tab. A list of equipment appears. Right-click on the top line and select “Update hardware configuration.”
If “Unidentified device” appears in the list, right-click on it and select “Update Drivers”. In the next window, select “Search for drivers automatically.” If you have an Internet connection, you can check the box next to the “Use the Internet” line.


